

myCGS User Manual

The "Forms" tab allows providers to submit certain types of requests directly to CGS through the myCGS web portal safely and securely. Most forms are pre-populated with information specific to your account, reducing the amount of time it takes to complete and submit them. You are also able to attach additional documentation that will be used for processing.
Available Forms
The table below lists the forms available for each line of business.
| Part A | Part B | Home Health | Hospice |
|---|---|---|---|
* Go to "Financial Tools" to access this form.
** Go to "Claims" to access this form.
Accessing myCGS Forms
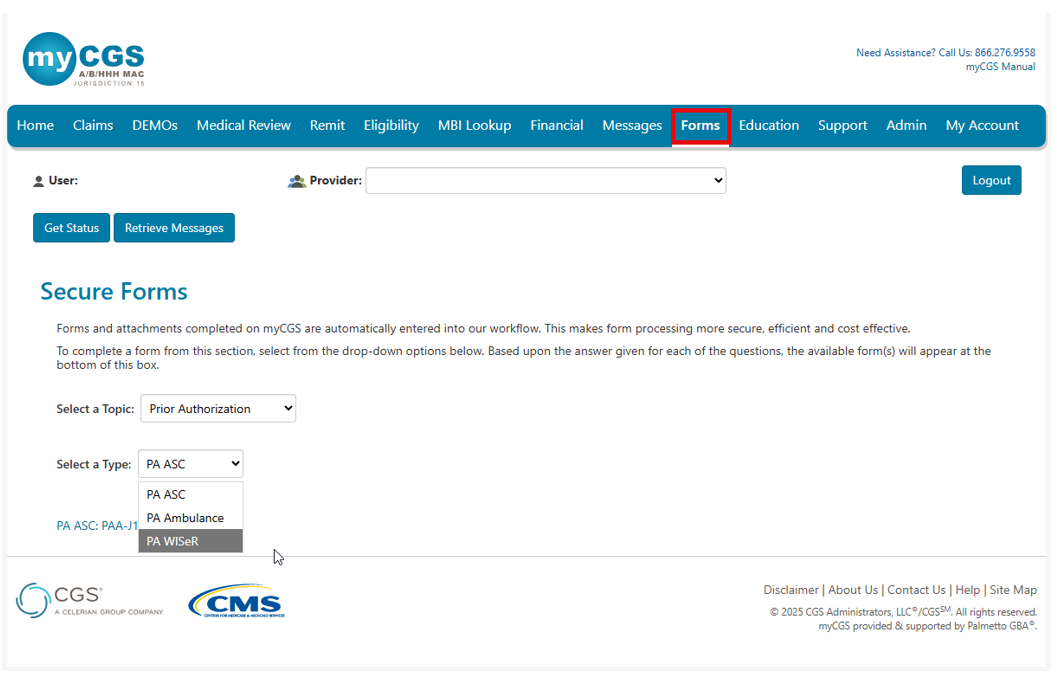
Select the Forms tab to access the Secure Forms page.

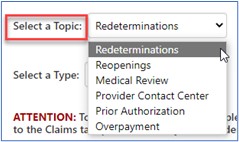
Once on the Secure Forms page, you will find an option to Select a Topic. Options in the drop-down box include Redeterminations, Reopenings (for Part B), Audit and Reimbursement (for Part A and HHH), Medical Review, Provider Contact Center, Overpayment (for Part B), and Prior Authorization.
You may have to select an option under the Select a Type drop-down, as some topics have multiple types of forms. Once selected, click on the link to the form.
NOTE: Provider Administrators have access to all tabs within myCGS. Provider Users have access to only the tabs the Provider Administrator has granted permission to access. If you have access to the forms available in myCGS, the 'Forms,' 'Financial Tools' and 'Claims' tabs will be visible once you successfully log into the portal. If a tab is grayed out, but you believe you need access to the tab, contact your Provider Administrator.
Completing a Form
You will find the form you select is pre-populated with information specific to your account including the provider's name, PTAN, and NPI. Complete the remaining fields of the form. Those fields that are required are marked with a RED asterisk (*).
NOTE: CGS encourages you to access the forms available under the Claims and Medical Review tabs, as they will auto-populate with the information we need to process your request. When these same forms are completed from the Forms tab, they oftentimes include typographical errors, which require us to reject your request. Access forms from the Claims and Medical Review tabs whenever possible. An alert will display to remind you.
Redeterminations
Providers and beneficiaries may appeal an initial claim determination when Medicare's decision is to deny or partially deny a claim. The first level of the appeal process is Redetermination. You have 120 days from the date of receipt of the notice of initial determination to submit a request. There is no monetary threshold.
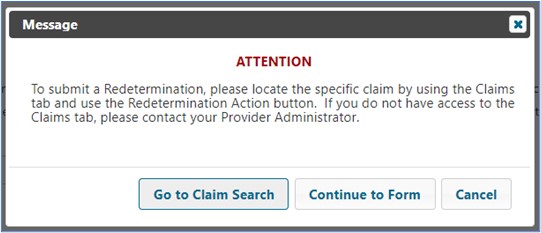
Note: Access this form from the Claims tab to ensure the form correctly auto-populates with the information we need to process your request.
Refer to the Appeals section of this manual for step-by-step instructions on how to complete and submit Redeterminations.
Reopenings (Part B)
Part B Reopenings may be submitted to correct minor errors and omissions on previously processed claims. Requests must be submitted within 12 months of the original claim remittance date. Only one claim can be corrected per form.
NOTE: To complete the form accurately you must have access to your CGS Remittance Advice (RA). If you download your RA from a billing service or clearinghouse, the line items may be in a different sequence, which will affect how Reopenings are processed. We suggest accessing your RA directly from the myCGS Web Portal. (Refer to the Remittance section of the myCGS User Manual.)
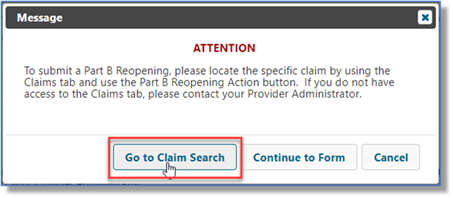
Accessing this form from the Claims tab will ensure the top portion (Provider, Beneficiary, and Claims Information sections) correctly auto-populates with the information we need to completely process your request.
An alert will display reminding you to access the form from the Claims tab instead of the Forms tab.
After selecting the Reopenings form it will load auto-populated with the provider information. Add any missing information to the form.
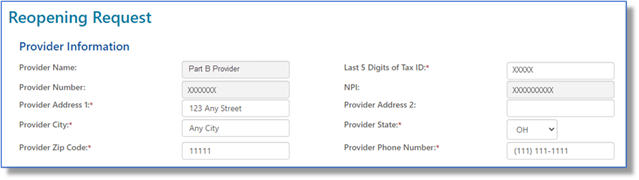
Enter the patient's name and Medicare Beneficiary Identifier (MBI) in the Beneficiary Information section.

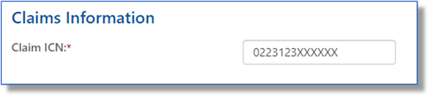
Under the Claim Information section, enter the claim Internal Control Number (ICN). The ICN is located on the CGS remittance advice (RA).
Next, under Type, click the drop-down box to select the type of reopening you wish to submit. Refer to the instructions below for the various types of Part B reopenings.
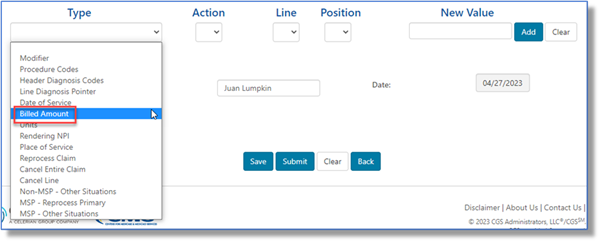
When the form is complete, click the Submit button to file your reopening request. If you need some additional time to complete the form, click Save. To find the saved form go to the Saved Forms sub-tab, which is located under the Messages tab.

Click on a heading to expand/close it.
Billed Amount
Part B providers may submit Reopening requests to change the billed amount submitted on line items of a previously processed Part B claim. If decreasing the billed amount will result in a reduction in payment, please submit an Overpayment Recovery (OPR) request instead.
- Click the drop-down box under Type and select BILLED AMOUNT.
- Under the Action drop-down box, select the Replace option.
- Under the Line drop-down, select the claim line item for which you would like the billed amount changed. The current claim will allow up to 50 lines, so your options are 1-50.
- The Position drop-down is not applicable when replacing a billed amount, so it will be grayed.

- Enter the new billed amount in the New Value field in the X.XX format.
- Click ADD to attach this request to the form.

- Once your type of change has been added to the form, you may:
- Add additional changes needed to this specific claim ICN by selecting a new Type then completing the applicable fields (i.e., Action, Line, Position, and New Value).
- Delete a line added to the form by selecting the red 'X' in the last column.

Cancel Entire Claim
Part B providers may submit Reopening requests to cancel an entire claim from the processing system.
- Click the drop-down box under Type and select CANCEL ENTIRE CLAIM.
- Under the Action drop-down box, select the Cancel option.
- The Line and Position drop-downs and the New Value field are not applicable when requesting to cancel a claim, so they will be grayed.
- Click ADD to attach this request to the form. Note: When canceling the claim, no other correction requests can be submitted.

Cancel Line
Part B providers may submit Reopening requests to cancel a line item of a previously processed Part B claim. If removing a claim line will result in a reduction in payment, please submit an Overpayment Recovery (OPR) request instead.
- Click the drop-down box under Type and select CANCEL LINE.
- Under the Action drop-down box, select the Cancel option.
- Under the Line drop-down, select the claim line item you would like canceled. The current claim will allow up to 50 lines, so your options are 1-50.
- The Position drop-down and the New Value field are not applicable when requesting to cancel a line item, so they will be grayed.
- Click ADD to attach this request to the form.

- Once your type of change has been added to the form, you may:
- Add additional changes needed to this specific claim ICN by selecting a new Type then completing the applicable fields (i.e., Action, Line, Position, and New Value ).
- Delete a line added to the form by selecting the red ‘X’ in the last column.

Date of Service
Part B providers may submit Reopening requests to change the date of service submitted on line items of a previously processed Part B claim. If the change is to the YEAR of service, other services on the claim MUST have the same year.
- Click the drop-down box under Type and select DATE OF SERVICE.
- Under the Action drop-down box, select the Replace option.
- Under the Line drop-down, select the claim line item for which you would like the rendering provider's NPI changed. The current claim will allow up to 50 lines, so your options are 1-50.
- The Position drop-down is not applicable when replacing a date of service, so it will be grayed.
- Enter the new FROM and TO date the service was performed. Either enter in the XX/XX/XXXX format (the slashes (/) will auto-populate) or use the calendar icon.
- Click ADD to attach this request to the form.

- Once your type of change has been added to the form, you may:
- Add additional changes needed to this specific claim ICN by selecting a new Type then completing the applicable fields (i.e., Action, Line, Position, and New Value ).
- Delete a line added to the form by selecting the red ‘X’ in the last column.

Header Diagnosis Codes
Part B providers may submit Reopening requests to add, remove, or replace the header diagnosis code of a previously processed Part B claim.
- Click the drop-down box under Type and select HEADER DIAGNOSIS CODES.
- Under the Action drop-down box, select the type of header diagnosis code change you would like to request. The options available are Add, Remove, or Replace. Refer to the separate instructions below.

To ADD and REPLACE:
- The Line drop-down is not applicable when changing the header diagnosis, so it will be grayed.
- Under the Position drop-down, identify the position (1 – 12) of the diagnosis code for which the change is requested. This coincides with the number of diagnoses that may be submitted in the header of a claim.

- When adding or replacing a header diagnosis code, enter the new ICD-10 code WITHOUT the decimal in the New Value field.
- Click ADD to attach this request to the form.

To REMOVE:
- The Line drop-down is not applicable when changing the header diagnosis, so it will be grayed.
- Under the Position drop-down, identify the position (1 – 12) of the diagnosis code for which the change is requested. This coincides with the number of diagnoses that may be submitted in the header of a claim.

- When Removing Header Diagnosis Codes, enter the diagnosis code to be removed in the New Value field.
- Removing the code will then move all other diagnosis codes one position FORWARD, making the original diagnosis code in position 2, the new position 1 code. For example: A claim has header diagnoses 1) Z00000 and 2) I10. Removing Z00000 will move I10 to the first header diagnosis code position.
- NOTE: If a NEW diagnosis code needs to be added to the claim, which is not currently present, please use the action REPLACE instead of REMOVE.
- Click ADD to attach this request to the form.

- Once your type of change has been added to the form, you may:
- Add additional changes needed to this specific claim ICN by selecting a new Type then completing the applicable fields (i.e., Action, Line, Position, and New Value).
- Delete a line added to the form by selecting the red 'X' in the last column.

Line Diagnosis Pointer
Part B providers may submit Reopening requests to add, remove, or replace the diagnosis pointer on the line item of a previously processed Part B claim.
- Click the drop-down box under Type and select LINE DIAGNOSIS POINTER.
- Under the Action drop-down box, select the type of change you would like to make to the diagnosis pointer. The options available are Add, Remove , or Replace.

- Under the Line drop-down, select the claim line item requiring the diagnosis pointer change. The current claim will allow up to 50 lines, so your options are 1-50.

- Under the Position drop-down, identify the position (1 – 4) of the diagnosis pointer for which the change is requested. This coincides with the number of diagnosis positions on a claim line.

- When adding or replacing a diagnosis pointer, enter the new ICD-10 code WITHOUT the decimal in the New Value field.
- NOTE: If you are adding an ICD-10 code that was NOT in the header of the original claim, you must ALSO submit a HEADER DIAGNOSIS CODE to this request. This can be done by selecting this option under Type and selecting ADD as the Action, as noted under the Header Diagnosis Codes form above.
- When removing a diagnosis pointer, enter the ICD-10 code WITHOUT the decimal in the New Value field.
- Click ADD to attach this request to the form.

- Once your type of change has been added to the form, you may:
- Add additional changes needed to this specific claim ICN by selecting a new Type then completing the applicable fields (i.e., Action, Line, Position, and New Value ).
- Delete a line added to the form by selecting the red 'X' in the last column.

Modifier
Part B providers may submit Reopening requests to add, remove, or replace certain modifiers to line items of a previously processed Part B claim.
NOTE: If the request is to add HCPCS modifier GA (Waiver of Liability Statement on File), please use the "OTHER SITUATIONS" form instead, as a copy of the signed Advance Beneficiary Notice on Non-Coverage (ABN) must be sent as an attachment.
- Click the drop-down box under Type and select MODIFIER.
- Under the Action drop-down box, select the type of modifier change you would like to request. The options available are Add , Remove, or Replace.
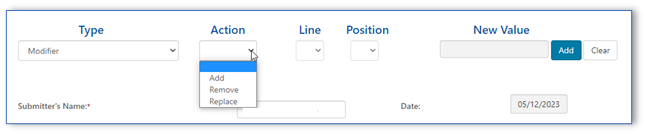
- Under the Line drop-down, select the claim line item you would like the modifier to be added. The current claim will allow up to 50 lines, so your options are 1-50.
- Under the Position drop-down, identify the position (1 – 4) of the modifier for which the change is requested. This coincides with the number of modifiers that may be added to a claim line.
- NOTE : If the current modifier position is already filled with a modifier which is required for the claim and you use the ADD, the new modifier will replace/remove that modifier. Make sure to add new modifiers to the NEXT open position.
- When Add or Replace is selected the New Value field is required. Enter the new modifier in this field.
- The New Value field will be grayed when Remove is selected in the Action drop-down box.
- Click ADD to attach this request to the form.

- Once your type of change has been added to the form, you may:
- Add additional changes needed to this specific claim ICN by selecting a new Type then completing the applicable fields (i.e., Action, Line, Position, and New Value ).
- Delete a line added to the form by selecting the red 'X' in the last column.

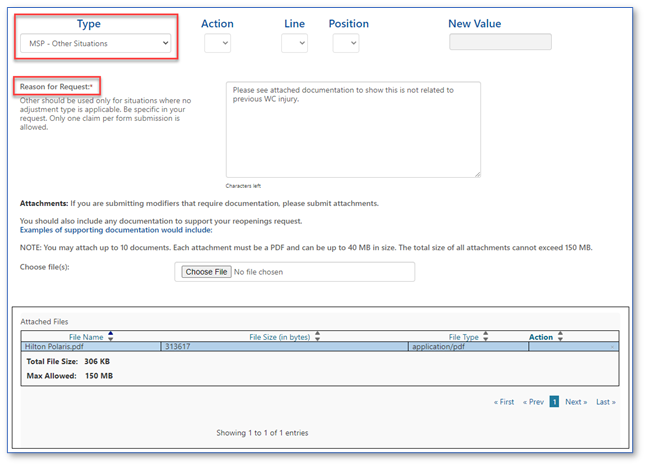
MSP (Other Situations)
Part B providers may submit Reopening requests to make simple corrections to Medicare Secondary Payer (MSP) claims for situations which require an Explanation of Benefits (EOB) from another insurance or other documentation required for processing of MSP claims.
- The Action, Line, and Position drop-downs, in addition to the New Value field are not applicable when this type is selected, so they will be grayed.
- In the Reason for Request field, please provide details about your request. For example:
- Proof of timely filing within six months from the recoupment date of another insurance
- Explanation of Benefits and/or Documentation required to substantiate differing injuries in liability or Workers' Compensation insurance
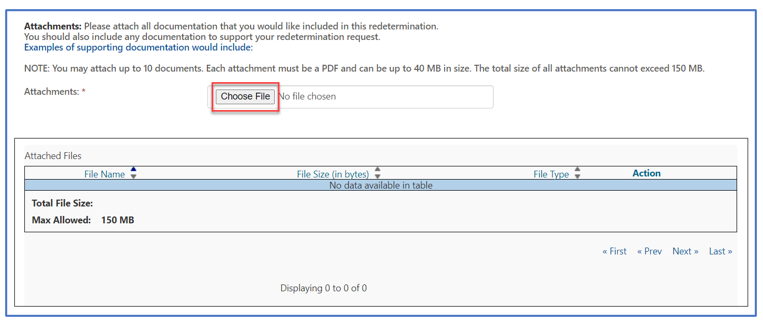
- You may attach documentation to support your request. All attachments must be in a PDF format. Up to 10 attachments are accepted. Each PDF can be up to 40MBs in size; the total of all attachments cannot exceed 150MBs.
- Only one beneficiary date of service per request.
- No spreadsheets are accepted.
MSP – Reprocess Primary
Part B providers may submit reopening requests to reprocess a claim we originally processed and denied as secondary and the beneficiary's MSP record is now updated to reflect Medicare is primary. This includes Medicaid claims which denied as timely filing.
- Click the drop-down box under Type and select MSP – REPROCESS PRIMARY.
- Under the Action drop-down box, select the Reprocess option.
- The Line, and Position drop-downs, in addition to the New Value field are not applicable when this type is selected, so it will be grayed.
- Click ADD to attach this request to the form.

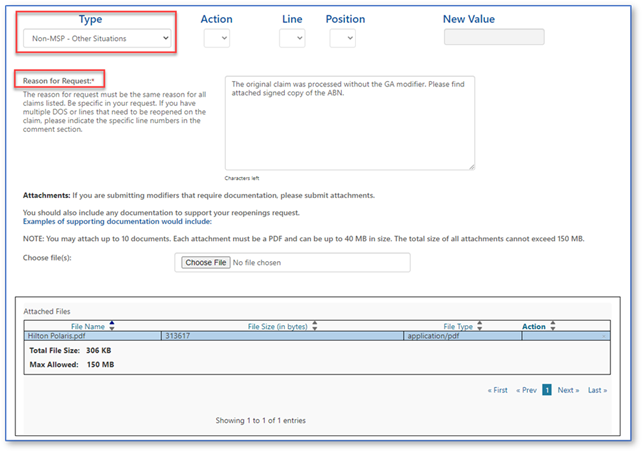
Non-MSP (Other Situations)
Part B providers may submit Reopening requests to make simple corrections to non-MSP claims for situations not addressed with any of the other options.
- The Action, Line, and Position drop-downs, in addition to the New Value field are not applicable when this type is selected, so they will be grayed.
- In the Reason for Request field, please provide details about your request. For example:
- If you received a timely filing denial, explain why the claim should be adjusted.
- Did you receive an incorrect denial for global surgery? Provide details here.
- Was an Advance Beneficiary Notice of Non-Coverage (ABN) signed? Add this information here and attach a copy of the signed ABN.
- Was there a duplicate or a clearinghouse issue? State the specific issue and the claim that should process for payment.
- You may attach documentation to support your request. All attachments must be in a PDF format. Up to 10 attachments are accepted. Each PDF can be up to 40MBs in size; the total of all attachments cannot exceed 150MBs.
- Only one beneficiary date of service per request.
- No spreadsheets are accepted.
Place of Service
Part B providers may submit Reopening requests to change the place of service code submitted on the line items of a previously processed Part B claim.
NOTE: If changing the place of service code results in a reduced payment (for example, from an Office (11) to Outpatient Hospital (22)), please submit an Overpayment Recovery (OPR) request instead.
- Click the drop-down box under Type and select Place of Service.
- Under the Action drop-down box, select the Replace option.
- Under the Line drop-down, select the claim line item for which you would like the place of service code changed. The current claim will allow up to 50 lines, so your options are 1-50.
- The Position drop-down is not applicable when replacing the place of service code, so it will be grayed.
- Enter the place of service code in the New Value field.
- Click ADD to attach this request to the form.

- Once your type of change has been added to the form, you may:
- Add additional changes needed to this specific claim ICN by selecting a new Type then completing the applicable fields (i.e., Action, Line, Position, and New Value).
- Delete a line added to the form by selecting the red 'X' in the last column.

Procedure Codes
Part B providers may submit Reopening requests to replace a CPT/HCPCS code on line items of a previously processed Part B claim.
- Under the Action drop-down box, select the Replace option.
- Under the Line drop-down, select the claim line item for which you would like the procedure code changed. The current claim will allow up to 50 lines, so your options are 1-50.
- The Position drop-down is not applicable when replacing a procedure code, so it will be grayed.
- Enter the new procedure code in the New Value field.
- Click ADD to attach this request to the form.

- Once your type of change has been added to the form, you may:
- Add additional changes needed to this specific claim ICN by selecting a new Type then completing the applicable fields (i.e., Action, Line, Position, and New Value ).
- Delete a line added to the form by selecting the red 'X' in the last column.

Rendering NPI
Part B providers may submit Reopening requests to change the National Provider Identifier (NPI) identifying the physician/practitioner who performed a service submitted on the line items of a previously processed Part B claim.
NOTE: Only the performing physician/practitioner NPI may be changed using this form. To change the Billing Provider, Referring/Order provider, or the Facility provider, please use the regular Written Reopenings form and specify the type of provider correction.
- Click the drop-down box under Type and select RENDERING NPI.
- Under the Action drop-down box, select the Replace option.
- Under the Line drop-down, select the claim line item for which you would like the rendering provider's NPI changed. The current claim will allow up to 50 lines, so your options are 1-50.
- The Position drop-down is not applicable when replacing the rendering NPI, so it will be grayed
- Enter the new rendering physician/practitioner's NPI in the New Value field.
- Click ADD to attach this request to the form.

- Once your type of change has been added to the form, you may:
- Add additional changes needed to this specific claim ICN by selecting a new Type then completing the applicable fields (i.e., Action, Line, Position, and New Value).
- Delete a line added to the form by selecting the red 'X' in the last column.

Reprocess Claim
Part B providers may submit Reopening requests to reprocess a claim that denied when there are no changes or updates to make to the actual claim. Examples include:
- Global surgery denials that should be reversed due to an update to a different claim.
- A patient's file was updated to show Medicare should pay as primary on a claim we originally processed as secondary.
- An erroneous duplicate denial. NOTE : Make sure the duplicate denial is incorrect; otherwise the adjustment may result in payment errors and/or recoupments.
- Click the drop-down box under Type and select REPROCESS CLAIM.
- Under the Action drop-down box, select the Reprocess option.
- The Line and Position drop-downs and the New Value field are not applicable when requesting to reprocess a claim, so they will be grayed.
- Click ADD to attach this request to the form. NOTE: No other corrections can be made to this request.

Units
Part B providers may submit Reopening requests to change the number of units submitted on line items of a previously processed Part B claim.
NOTE: If decreasing the number of units will result in a reduced payment, please submit an Overpayment Recovery (OPR) request instead..
- Click the drop-down box under Type and select UNITS.
- Under the Action drop-down box, select the Replace option.
- Under the Line drop-down, select the claim line item for which you would like the number of units changed. The current claim will allow up to 50 lines, so your options are 1-50.
- The Position drop-down is not applicable when replacing the units, so it will be grayed.
- Enter the new units in the New Value field.
- Click ADD to attach this request to the form.

- Once your type of change has been added to the form, you may:
- Add additional changes needed to this specific claim ICN by selecting a new Type then completing the applicable fields (i.e., Action, Line, Position, and New Value).
- Delete a line added to the form by selecting the red 'X' in the last column.
Audit & Reimbursement
Home Health, Hospice, and Part A providers are required to submit financial data, which support amounts claimed in a cost report, directly to CGS. This financial information is reviewed and processed by our Audit & Reimbursement (A&R) team.
This sensitive information and other correspondence may be submitted securely through myCGS.
NOTE: Per the Centers for Medicare & Medicaid Services (CMS), cost report submissions are no longer accepted through myCGS. Please refer to MLN Matters® article MM10611![]() for more on submitting cost reports.
for more on submitting cost reports.
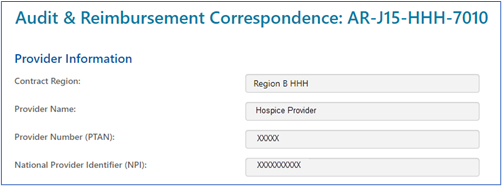
After clicking the “A&R Correspondence: AR-J15-HHH-7010” link and the form loads, the Provider Information section will auto-populate.
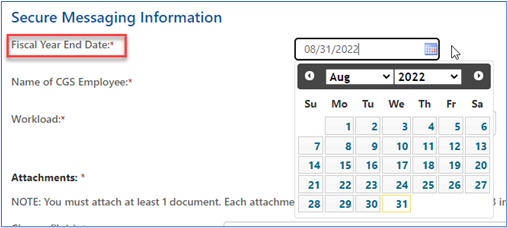
- From the 'Fiscal Year End Date' field, select the date from the calendar icon or enter the fiscal year end date in the XX/XX/XXXX format.
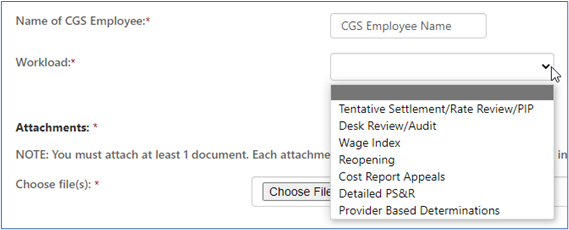
- Enter the name of the specific CGS employee for whom the correspondence is being sent.
- In the 'Workload' field, click the drop-down box to select the subject of your correspondence. The options available are:
- Tentative Settlement/Rate Review/PIP – Used to determine a tentative settlement after a cost report is submitted. A Rate Review and Periodic Interim Payment (PIP) are reviews to determine a rate to pay the provider.
- Desk Review/Audit – Reviews to determine the accuracy of the cost report for final settlement.
- Wage Index – A review of wages used by CMS to establish the wage index amounts used to calculate payment of claims.
- Reopening – A review of issue(s) from a cost report that has been previously settled. This review is subsequent to a request received by a provider to correct an error made during the desk review or audit, or based on new data not available to the provider prior to the submission of the original cost report.
- Cost Report Appeals – This is an appeal that may be requested that is related to adjustments made to the final settlement.
- Detailed PS&R – This is a listing of claims for a set period.
- Provider Based Determinations – A request to review provider based facilities to ensure they meet Medicare regulations.
NOTE: Please refer to MLN Matters® article MM10611![]() for more on submitting cost reports.
for more on submitting cost reports.
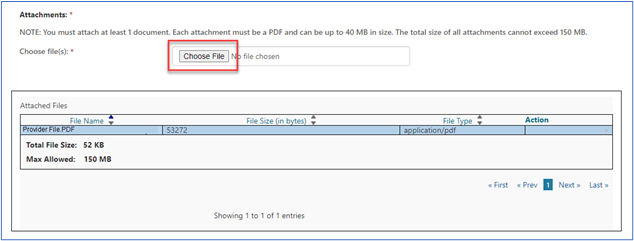
- You must upload at least one document to be sent with the form. Attachments can be up to 40MBs in size, not to exceed to total of 150MBs for all attachments. The documents must be in a PDF format.
- Click on the “Choose File” button and a window will open allowing you to locate and attach the PDF document to the form. Each attachment will populate in the “Attached Files” window.
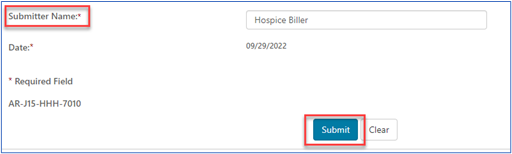
- Enter the name of the person submitting the form. Click the “Submit” button when the form is complete and ready to be submitted. The date will auto-populate.
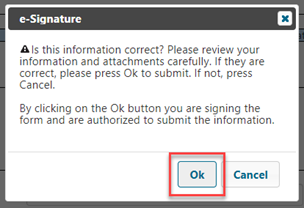
- An ‘e-signature’ box will appear, asking you to verify that the information entered and attachments are all correct. This ensures the signature requirements have been met.
Once received, confirmation will be delivered to your secure Messages inbox letting you know.
Responses sent to you from our A&R team will also be delivered to your Messages inbox.
Comparative Billing Reports
Comparative Billing Reports (CBRs) are created to give you a snapshot of your specific billing pattern data in comparison to peer groups within your CGS jurisdiction. This information is helpful in conducting education and self-audit activity.
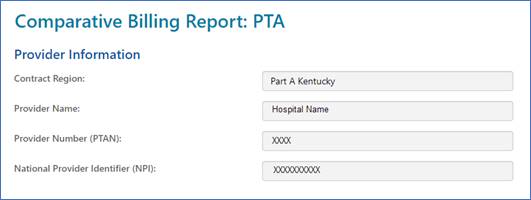
After clicking the "CBR" link for your line of business and the form loads, the Provider Information section will auto-populate.
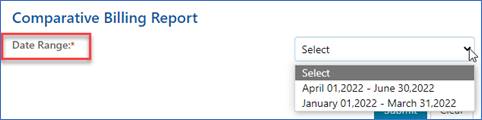
Select the calendar quarter from the drop-down box.
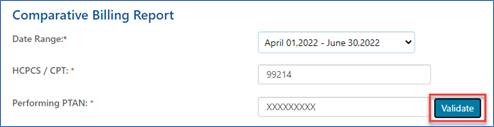
For Part B CBRs, identify the specific CPT/HCPCS code and enter the performing provider's PTAN. Click the "Validate" button so that myCGS can verify the PTAN entered is associated with the group identified in the "Provider Information" section.
NOTE: There is no additional information for HHH and Part A users to enter.
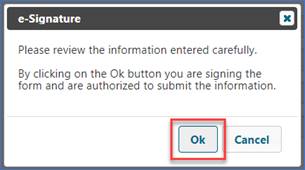
Click Submit to send your CBR request. An "e-signature" box will appear, asking you to verify that the information entered is correct. This ensures the signature requirements have been met.
Once received, confirmation will be delivered to your secure Messages inbox letting you know. myCGS will notify you when the CBR has been generated.
Responding to Requests for Additional Documentation
The myCGS web portal allows you to respond to our additional documentation request (ADR) letters directly from your MR Dashboard and Claims tab.
MR Dashboard:
If you have a pending ADR on your MR Dashboard, simply click on the 'Submit Documents' icon, which will connect you directly to the MR ADR Form.
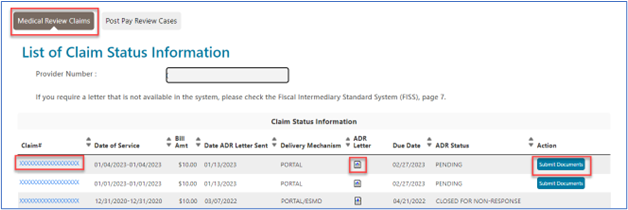
You can also access the form from the 'Detailed Claim Status Information' page by clicking the 'Submit Document' button.
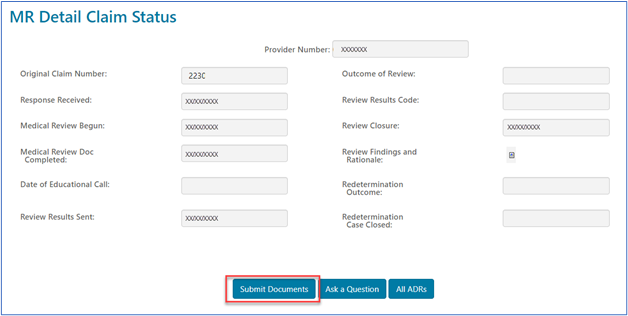
For your convenience, the MR ADR form will auto-populate with information in most of the required fields.
Claims Tab:
When checking the status of your claims from the Claims tab, if you see a claim pending awaiting response to an ADR letter, you can respond by selecting the 'Submit Documents' button located at the bottom of the page.
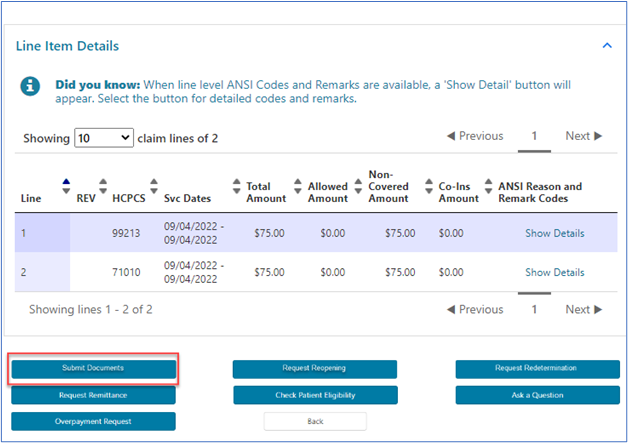
To save you time, the form will auto-populate with information in most of the required fields.
When claims are pending due to an ADR, do not use the 'Ask a Question' button, as it will not route the documentation you attached to the pending claim.
Reconsiderations (HHH and Part A)
Home Health, Hospice, and Part A providers may request a Reconsideration (second-level appeal) through myCGS. The request must be submitted within 180 days from the date of receipt of the Redetermination decision. In cases where the Redetermination request is dismissed, a Reconsideration may be requested within 60 days of the dismissal notice.
The form is available under the Claims tab for claims that have completed the 1st level appeal, Redetermination. Refer to the Appeals: Submitting a 2nd Level Appeal section of this manual for step-by-step instructions on how to submit a 2nd level appeal.
General Inquiries
You may submit general questions through myCGS related to various topics, including appeals, finance, education, and medical review.
NOTE: This form should not be used in place of the other functions available to you through myCGS.
- To submit a Redetermination (1st level appeal) please complete the Redetermination Request Form.
- To submit an eOffset (offset authorization for a demanded overpayment), please complete the eOffset Request Form.
- To respond to an additional documentation request (ADR) from our medical review or claims departments, please complete the MR ADR or Claim ADR Response Form.
After clicking the form link and the page loads, you will find some fields are auto populated based on your myCGS user ID. The required fields that must be completed to submit the General Inquiry Form are identified by a RED asterisk (*).
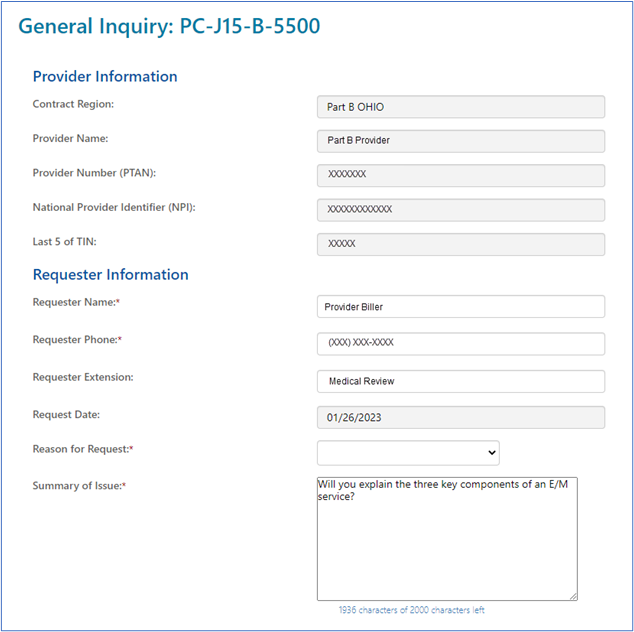
Complete the top portion of the form. There is also an area to summarize the reason for the inquiry. In 2000 characters or less, summarize the issue.
You must include an attachment with your inquiry. Attachments must be in a PDF format and no larger than 40MBs in size. Click the ‘Choose File’ button to locate the PDF document on your system.
Immediate Offset
An Immediate Offset is your electronic authorization allowing us to offset funds to satisfy an overpayment requested by CGS. You may request an immediate offset each time a demanded overpayment is received or authorize a permanent request for all future demanded overpayments.
The forms are located under the Financial Forms sub-tab. Instructions on completing the forms are available in the Financial Tools section of this user manual.
NOTE: Provider Administrators have access to all tabs within myCGS. Provider Users have access to only the tabs the Provider Administrator has granted them permission to access. If you have access to the forms available in myCGS, the "Forms," "Financial Tools," and "Claims" tabs will be visible once you successfully log into the portal. If a tab is grayed out but you believe you need access to the tab, contact your Provider Administrator.
Credit Balance
A Medicare Credit Balance is an amount determined to be refundable to the Medicare program for an improper or excess payment made to a provider because of patient billing or claims processing errors. Each HHH and Part A provider must submit a quarterly Credit Balance Report (Form CMS-838). To ensure timely receipt and processing, myCGS is the preferred method of submission.
The form is located under the Financial Forms sub-tab.

- Select 'CMS 838 Credit Balance' from the "Select a Form" drop down menu. The myCGS Credit Balance form will display.
- The top of the 'Provider Information' section will auto-populate. Select the quarter end date from the drop-down menu.
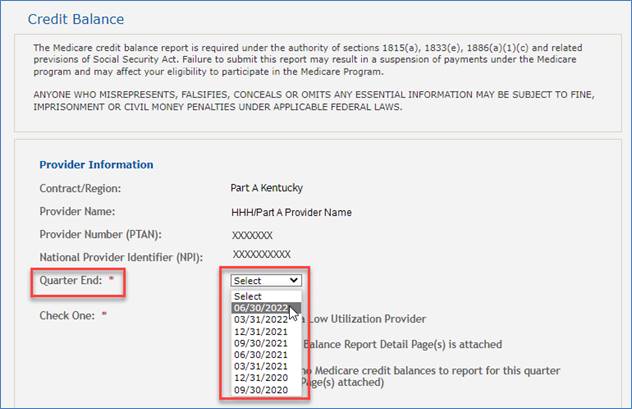
- Check one item from the list: "Qualify as a Low Utilization Provider"; "The Credit Balance Report Detail Page(s) is attached"; or "There are no Medicare credit balances to report for this quarter (No Detail Page(s) attached)."
- In the 'Attachments' section, attach up to 10 documents in a PDF format (each up to 40MB in size, not to exceed a total of 150MBs). NOTE: CMS regulations prevent CGS from accepting electronic signatures; therefore, the first attachment must be the signed CMS-838 Credit Balance form.
See "Submitting a Form" below for next step.
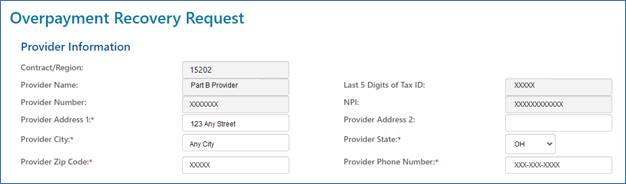
Overpayment Recovery Request (Part B)
Part B providers may submit an Overpayment Recovery Request to notify us of an overpayment. Doing this will generate a demand letter identifying the amount to be refunded.
Once the request is received, approved, and processed, we will issue an overpayment demand letter. The debtor has 30 days from the date of the demand letter to submit the refund. (See Immediate Offset in the Financial Tools section of this user manual to avoid delays and possible interest added to the principal balance.)
After clicking the form link the Overpayment Recovery Request form will display. Required fields are identified by a RED asterisk (*). For your convenience, some fields of the form are pre-populated with information specific to your myCGS User ID and PTAN/NPI combination.
Verify/complete the PROVIDER INFORMATION section. Add your phone number in the appropriate field. NOTE: Should we need to contact you with questions about your request, please be sure to enter a number to a direct line to reach you.
Complete the BENEFICIARY INFORMATION section by entering the patient's name and Medicare ID.

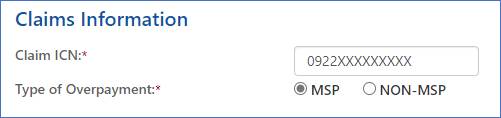
Complete the CLAIMS INFORMATION section by entering the claim Internal Control Number (ICN). The ICN is located on your CGS Remittance Advice (RA). Also, select the option to identify whether this request is related to Medicare Secondary Payer (MSP) or not related to MSP (NON-MSP).
- MSP: If MSP is involved, click the drop-down box under Type and select the appropriate value. If none apply, select Other and a box will display allowing you to enter text identifying the specific reason for your request. Also, complete the Line and Date of Service fields.
- Under the Line drop-down, select the applicable claim line number. If this applies to all lines of the claim, scroll to bottom of drop-down and select ALL.
- Enter the primary payer allowed and paid amounts, and the "Obligated to Accept" amount (if the provider has contracted with the primary insurance company and is obligated to accept their allowed amount for the service). Also, enter the From and To date of service.
- Click ADD to insert this line onto the form.
- Once the line is added to the form, you may:
- Add additional lines from the claim (unless ALL is selected)
- Delete a line added to the form by selecting the red 'X' in the last column.
- Complete the request.
- NON-MSP: If MSP is NOT involved, click the drop-down box under Type of Adjustment to identify if the overpayment applies to a single line of the claim or the entire claim.
- If the overpayment applies to the entire claim, under the Type drop-down, select the reason the overpayment occurred. The remaining fields (Action and Line) will auto-populate.
- If the overpayment applies to a specific line(s) of the claim and not the entire claim, under the Type drop-down, select the reason the overpayment occurred. If none apply, select Other and a box will display allowing you to enter text identifying the specific reason for your request.
- Select appropriate value under the Action drop-down. Values vary depending on what was selected under the Type drop-down. The option under Action is DENY for all types except:
- Corrected # of Units: The value is REPLACE.
- Corrected Date of Service: The value is REPLACE.
- Corrected Procedure Code: The value is REPLACE.
- Modifier: The values are ADD, REMOVE, or REPLACE.
- Under the Line drop-down, select the applicable claim line number. If this applies to all lines of the claim, scroll to bottom of drop-down and select ALL.
- The Position drop-down displays only when Modifier is selected under the Type field. In this case you would identify the position of the modifier.
- The New Value field is required when the following are selected under the Type field:
- Corrected # of Units: Enter the correct number of units.
- Corrected Date of Service: The field changes to FROM/TO DATE OF SERVICE. Enter the correct date of service.
- Corrected Procedure Code: Enter the correct procedure code.
- Modifier: When ADD or REPLACE is selected under Action. Enter the correct modifier.
- Click ADD to insert this line onto the form.
- Once the line is added to the form, you may:
- Add additional lines from the claim (unless ALL is selected)
- Delete a line added to the form by selecting the red 'X' in the last column.
- Complete the request.
Prior Authorization for Certain Hospital OPD Services (Part A)
This option allows users to submit a prior authorization request (PAR) for certain hospital outpatient department (OPD) services. See Hospital Outpatient Department Prior Authorization for details about the prior authorization process.
NOTE: Since prior authorization is a condition of payment for the hospital OPD, this form is only available to users who sign in with a user ID registered to a Part A NPI/PTAN.
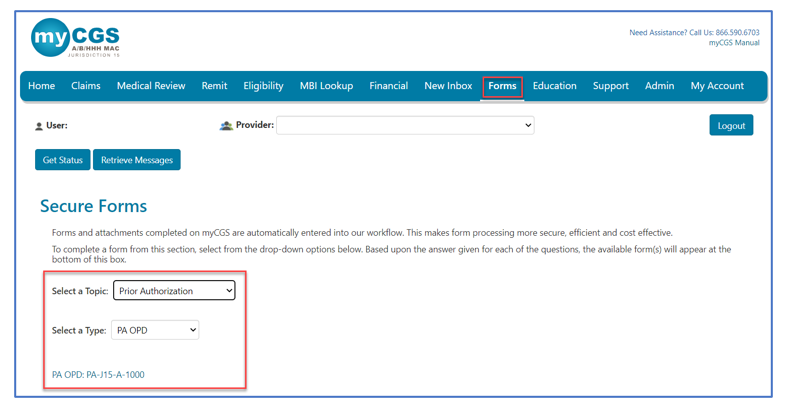
Once logged into myCGS, select the FORMS tab.
- Under the "Select a Topic" drop-down box, click "Prior Authorization."
- The "Select a Type" drop-down will default to "PA OPD."
- Select the "PA OPD: PA-J15-A-1000" link at the bottom of the page.
Once the PA form loads you will find several sections requiring your attention. Carrots at the top corners of each section allow you to collapse or expand the sections.
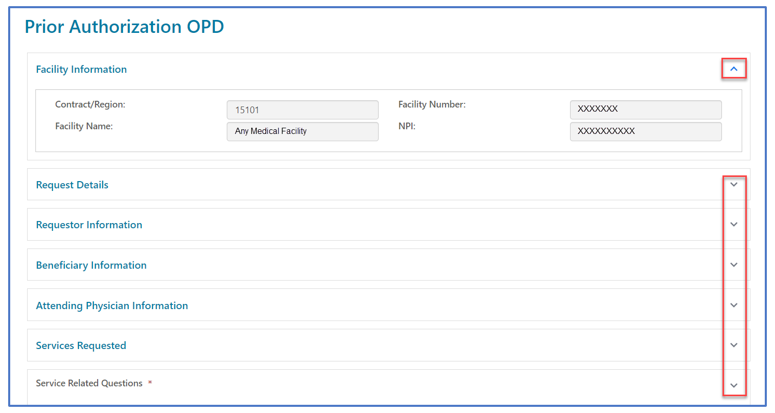
Facility Information
This section will auto-populate with information specific to your myCGS ID and provider information. No changes can be made to the Provider Information section.

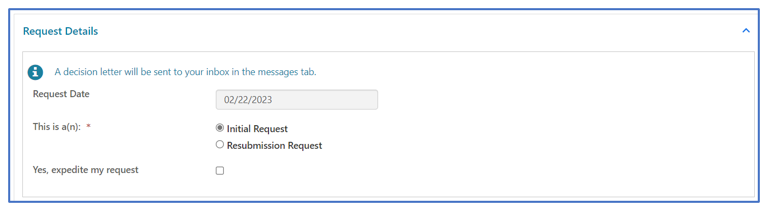
Request Details
Select the appropriate request type.
- Initial Request: First prior authorization request (PAR) submission for this beneficiary/date of service.
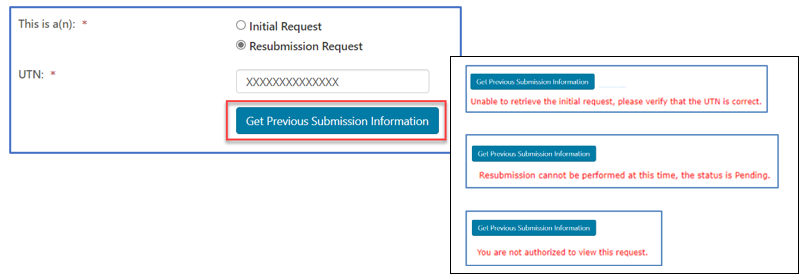
- Resubmission Request: Any subsequent PAR submission (i.e., to correct an error or omission identified after receiving a non-affirmation decision).
- Include additional/updated documentation not provided with a prior PAR.
- Enter the 14-digit unique tracking number (UTN) assigned to the most recent PAR. (Select 'Get Previous Submission Information' to verify).
- Expedited Request: Used ONLY when a delay for a decision could seriously jeopardize the beneficiary's life, health or ability to regain maximum function. Enter the specific reason/rationale for CGS to substantiate the need for an expedited decision.

Requestor Information
This section identifies your name, email, and phone number associated with your myCGS user ID and will auto-populate. If you would like to receive your PAR decision via fax, check the box and enter the fax number of the hospital OPD.

Beneficiary Information
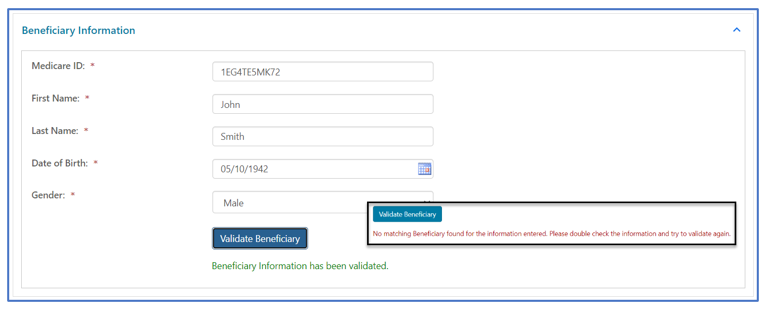
Enter the beneficiary's Medicare ID, first name, last name, and date of birth.
For initial requests, select "Validate Beneficiary". myCGS will verify the information you entered corresponds with the beneficiary’s eligibility record on file.
NOTE: Refer to the beneficiary's Medicare card to verify this information before you submit a request.
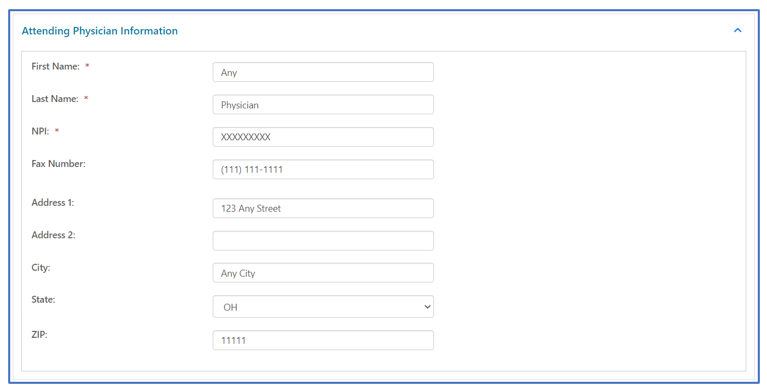
Attending Physician Information
Enter the name, National Provider Identifier (NPI), and complete address of the physician/non-physician practitioner (NPP) who has overall responsibility for the patient's medical care and treatment. If the attending physician would like to receive a copy of the PA decision letter, enter the physician's fax number to the form.
Services Requested
The "Services Requested" section of the form varies depending upon the type of service for the PAR.
- On the "Select a Service" drop-down, click on the service for which the PAR is for. Depending on the service selected, certain fields will display.
- HCPCS Code: Select the CPT code from the listing
- Primary Diagnosis Code: Enter the primary diagnosis code
- Number of Units: Enter the number of units (for Botulinum Toxin Injection PARs)
- Secondary Diagnosis Code: Identify a second diagnosis code, if applicable
- Related Codes: Enter any CPT/HCPCS codes related to those selected above
- Dates of Service: Enter the date the service will be rendered
- Type of Bill: Identify the appropriate TOB applicable to this service
- Part A hospital outpatient (TOB 13X)
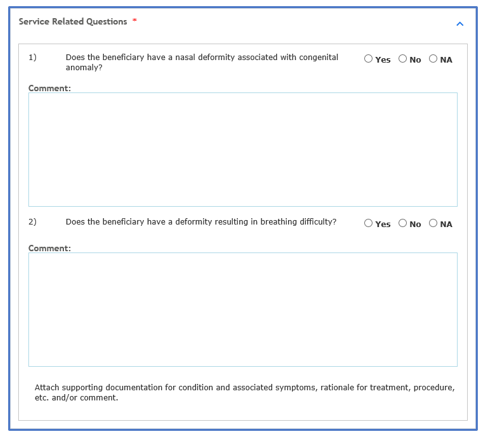
- Service Related Questions will display based upon the type of service. Answers to these questions help support medical necessity.
Attachments
Documentation from the medical record to support medical necessity of the service is to be attached to the myCGS form. Attachments must be in a PDF format and no large than 40MBs. The total of all attachments cannot exceed 150MBs.
NOTE: You must attach at least one document. Please refer to the applicable Local Coverage Determination and/or Local Coverage Article for direction.

Once the form is complete and all documentation attached, select "Submit" to send the PAR to CGS.
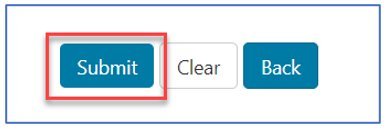
An eSignature box will display. Click OK to confirm the request and to sign the form.
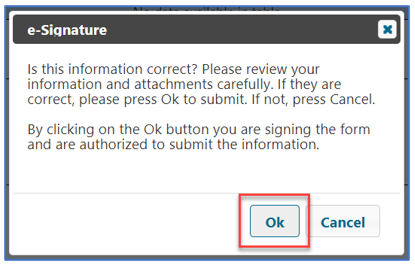
NOTE: If you do not click OK to sign the form, it will not be sent.
Confirmation
Confirmation messages will be delivered to your Messages inbox. The message that includes a Submission ID may be used to check the status of the PAR by entering the Submission ID into the "Get Status" screen located on any tab throughout the portal.
- PAR statuses available:
- Confirmed: CGS received the request.
- Decision: CGS issued an affirmed or non-affirmed decision. Refer to the PAR Decision Letter for details.
View PAR Decision Letter
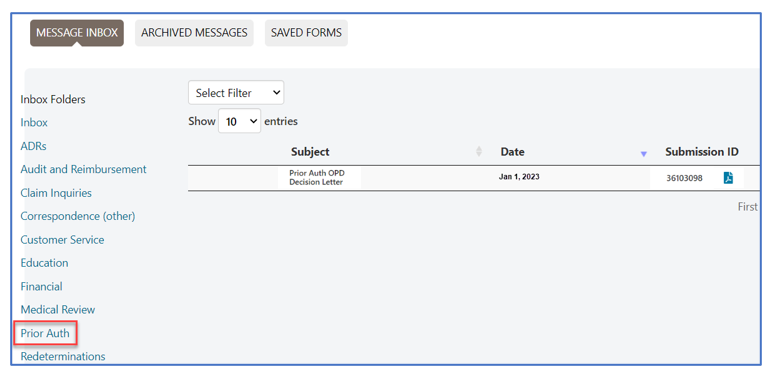
The decision letters for PARs submitted through myCGS will be delivered to your myCGS Messages inbox (unless you request to receive it via Fax in the Requestor Information section above.) You may also check the Prior Authfolder for decision letters.
The decision letter will open as a PDF document.
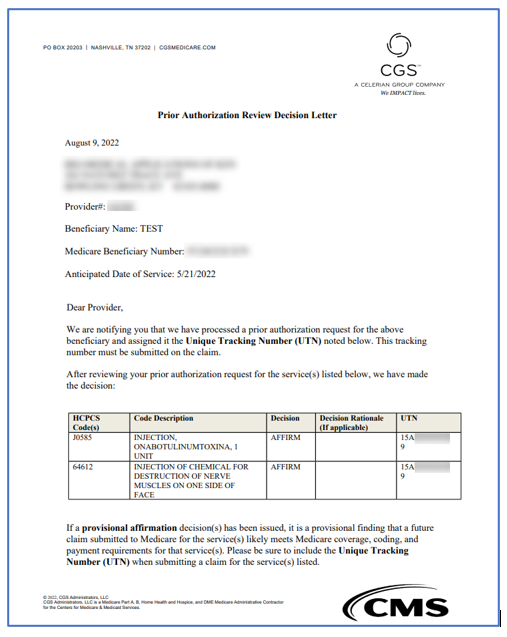
NOTE: PAR decisions and UTNs are valid for 120 days (the decision date is counted as day 1).
Prior Authorization (PA) for Certain Hospital Outpatient Department (OPD) Services (Part A) Exemption Opt Out
Hospital Outpatient Department's (OPD) who demonstrate compliance with Medicare coverage, coding, and payment rules related to prior authorization are eligible for exemption. This exemption would remain in effect until CMS elects to withdraw the exemption. To be eligible, OPDs need to submit at least 10 prior authorization requests during the previous review period and achieve a provisional affirmation threshold of at least 90% during an annual assessment.
Hospital OPDs have the option to opt out of the exemption process and continue submitting PARs. Hospital OPDs that choose to opt out of this exemption process must submit an opt-out request. To complete the myCGS form:
Once the form loads, you will find some information pre-populated with identifying information for your PTAN/NPI and myCGS account.
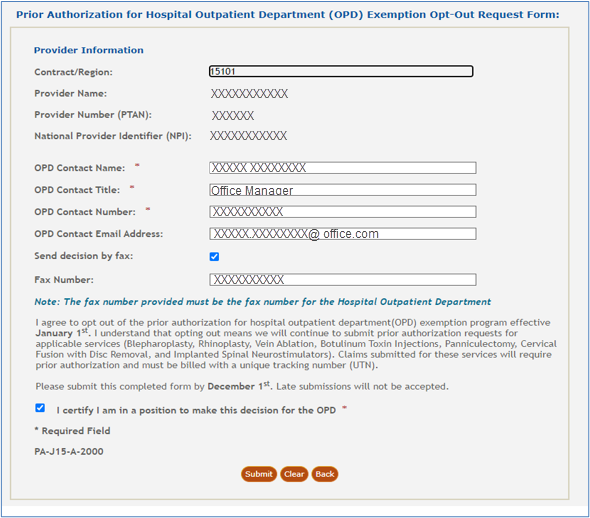
Complete the form by entering the contact person's name, title, phone number, and email address. If you would like to receive our decision letter via fax, check the box and enter the fax number.
Read the certification statement. To agree, click the check box. Click submit to send the completed form.
Prior Authorization: ASC
Ohio Part B users can access this form. Use the PA ASC form to request prior authorization for items or services subject to the Prior Authorization Demonstration for Certain Ambulatory Surgical Center (ASC) Services.
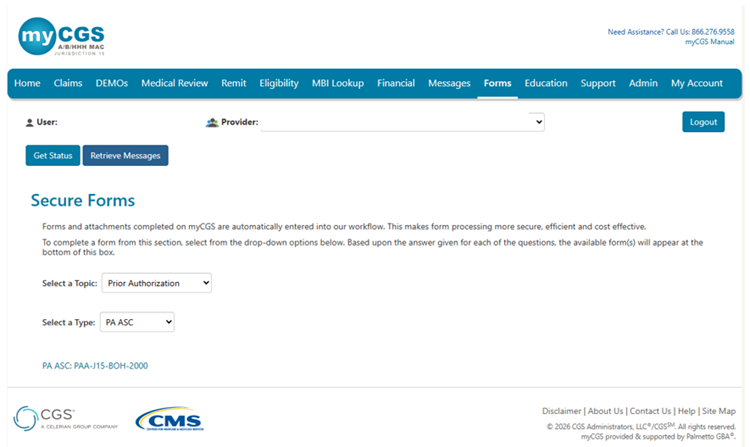
- Select ‘Forms’.
- Select ‘Prior Authorization’ from the ‘Select a Topic’ drop-down menu.
- Select ‘PA ASC from the ‘Select a Type’ drop-down menu.
- Click the link to open the form.
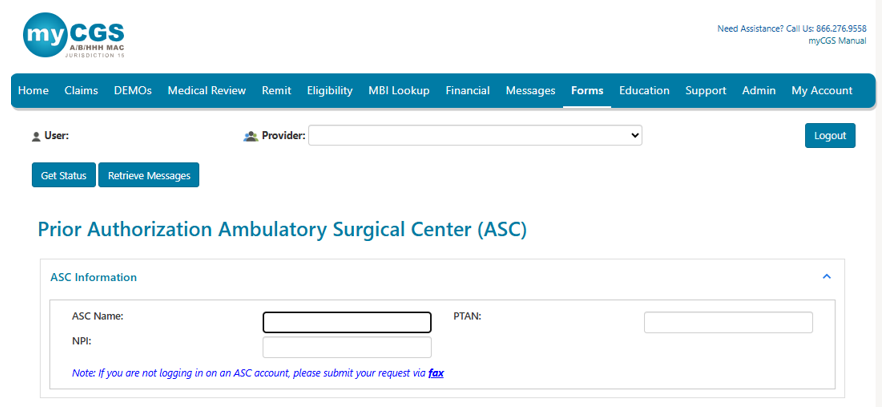
The ASC Information fields auto-populate based on the user ID used to log in and can't be edited. If you can't log in with an ASC account, please fax your request.
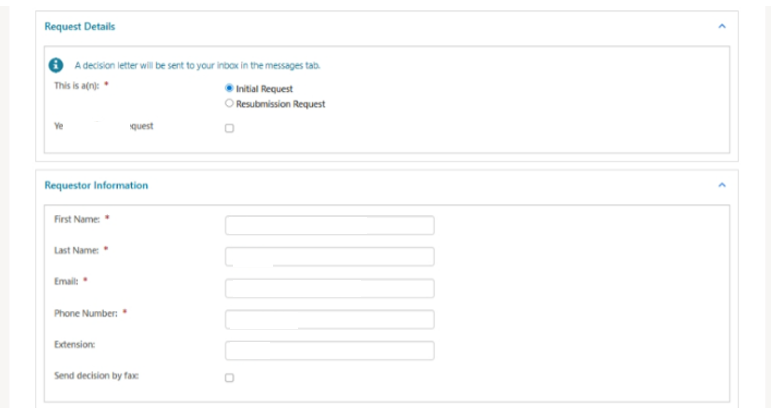
Request Details
Select the appropriate request type:
- Initial Request (first request for this beneficiary and date of service)
- Resubmission Request (subsequent request after receiving a non-affirmation decision)
- If you need the request expedited, check box.

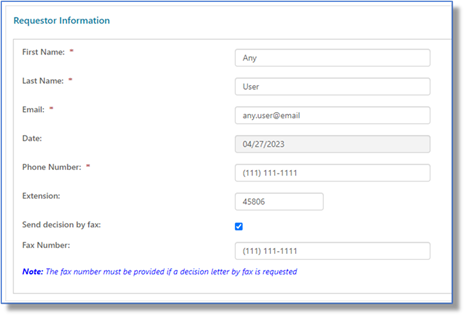
Requestor Information
This section describes the person who should receive the prior authorization decision. Report the following:
- First Name
- Last Name
- Phone Number
- Extension (if applicable)
- Send decision by fax (check box, if applicable)
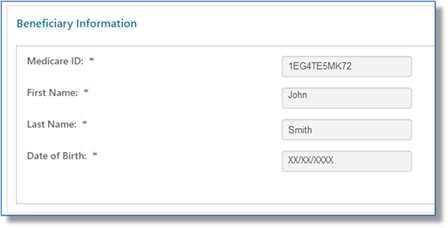
Beneficiary Information
This section describes the patient who will receive the items or services. Report the following (as it appears on the current Medicare card):
- Medicare ID
- First Name
- Last Name
- Date of Birth
You may use the ‘Validate Beneficiary’ button to verify that the information you enter matches the eligibility file.
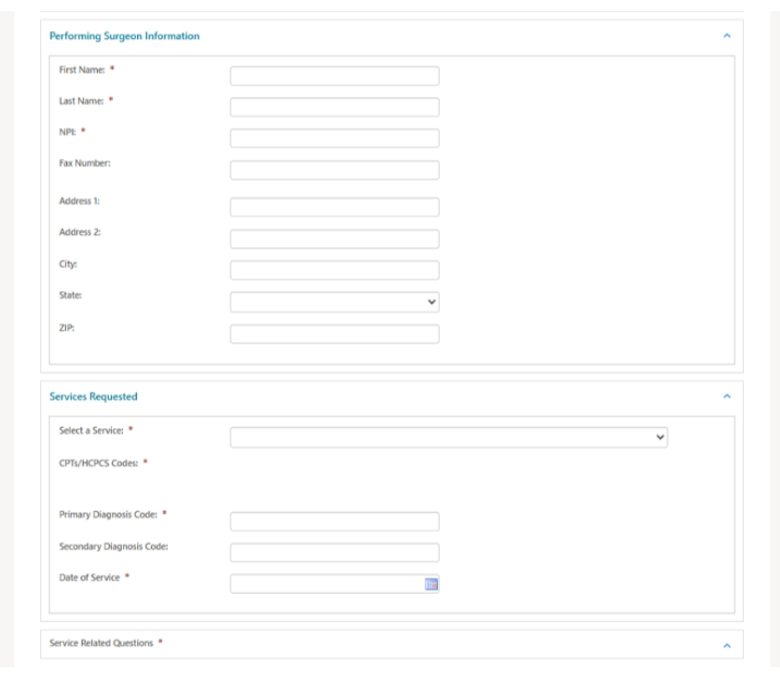
Performing Surgeon Information
This section describes the physician who will provide the item or service. Report the following:
- First Name
- Last Name
- NPI
- Fax Number (optional; the prior authorization decision will be faxed to this number)
- Address (optional; the prior authorization decision will be mailed to this address)
Services Requested
This section describes the ASC services for which you’re requesting prior authorization. Report the following:
- Choose the appropriate option from the 'Select a Service' drop-down menu.

- CPT/HCPCS Codes
- Key 1 CPT/HCPCS code; click ‘Add’.
- You may add up to 4 codes.
- Primary Diagnosis
- Secondary Diagnosis (if applicable)
- Date of Service
- Answer each question under Service-Related Questions.
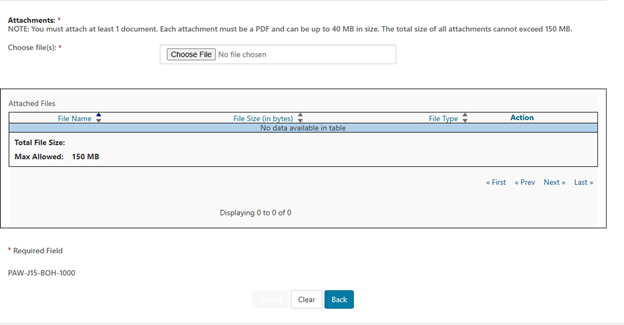
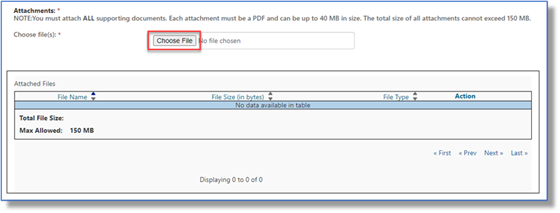
Attachments
You must attach at least 1 PDF document (up to 40 MB). The total size for all attachments can’t exceed 150 MB.
Select ‘Choose File’. Follow the prompts to locate and attach your document(s).
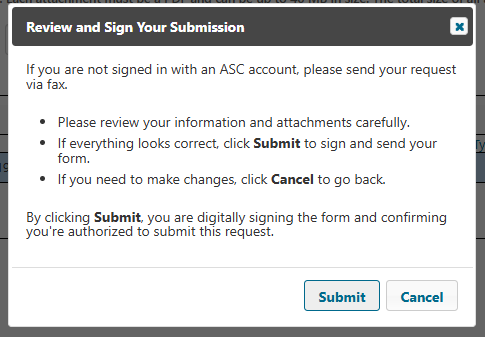
Submit
When ready, click ‘Submit’.
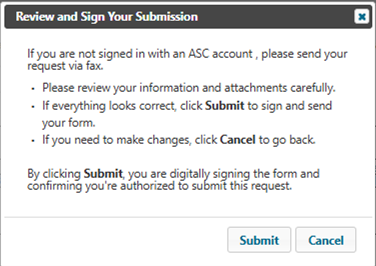
Please make sure you are signed in with an ASC account.
If you are not, please submit your request via fax.
The e-Signature box will display. First, review to ensure all required fields and attachment(s) are complete and correct.
- If satisfied, select ‘Ok’.
- If not, select ‘Cancel’ to make any corrections to the form or attachment(s).
Messages
Go to ‘Messages’ to view the following notifications in your Message Inbox:
- After you submit the form, myCGS will deliver a message with your request details (confirmation).
- Once the review is complete, you’ll receive a decision letter.
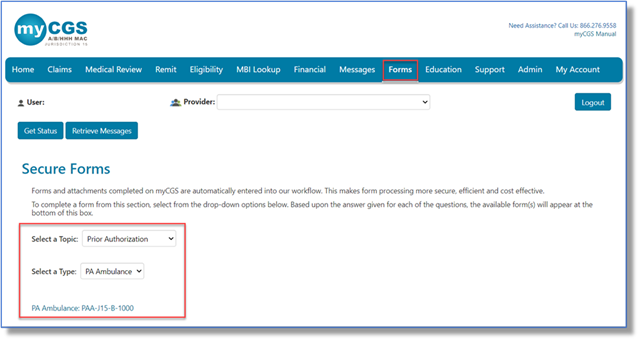
Prior Authorization for Repetitive, Scheduled, Non-Emergent Ambulance Transports (RSNAT)
This option allows you to submit a prior authorization request for RSNAT. See the Prior Authorization for RSNAT webpage for details about the prior authorization process.
- Log in with a user ID registered to a Part B NPI/PTAN.
- Select the 'Forms' tab.
- Choose 'Prior Authorization' from the 'Select a Topic' drop-down selection.
- The 'Select a Type' drop-down selection will default to 'PA Ambulance'.
- Select 'PA Ambulance: PAA-J15-B-1000' at the bottom of the page.
Request Details
Select the appropriate request type:
- Initial Request: First prior authorization request (PAR) submission.
- Resubmission Request: Any subsequent PAR submission (i.e., to correct an error or omission identified after receiving a non-affirmation decision).
- Enter the 14-digit Unique Tracking Number (UTN) assigned to the most recent PAR. (Select 'Get Previous Submission Information' to verify).
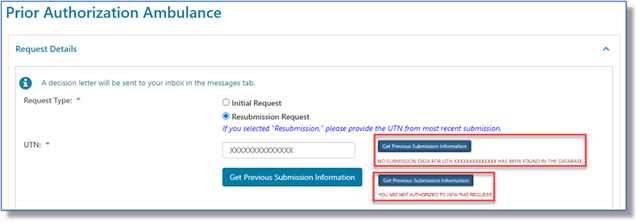
- Enter the 14-digit Unique Tracking Number (UTN) assigned to the most recent PAR. (Select 'Get Previous Submission Information' to verify).
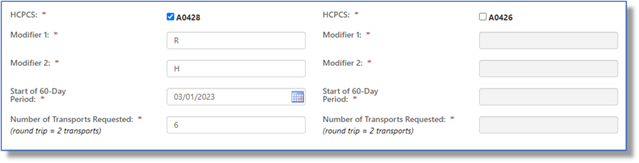
Select the appropriate HCPCS code(s) (A0428 or A0426) and enter the applicable origin/destination modifiers, start date, and number of transports.
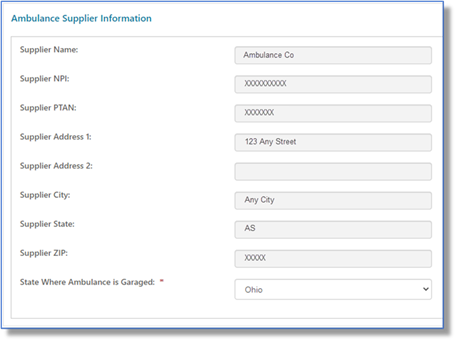
Ambulance Supplier Information
This section auto-populates based on your user ID. Exception: Select the state where your vehicle is garaged.
Beneficiary Information
Enter the beneficiary's Medicare Beneficiary Identifier (MBI), name, and date of birth.
NOTE: See the 'Eligibility' tab to verify and ensure the information you enter matches.
Certifying Physician Information
Enter the certifying physician/non-physician practitioner's name, identifiers (NPI/PTAN), and complete address.

Requestor Information
This section auto-populates based on your user ID. To receive the PAR decision via fax, check 'Send decision by fax' and enter the fax number.
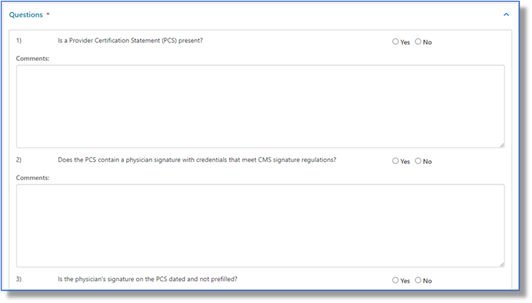
Questions
Answer each service-related question to help support medical necessity and enter comments as appropriate.
Attachments
Select the 'Choose File' button to attach ALL supporting documentation. Attachments must be in PDF format and no larger than 40 MB each. The total for all attachments can't exceed 150 MB.
If you're ready to send the request, click 'Submit'.
The eSignature box will display. Before you select 'OK' (to sign and acknowledge that you're authorized to submit the information), verify that the displayed information and attachment(s) are correct.
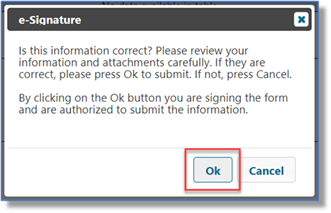
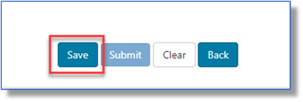
If you need additional time, click 'Save'.
A confirmation message will display.
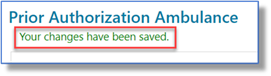
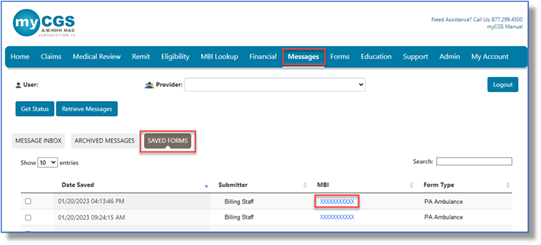
To access a saved form, go to your 'Messages' tab and select 'Saved Forms'. Select the form you want to load and update.
Prior Authorization: WISeR
Ohio Part A & Part B users can access this form. Use the PA WISeR form to request prior authorization for items or services subject to the Wasteful and Inappropriate Service Reduction (WISeR) Model.
NOTE: Facility information auto-populates based on the user ID used to log in and can't be edited. You must log in with an ASC account to submit a prior authorization request for services provided in an ASC setting. If you don't have access to an ASC account, please fax your request.
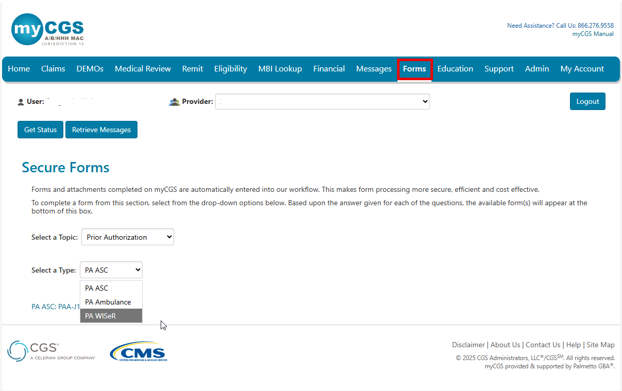
- Select 'Forms'.
- Select 'Prior Authorization' from the 'Select a Topic' drop-down menu.
- Select 'PA WISeR' from the 'Select a Type' drop-down menu.
- Click the link to open the form.
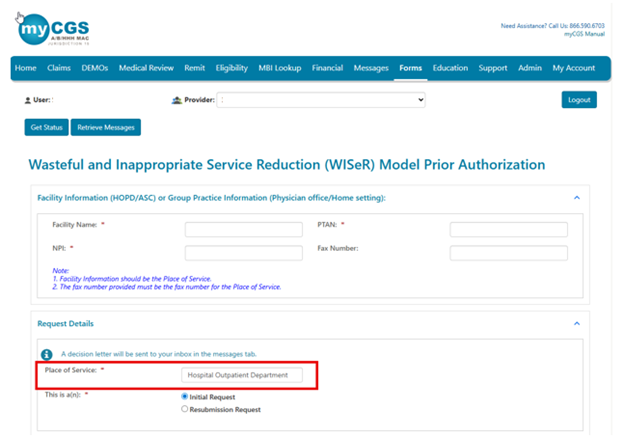
Facility or Group Practice Information
This section describes the place of service (i.e., where you plan to provide the WISeR items or services). Report the following:
- Facility Name
- PTAN
- NPI
- Fax Number (optional; report the place of service fax number only)
Request Details
Select the appropriate 'Place of Service' option:
- Part A users: Hospital Outpatient Department (only option)
- Part B users:
- Ambulatory Surgical Center
- Physician Office
- Home Setting
Select the appropriate request type:
- Initial Request (first request for this beneficiary and date of service)
- Resubmission Request (subsequent request after receiving a non-affirmation decision)
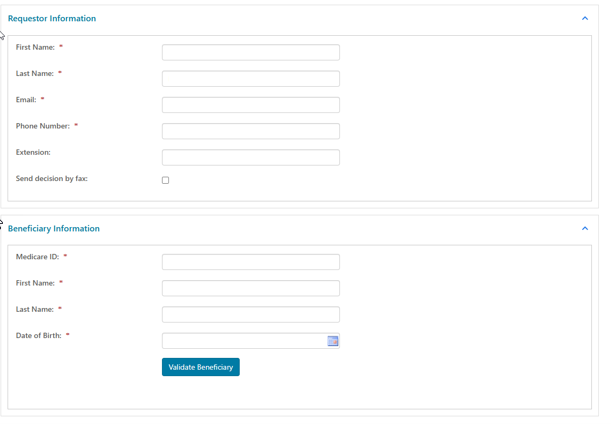
Requestor Information
This section describes the person who should receive the prior authorization decision. Report the following:
- First Name
- Last Name
- Phone Number
- Extension (if applicable)
- Send decision by fax (check box, if applicable)
Beneficiary Information
This section describes the patient who will receive the items or services. Report the following (as it appears on the current Medicare card):
- Medicare ID
- First Name
- Last Name
- Date of Birth
You may use the 'Validate Beneficiary' button to verify that the information you enter matches the eligibility file.
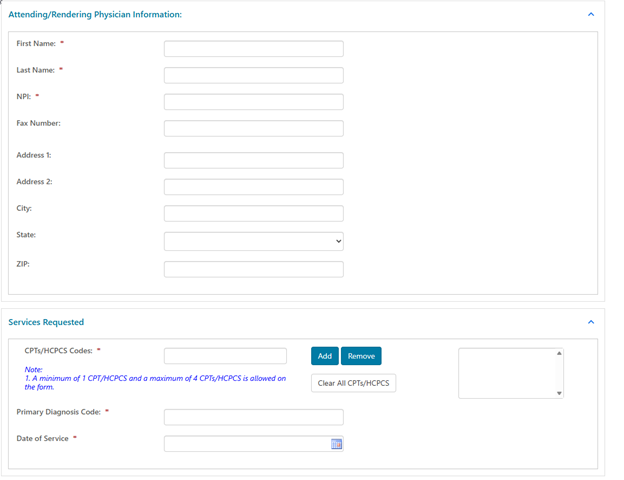
Attending/Rendering Physician Information
This section describes the physician who will provide the item or service. Report the following:
- First Name
- Last Name
- NPI
- Fax Number (optional; the prior authorization decision will be faxed to this number)
- Address (optional; the prior authorization decision will be mailed to this address)
Services Requested
This section describes the WISeR items or services for which you're requesting prior authorization. Report the following:
- CPT/HCPCS Codes
- Key 1 CPT/HCPCS code; click 'Add'.
- You may add up to 4 codes.
- Primary Diagnosis Code
- Date of Service

Attachments
You must attach at least 1 PDF document (up to 40 MB). The total size for all attachments can't exceed 150 MB.
Select 'Choose File'. Follow the prompts to locate and attach your document(s).
Submit
When ready, click 'Submit'.
The e-Signature box will display. First, review to ensure all required fields and attachment(s) are complete and correct.
- If satisfied, select 'Ok'.
- If not, select 'Cancel' to make any corrections to the form or attachment(s).
If you don't have access to an ASC account, you will receive the message below, Please fax your request.
Messages
Go to 'Messages' to view the following notifications in your Message Inbox:
- After you submit the form, myCGS will deliver a message with your request details (confirmation).
- Once Innovaccer completes the review, you'll receive a decision letter.
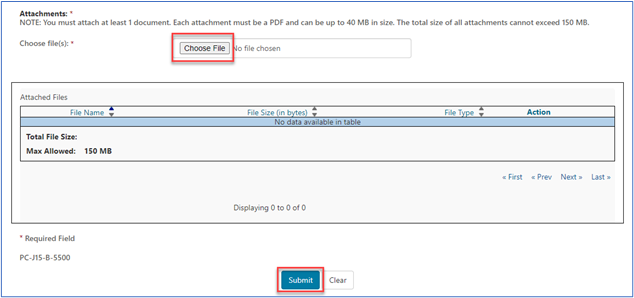
Attachments Section
Most of the forms in myCGS give you the option to attach additional documentation (e.g., medical records, operative/radiology reports, attestations) you would like CGS to consider when processing your request. You may attach up to 10 documents. Each document must be in a PDF format and can be up to 40MB each. The total size of all attachments cannot exceed 150MB in size.
To add an attachment, select the “Choose File” button, and a window will open allowing you to locate the PDF document you wish to add. Select the PDF document to attach it. Repeat this process for each additional PDF document you wish to attach.
Submitting a Form
Once all required information has been entered, and all necessary PDF documents have been attached, click "Submit."
An e-signature box will appear, asking you to verify that the information entered and documents attached are correct. This ensures the signature requirement for all forms have been met.
If the information was entered correctly, and all desired attachments were included, click "OK" to submit the form and all attachments.
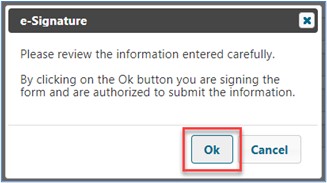
If any information needs to be corrected, or if any attachments need to be added or deleted, click "Cancel" to return to the form.
Checking Status
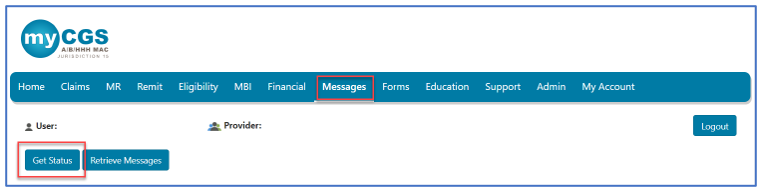
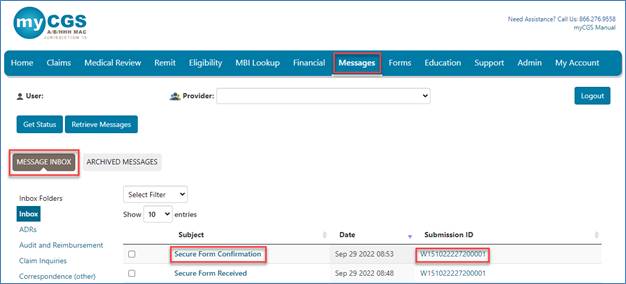
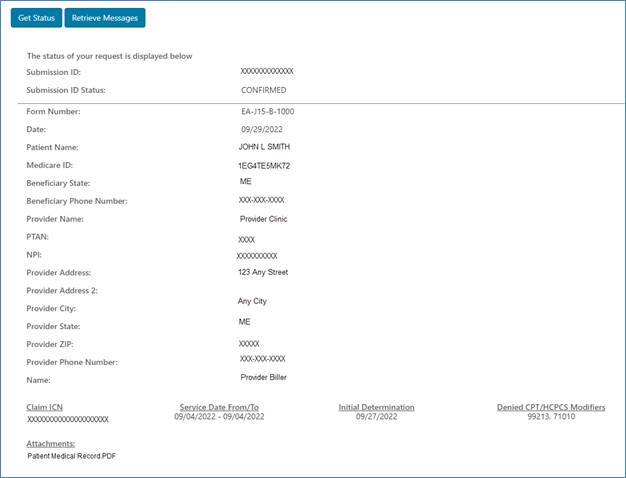
All users may check the status of a form submitted through myCGS from the "Get Status" button.
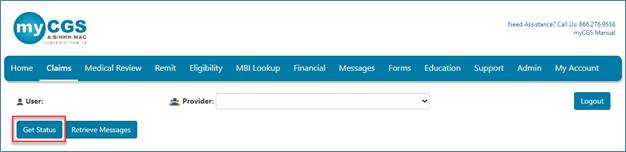
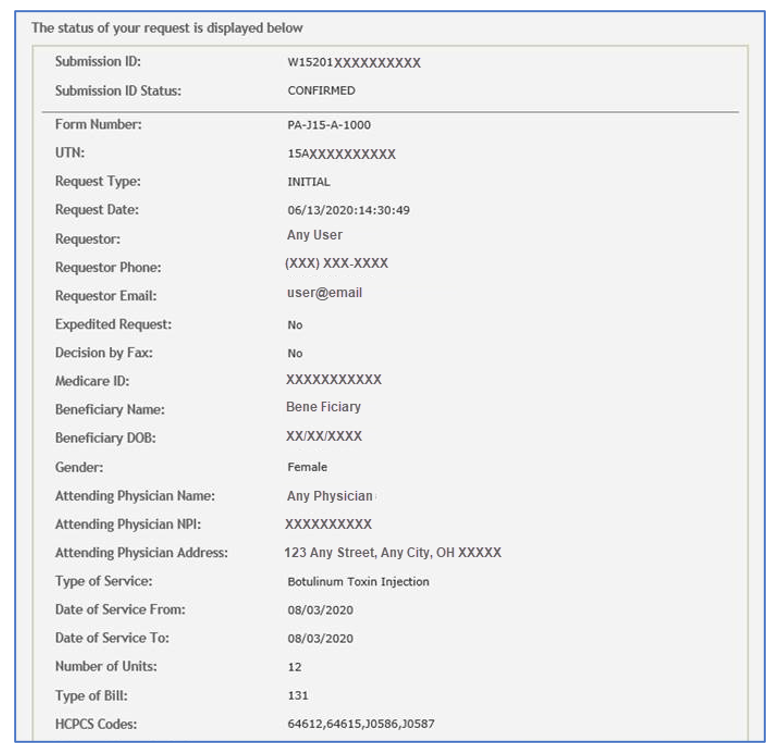
Enter the Submission ID assigned to the form for a general status. The status page will show the status of the request in addition to the details submitted on the form.
Users may also obtain a status on a request by clicking on the Submission ID located in the confirmation received in your Messages inbox. myCGS will display a general status.
This is an example of the status for a Redetermination:
 Join Electronic Mailing List
 Print
Print Bookmark
 Email
Email Facebook
 YouTube
 LinkedIn