

myCGS User Manual

As the Provider Administrator of your organization/office, you have a very important role. You will be able to perform functions that Provider Users cannot. Provider Administrators are responsible for managing all access and ensuring only authorized individuals have access to the sensitive information available through myCGS.
The Provider Administrator's role involves adding and deleting users, assigning additional Provider Administrators, authorizing access to functions, unlocking accounts, and recertifying user access.
NOTE: CGS suggests there be at least two Provider Administrators established for each PTAN/NPI combination to be responsible for maintaining portal access for the office/organization.
The "Admin" Tab
Only Provider Administrators have access to the "Admin" tab, which is in the header of myCGS.

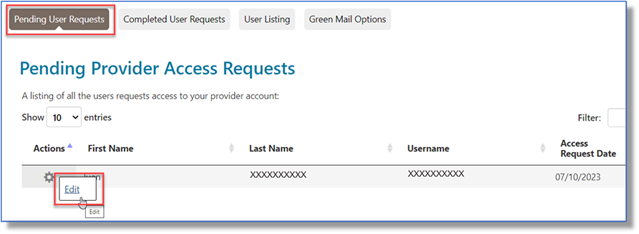
Pending User Requests
All myCGS users can send requests to access provider accounts. These requests also include the tabs and/or permissions users would like to have. Provider Administrators receive these requests and can either approve or decline them.
When the Provider Administrator selects the Admin tab, the page defaults to the Pending User Requests sub-tab. The Admin clicks on the gear icon and selects "Edit" to view the request.
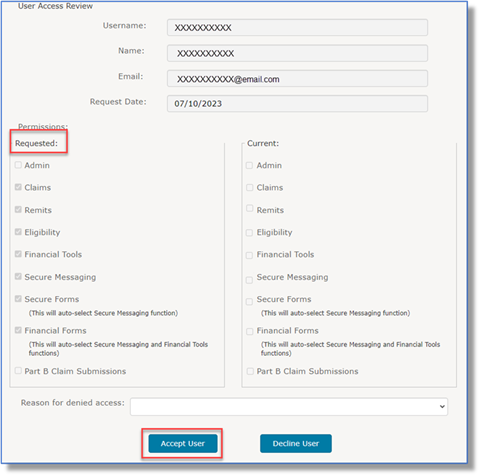
From the User Access Review page, the Admin reviews the request to see what the user has requested. If approved, the Admin clicks the "Accept User" button.
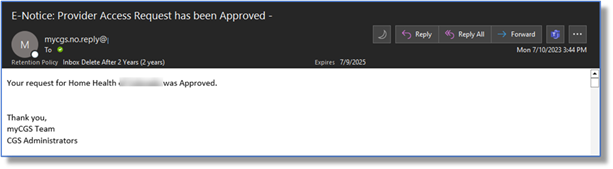
Once the User's request is accepted, a confirmation email is sent.
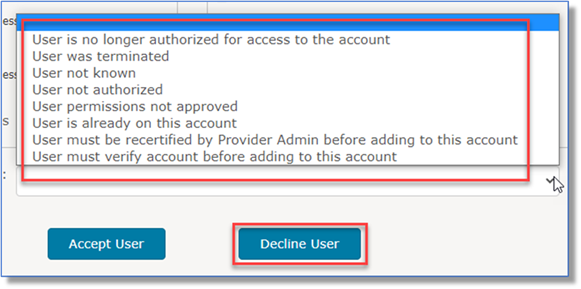
To disapprove the request, the Admin selects the reason from the "Reason for denied access" drop-down, then clicks the "Decline User" button.
Completed User Requests
When a decision is made on a pending request, the user’s information will eventually move to the Completed User Requests sub-tab.
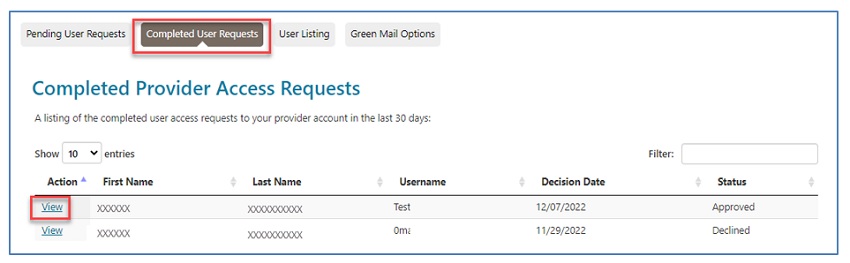
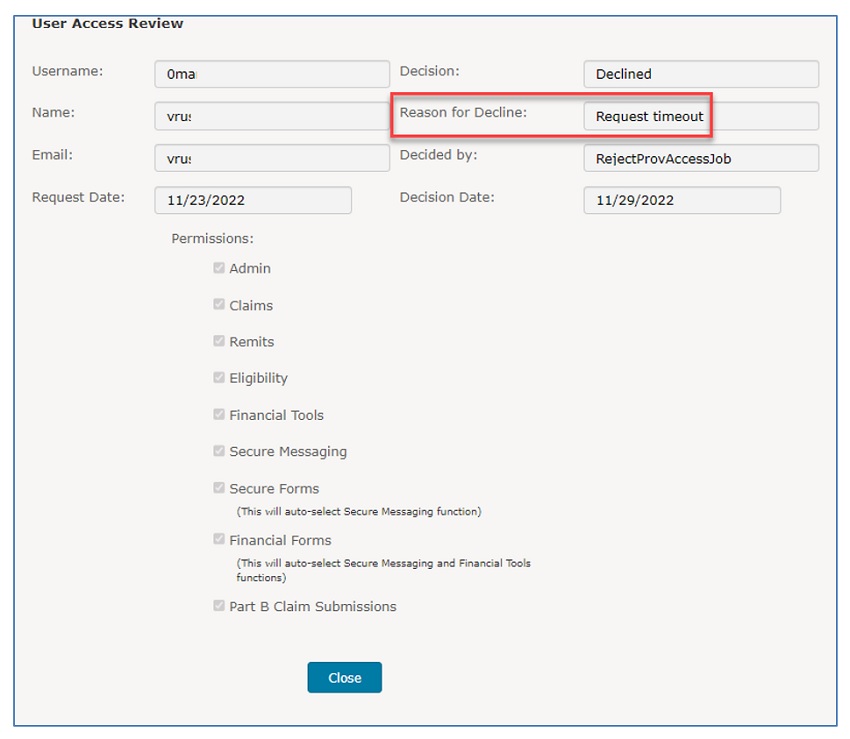
Click the “View” link to review the request and your decision. If declined, you can also see the reason you made that decision.
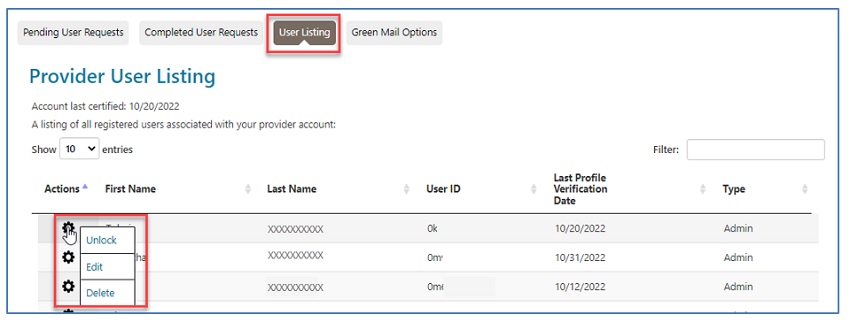
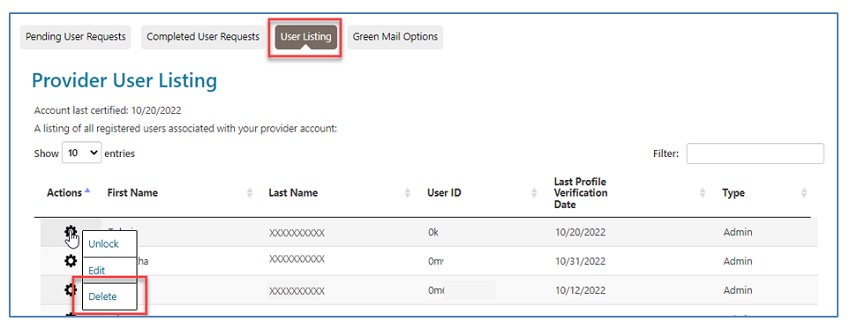
User Listing
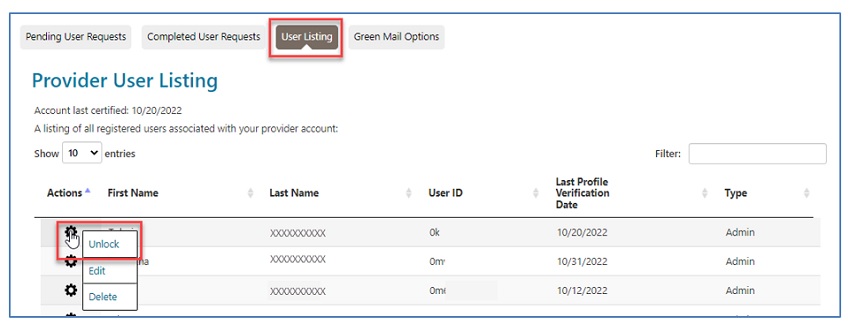
The Provider User Listing page lists all Admins and Users registered under the PTAN/NPI. From this sub-tab the Admin can unlock IDs, edit user permissions, send temporary passwords to users, and delete users.
Unlocking Accounts
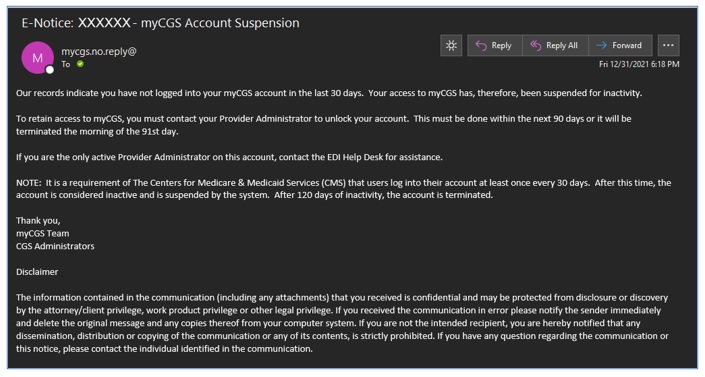
All myCGS users (Provider Administrators and Provider Users) are required to log into myCGS at least once every 30 days. Inactivity results in the ID being disabled. (If the inactivity continues, the ID will eventually be terminated.) Users will receive an e-mail informing them if their account is disabled.
Also, myCGS IDs will be locked upon three unsuccessful login attempts within a 120-minute time span.
Provider Administrators are responsible for unlocking accounts disabled for these reasons.
To unlock an account:
- From the User Listing sub-tab, locate the user who has been locked out.
- You may use the "Filter" field to enter the user's name or ID.
- Once you find the user, click on the gear icon located under the "Actions" column.
- Select "Unlock" to re-establish the user's access to myCGS.
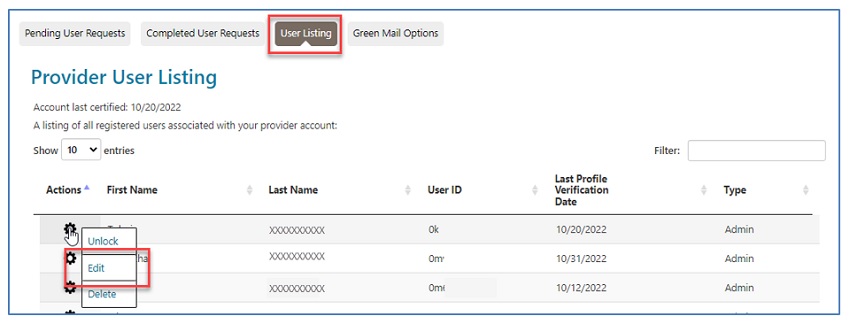
Modifying User Accounts
If a user’s role has changed and you need to allow or remove permissions for performing certain myCGS functions, as Provider Administrator, you may modify user accounts.
To edit an account:
- Locate the user on the User Listing. Under the “Actions”column, click on the gear icon in front of the user’s name.
- Select "Edit"to view the user's account.
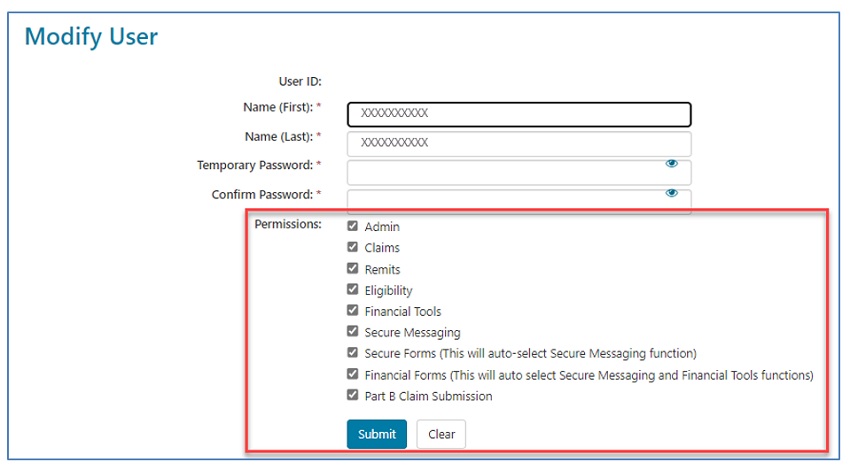
- The user information will display on the Modify User screen. Check and/or uncheck boxes next to each myCGS function listed under the Permissions section. Click “Submit” to save changes.
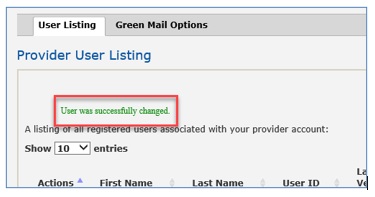
- Once done, a message confirming the change will display at the top of the Provider User Listing page.
Deleting a User
The Provider Administrator is responsible for managing myCGS access for the entire office/organization. This includes deleting users who no longer need access to the portal
- Locate the user on the Provider User Listing. Under the “Actions” column, click on the gear icon in front of the user’s name.
- Select "Delete" to remove the user.
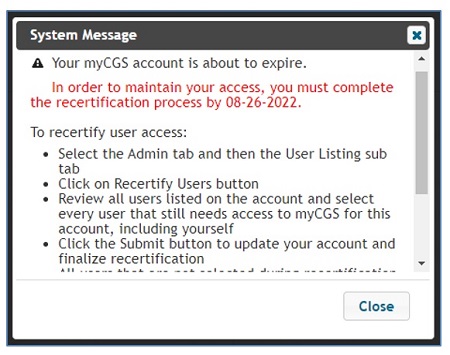
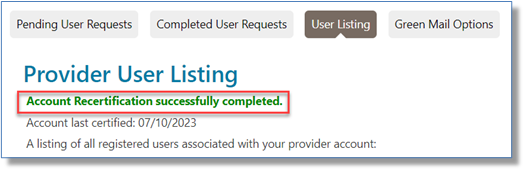
Account Recertification
To ensure all myCGS users are compliant with updated Centers for Medicare & Medicaid Services (CMS) security requirements, account recertification is required to be completed by the Provider Administrator. This task must be completed every 360 days.
Notification pop-up messages will display upon login within 47 days of the date recertification is due.
Also, email notification will be sent to you starting day 20 of the date recertification is due.
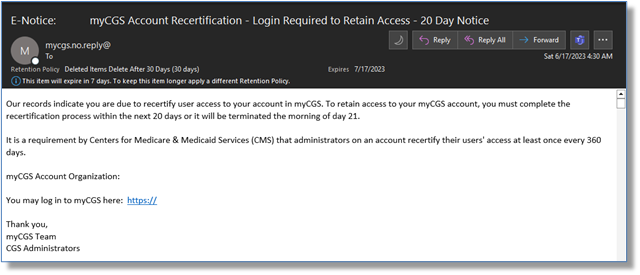
Failure to complete the process timely will result in an interruption of service, including deactivation. The user cannot access myCGS until the recertification is completed.
This process applies to the Provider Administrator as well.
To recertify an account:
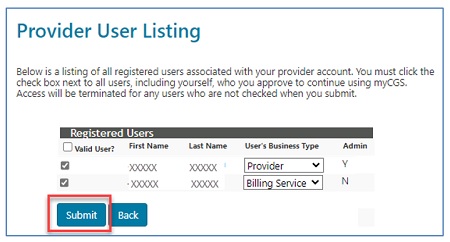
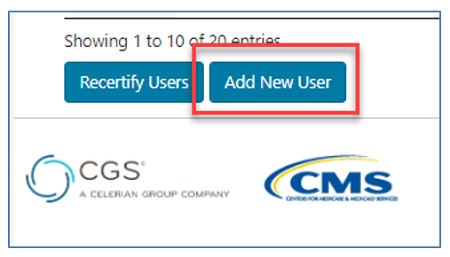
- From the User Listing sub-tab, scroll to the bottom of the page and select the “Recertify Users” button.
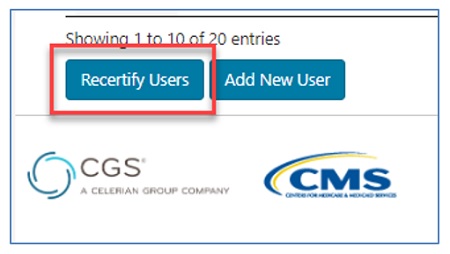
- The Registered Users list will display. Check the box of the user(s) you are recertifying. Multiple users may be selected if necessary. Once selected, click "Submit." Note that those not selected will be terminated.
- A message will display, asking you to verify you are recertifying the selected users.
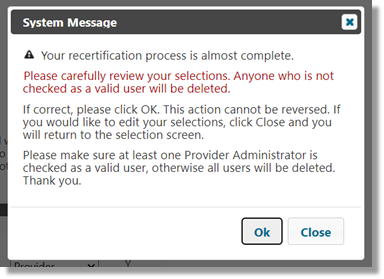
- Once confirmed by clicking "OK," a message will display.
- Before gaining access to myCGS, the user may have to review the Terms and Conditions and, if in agreement, check the box and click "Submit."
NOTE: These steps also apply if the Provider Administrator is recertifying his/her own access to myCGS.
Adding New Users
New users may send requests to be added to an account. (Refer to the My Account section under myProviders for more information.) Provider Administrators may also add new users to the account. Each user must have a unique User ID and password. The User ID must be created with the user’s actual first and last name. Generic first and last names are not permitted. User IDs and passwords should never be shared.
Examples of unacceptable user names:
- Front Desk
- Account Coordinator
- Billing Department
To add a new user:
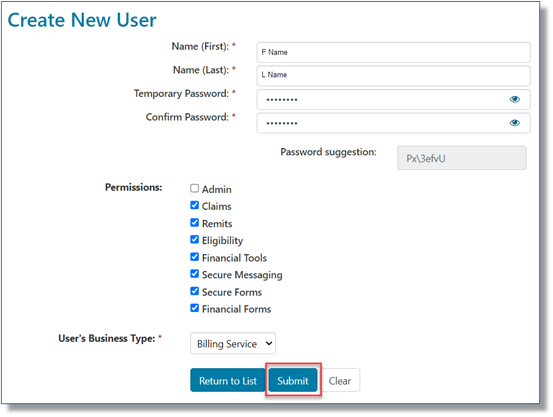
- Scroll to the bottom on the page and select the "Add New User" button.
- Complete the Create New User form.
- Enter the user's FIRST and LAST name.
- Create and enter a temporary password for the new user. Then confirm the temporary password.
- Under the Permissions section, identify the tabs/functions you, as the Provider Administrator, want the new user to access. Selecting the "Admin" box allows the user to have full Provider Administrator access under the account.
- Identify the new user's business type: provider, billing service, or clearinghouse.
- Verify information entered is correct. Click the "Submit"button.
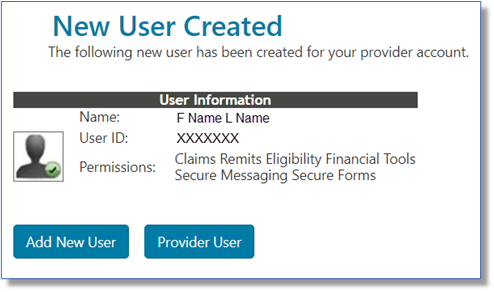
- The user information will display on the "New User Created" screen to share with the new user. Also, share the temporary password you created. The new user will be prompted to change the password during the registration process.
Green Mail
myCGS allows Provider Administrators to select the Green Mail option, which is a function that allows myCGS users IMMEDIATE access to correspondence sent from CGS.
This includes:
- Additional Documentation Requests (ADRs) for medical records and other documentation (pre- and post-pay)
- Requests for information to complete processing of pending claims
- Unfavorable and partially favorable decisions on redeterminations
- Reopening correction letter
- Claim dismissal letters
- Letters identifying changes to beneficiary records
- And MANY more!
Notification is delivered to the myCGS Messages tab of users registered under a specific PTAN/NPI combination. To ensure you receive the notification, users are also sent an email to the registered email address, informing them that notification has been delivered to the myCGS inbox.
Effective November 3, 2025, all providers with an active myCGS account (NPI/PTAN combination) will:
- Receive Green Mail only through their myCGS portal.
- No longer receive U.S. Mail when the same communication is already available via Green Mail.
- For more information, please refer to the official CGS announcement.
 Join Electronic Mailing List
 Print
Print Bookmark
 Email
Email Facebook
 YouTube
 LinkedIn