
From the "Claims" tab of myCGS, you will be able to perform the following:
- Check the status of your provider's Medicare claims
- View the details of each claim, including Current Procedural Terminology (CPT)/Healthcare Common Procedure Coding System (HCPCS) codes, allowed and paid amounts, and reason/remark Codes
- Submit other requests (depending on the status of the claim), including redeterminations, Part B reopenings, and general inquiries, and respond to pending requests for additional documentation
Claim Status
To access claim information:
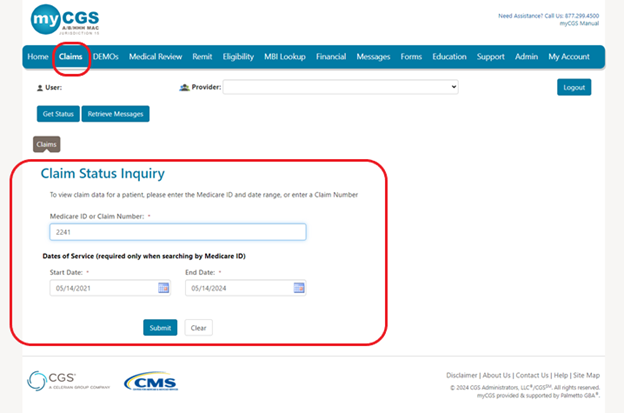
- Select the "Claims"tab. The "Claim Status Inquiry" page will display.
- You can now enter either the MBI or Internal/Document Control Number (ICN/DCN) in the field.
- The date of service will be pre-populated with the last three years and is editable. Enter a date of service in the MM/DD/CCYY format or select the calendar icon
 to select the date.
 - Please note, there will be times when the original ICN/DCN of the claim will not display. An example of this is when the claim has been adjusted, in which case the adjustment number will display instead. Please search using the MBI option.
NOTE: Retrieving claims information older than 6 months may take additional time. In addition, offline claims will not be displayed. Many claims are offline after 3 years, sometimes earlier.
- The date of service will be pre-populated with the last three years and is editable. Enter a date of service in the MM/DD/CCYY format or select the calendar icon
- Click Submit.

Claims that are paid, in process, returned or denied are displayed. Information is retrieved from CMS standard systems and is as current as the standard systems. Claims that are offline or returned without processing will not appear. Nor will the original ICN/DCN of claims that have been adjusted.

If finalized, information specific to the claim will display such as ICN/DCN, duplicate DCN (if applicable for A/HHH claims), date of service, billed amount, co-insurance amount, date processed, check number, amount paid, reason code (A/HHH), and general status.
Duplicate/Overlap Claims
For Part A and HHH claims, if a different claim caused a duplicate or overlap situation, the DCN of that claim will display. This allows you to do the research you need to do to resolve the situation.
Detailed Claims Status Information
The header of the "Detailed Claim Status Information" page provides information specific to the claim. You will also see a letter icon in the "ADR Letter" field if the claim is pending response to a request for additional documentation.

Part A and HHH claims will also display an appeals window, giving you access to appeal actions taken on claims. Not only will the status of the 1st level of the appeal (Redetermination) display, but also links to the decision letter and, if applicable, a link to request a 2nd level appeal (Reconsideration). Refer to the Appeals section of this user manual for additional information.

The line item details are displayed next, which includes:
- HCPCS/CPT codes
- Service dates
- Billed and allowed amounts
- Non-covered charges
- CARC and RARC codes on completed claims only (if available).
- Links will allow you to view the definition of CARC/RARC codes.

- Links will allow you to view the definition of CARC/RARC codes.
The Detailed Claim Status Information page for Part B users will not display the co-insurance information in the header, but on each detail line instead.

Depending upon the status of the claim, the date of service and/or the date the claim was processed, you may perform a number of functions directly from the status page:

- Submit Documents: Select this option if the claim is pending due to a request for additional documentation from either our Claims or Medical Review departments.
- This allows you to attach documentation and respond to the request directly through myCGS.
- Accessing the ADR form from the Claims for Medical Review tabs will ensure the form is correctly auto-populated with the details needed to process your response.
- Refer to the Medical Review section of this user manual for help navigating the ADR form.
NOTE: When claims are pending due to an ADR, do not use the 'Ask a Question' button, as it will not route the documentation you attach to the pending claim.
- This allows you to attach documentation and respond to the request directly through myCGS.
- Request Reopening (Part B): This option allows you to submit a request for a simple correction to a Part B claim that has been processed.
- There are various types of Part B Reopenings. Refer to the Forms/Reopenings (Part B) section of this user manual for help with navigation.
- Request Redetermination: This option allows you to submit a first-level appeal directly through the portal and include any documentation you have to support your case.
- Refer to the Appeals section of this user manual for help with navigation.
- Request Remittance: Select this option to review and/or print a copy of a remittance advice.
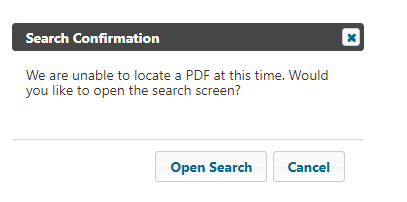
- When clicking the Remit button from the claims detail page, if there is a single remit associated with the claim, then the remit will automatically open. If associated with several remits, a popup will ask the user if they would like to open the Remit Search Screen
- Refer to the Remittance section of this user manual for navigation assistance.
- When clicking the Remit button from the claims detail page, if there is a single remit associated with the claim, then the remit will automatically open. If associated with several remits, a popup will ask the user if they would like to open the Remit Search Screen
- Check Patient Eligibility: Selecting this option will open the “Eligibility” tab, allowing you to view details specific to the patient, including status, deductible, preventive services, secondary status, and Medicare Advantage (MA) Plan enrollment.
- Refer to the Eligibility section of this user manual for additional information.
- Ask a Question: This option will allow you to submit a general question regarding the claim. Status Inquiries are not to be submitted for "Ask a Question."
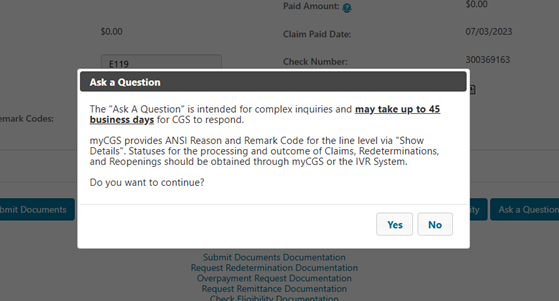
Please remember “Ask a Question” is not used for claim status inquires, but only for complex inquiries and may take up to 45 business days for a response.
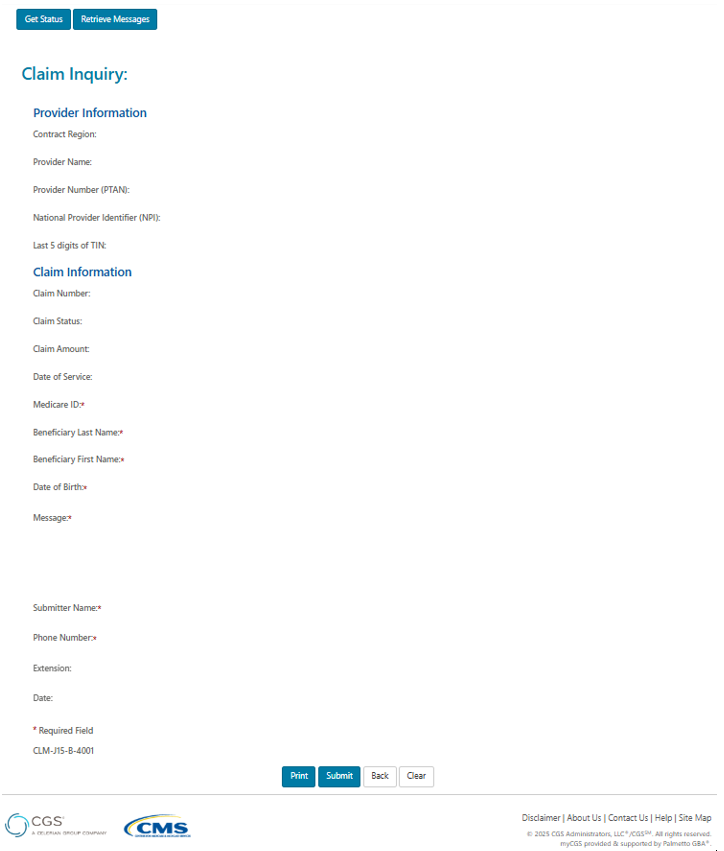
After selecting Yes, please complete all the fields and place your complex inquiry in the message field. Then click submit.
- Overpayment Request: Select this option if the claim was billed in error and you need an overpayment letter generated to request the funds be returned.
- 56900 Reopening (A/HHH Claims Only): For Part A, Home Health, and Hospice claims, users may submit a 56900 Reopening when a claim has denied for non-response to an ADR (reason code 56900). When this situation is present (after 45 days but within 120 days), the option to submit the request will display on the List of Claims page and at the very bottom of the Detailed Claim Status Information page.

For your convenience, when you select one of the functions noted above, you will be routed to the applicable online form. Most of the required fields on the form will auto-populate with information from the claim and specific to your User ID.
NOTE: Options above that are not available for the claim displayed will be grayed out. Grayed options could also indicate you do not have authorization to perform that function. Check with your Provider Administrator for access.
You may also click "Back" to return to the claim list.
Part A and HHH Cancel Claim and Cancel Line
You are now able to fully cancel or cancel a line on your Part A and Home Health and Hospice claims that you have submitted to CGS for processing.
To cancel a claim or a line on your submitted claim you will access Claims Tab and complete a “Claims Status Inquiry” with either the Medicare ID or Claim Number and click “Submit” as in the example below:
You will get a list of claims submitted for that Medicare ID or the Claim Number will display the claim as below:
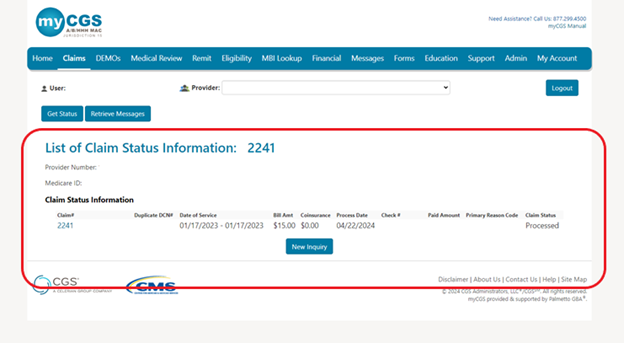
Now click on the “Claim #” in blue to be taken to the “Claim Status Information” screen and then you will click on the “Cancel Claim” button at the bottom of your screen as seen below:
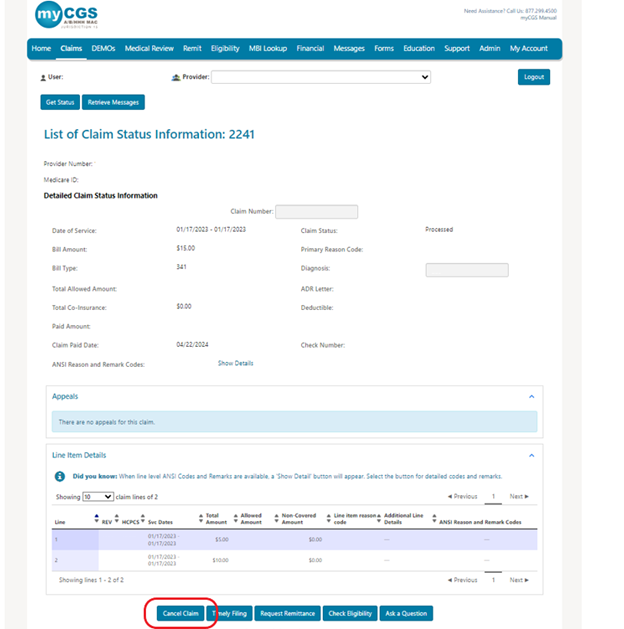
Clicking the “Cancel Claim” button will take you to the Cancel Claim/Line screen where your provider information will auto populate except for the “Provider Phone Number”.
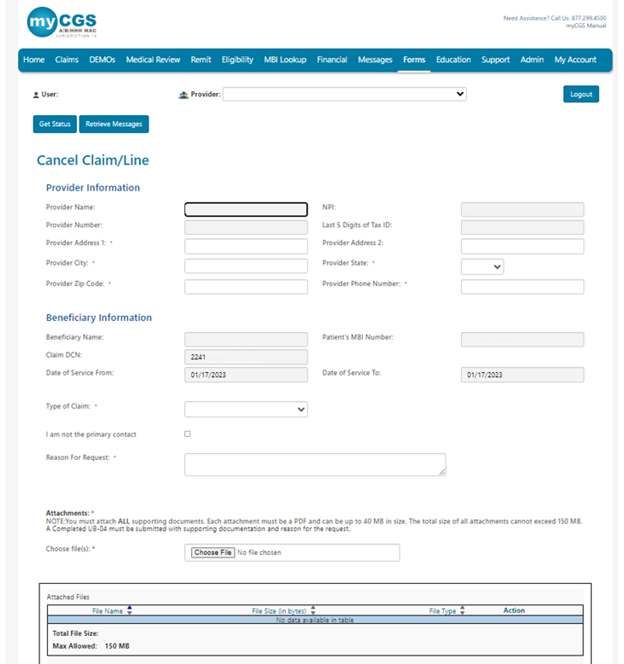
- You will need to key in your “Provider Phone Number” as this the contact number you may want us to reach out if necessary.

- Choose Type of Claim drop down
- Cancel Medically Denied Claim – choose this to fully cancel a claim
- Cancel Medically Denied Line – choose this to cancel a certain line on a claim or multiple lines on a claim

- If need to cancel a line on a claim you will enter the Claim Line here and click add. You can enter multiple claim lines if you need to cancel multiple lines on a claim by entering in the number and

- If you selected the wrong claim line you can select the trash can to remove and re add the correct line.

- If you are not the final contact that will handle any questions, please check the
 box and enter in the following:
- Primary Contact Name
- Primary Contact Phone Number
- Please key in the Reason for Request
- Up to 100 characters can be submitted

- Up to 100 characters can be submitted
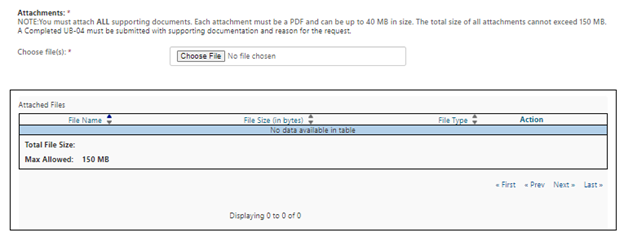
- Attachments:
NOTE: You must attach ALL supporting documents. Each attachment must be a PDF and can be up to 40 MB in size. The total size of all attachments cannot exceed 150 MB. A Completed UB-04 must be submitted with supporting documentation and reason for the request.
- Choose File
- Attached file can be viewed under Attached files.
- Now you will click submit at the bottom of the screen and will get a pop up like this:
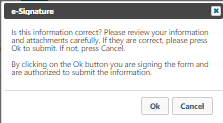
- Click okay and you have successfully submitted a Cancel Claim or Cancel Line request.
- If fields are missing fields, you will get message “Please review data entered”

- Once you have corrected any missing data you will click “Submit” again and click “Ok” on this pop up
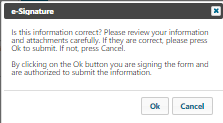
- You will receive a notice under the Messages tab that you have submitted a Cancel Claim or Cancel Line request.
Part A and HHH Timely Filing and Medicare Secondary Payor Reopening Request
You are now able to submit a Timely Filing or MSP Reopening request on claims that you have submitted to CGS for processing.
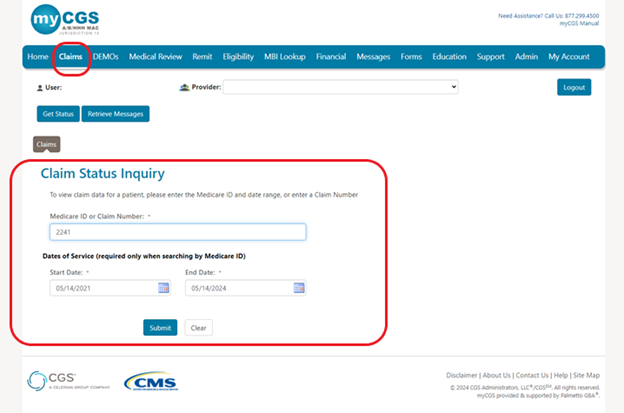
To submit a Timely Filing or MSP Reopening on your submitted claim you will access Claims Tab and complete a “Claims Status Inquiry” with either the Medicare ID or Claim Number and click “Submit” as in the example below:
You will get a list of claims submitted for that Medicare ID or the Claim Number will display the claim as below:
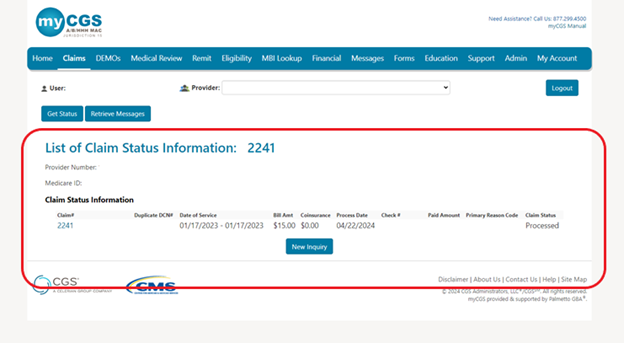
NOTE: The Timely Filing/MSP button will only be available if you selected a claim with the following reason codes: 34XXX for Medicare Secondary Payor Reopening Request and 39011 for Timely Filing. If the claim qualifies and you select the Timely Filing/MSP button it will auto populate the info needed to submit the request.
Now click on the “Claim #” in blue to be taken to the “Claim Status Information” screen and then you will click on the “Timely Filing/MSP” button at the bottom of your screen as seen below:
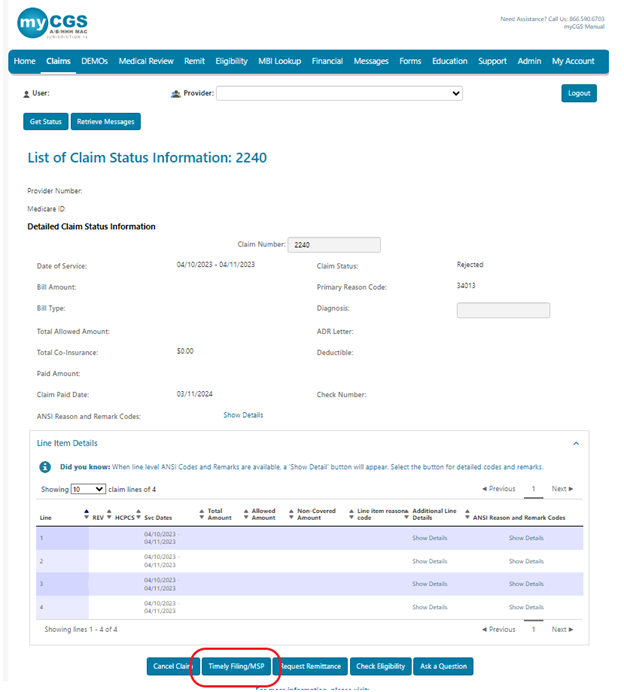
Clicking the “Timely Filing/MSP” button will take you to the Timely Filing/MSP screen where your provider information will auto populate except for the “Provider Phone Number” screen.
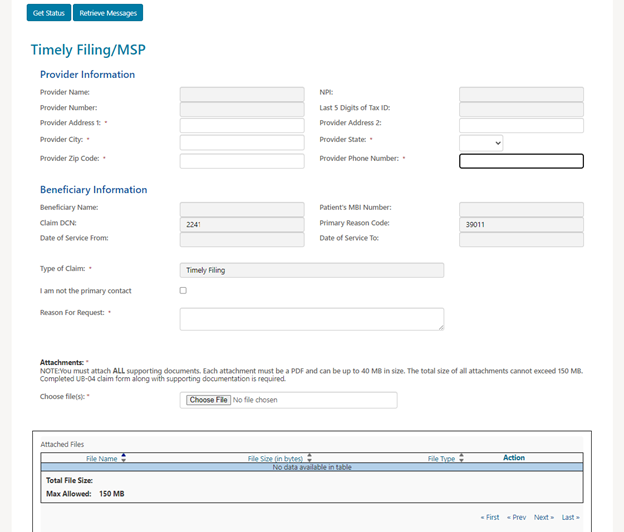
- You will need to key in your “Provider Phone Number” as this the contact number you may want us to reach out if necessary.

- If you are not the final contact that will handle any questions, please check the
 box and enter in the following:
- Primary Contact Name
- Primary Contact Phone Number
- If you are the final contact do not check this box.
- Please key in the Reason for Request
- Up to 100 characters can be submitted

- Up to 100 characters can be submitted
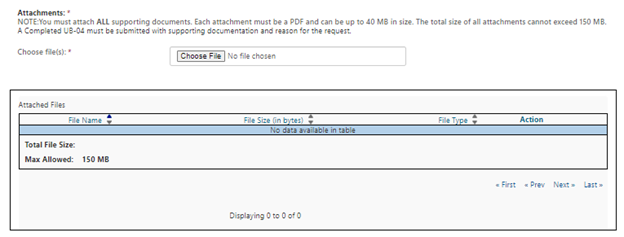
- Attachments:
NOTE: You must attach ALL supporting documents. Each attachment must be a PDF and can be up to 40 MB in size. The total size of all attachments cannot exceed 150 MB. A Completed UB-04 must be submitted with supporting documentation and reason for the request.
- Choose File
- Attached file can be viewed under Attached files.
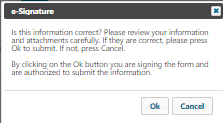
- Now you will click submit at the bottom of the screen and will get a pop up like this:
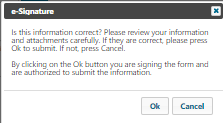
- Click okay and you have successfully submitted a Timely Filing or MSP request.
- If fields are missing fields, you will get message “Please review data entered”
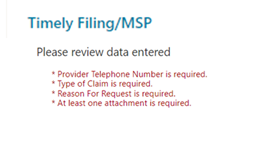
- Once you have corrected any missing data you will click “Submit” again and click “Ok” on this pop up
- You will receive a notice under the Messages tab that you have submitted a Medicare Secondary Payor Reopening or Time Filing request.
Part A Claims Practice Addresses
Part A Outpatient Prospective Payment System (OPPS) hospital providers can confirm that the practice addresses submitted on claims are an exact match to the Provider Enrollment, Chain, and Ownership System (PECOS) to help avoid/correct any Return to Provider (RTP) claims. This function is provided to ensure compliance with Change Requests (CRs) 9613 and 9907.
Once this process is implemented, CMS will direct A/B MACs to permanently turn on two system edits to enforce the requirements in the CMS Medicare Claims Processing Manual (Pub. 100-04), chapter 1, section 170:
- Reason Code 34977 (claim service facility address doesn't match provider practice file address)
- Reason Code 34978 (off-campus provider claim line that contains a HCPCS must have a HCPCS modifier PN or PO)

To access the practice addresses associated with your Part A account:
- Select the "Claims" tab.
- Select the "Practice Addresses" sub-tab.
A list of addresses associated with your NPI and PTAN will display as they appear in PECOS. Ensure the service location address reported on your claim is an exact match.
NOTE:The practice addresses information is updated on a weekly basis. Please allow up to 10 business days after you receive confirmation for a new/revised practice location address to become available in myCGS.
Part B Claims Submission
Part B users have access to the electronic claim submission feature by selecting the "Claim Submission" sub-tab. If the "Claim Submission" sub-tab is not displaying, the user is either not registered as or using a Part B account or may not have access to this feature. Check with your Provider Administrator for assistance.
As you enter data, this intuitive form will display the specific fields needed to submit your electronic claim according to ANSI 5010 requirements. Be sure to have all information needed to complete an electronic claim or the CMS-1500 claim form readily available. Refer to the CMS-1500 Claim Form/ANSI 5010 Crosswalk![]() for help identifying specific fields.
for help identifying specific fields.
- Select the "Claims" tab to find the "Claim Submission" sub-tab.
NOTE: As you complete the claim form, if you enter information that is incorrect and want to clear the form, simply click the "Claim Submission" sub-tab again or the "Clear" button located at the very bottom of the form and start over.
- Identify whether Medicare is the primary or secondary payer for the claim being submitted. When "Primary" is selected, identify whether the patient has a Medigap policy or is signed up to have claims crossed over to other plans.

The form has various sections to complete. After completion, each section may be collapsed by clicking on the carrot.
Billing Provider Information Section
- Identify whether your provider is an organizationor a solo practice.
- When "Organization" is selected, the rendering provider is identified in the "Line Items"section of the claim.
- When "Solo Practice" is selected, fields for the provider's name are displayed.
- Entities such as ambulance suppliers need to select "Solo Practice" and enter the organization name.
- Enter the contact name and phone number of someone we can call if we have questions about the claim.
- Enter the provider's physical address, including ZIP code + 4. No P.O. Boxes are accepted.
- Identify whether a Social Security Number or Employer ID is used and enter the Federal Tax ID Number.
- Complete the "Provider Signature" field.
- Identify whether you accept assignment on the claim.

Patient Information Section
- Enter the patient's Medicare Beneficiary Identifier (MBI), name, account number (if you have one assigned to the patient), date of birth, sex, and complete address.
- Select the patient's relationship to the insured.
- Identify whether the patient's condition is related to employment or an accident.
- Complete the "Patient Signature" and authorization fields.

Insured Information Section
When "Medigap/Crossover Claim" is selected at the very top of the claim the "Insured Information" section display. Complete this section with details of the other plan.

Miscellaneous Claim Information Section
- Identify a referring provider when applicable to the service billed.
- There are fields in this section for various types of services. This includes fields for:
- CLIA number (lab)
- IDE number (clinical trials)
- NPI of home health agencies (care plan oversight)
- Facility information
- Homebound and hospice provider indicators
- Dates care was assumed/relinquished (split post-op care)

Diagnosis Information Section
At least one (primary) ICD-10 diagnosis code must be entered. Up to 12 diagnoses may be submitted on the claim.

Line Items Section
- Enter the date of service, CPT/HCPCS code, place of service, up to four applicable modifiers, and a description of the service (if necessary).
- Identify the diagnosis based on the position in which the ICD-10 code was entered in the "Diagnosis Information"section (above).
- Enter the number of units.
- Enter the charge for the service.

- When "Organization" is selected at the top of the claim, identify the provider who rendered the service.
- If the service was ordered, identify the name and NPI of the ordering physician/practitioner.
- Select the purchased service indicator and other fields if applicable.

- Enter line items one at a time. After completing all applicable fields, click the "Add Line Information" button.
- Verify that all the lines added are correct.
- Select "Edit" to make changes to a claim line. The form will re-populate with claim line information, allowing you to make changes.
- Select "Delete" to remove a claim line.

- Enter the "Patient Amount Paid" ONLY when the patient paid for the service prior to submitting the claim.
- Enter the name of the person authorized to submit the claim on behalf of the provider. This will serve as an electronic signature.

NOTE: The "Total Charges" field is auto-populated based on the claim line charges added to the form.
Specialty/Service Type Line Items
The claim will display all applicable fields depending upon the CPT/HCPCS code and/or place of service entered.
Ambulance

Chiropractic

Screening Mammography

Erythropoietin (EPO)

Drug NOC

Podiatry

Attachments
You may attach files to your claims up to 40MB each. The combined size of all attachments cannot exceed 150MB. The attachments must be in PDF format and created using appropriate PDF creation software. Failure to create the PDF correctly can result in a corrupt file that could prevent you from successfully submitting the claim through myCGS.

Claim Submission Summary
Once you successfully submit the claim and accept the authorization signature message, myCGS will direct you to a "Claim Submission Summary" page that will provide the Transaction ID for this submission. The Transaction ID will serve as a confirmation number for the submission until the claim is accepted into our processing system.

Confirmation Messages
You will receive messages regarding claims submitted through myCGS in your inbox under the "Messages" tab. The first message is the submission confirmation. This message confirms that the form was sent.

A second message will be available once the claim submission is accepted or rejected. This may take 24-48 hours (not including weekends or holidays) to receive. If the submission is accepted, an ICN or DCN (if attachments are submitted) will be provided in the message. (Refer to the Messages section of the user manual for more information.)
NOTE: Receiving an accepted message does not mean that the claim was approved to be paid. Once the claim is processed, the approval or denial information will be noted on the "Detailed Claim Status Information" page or on your remittance advice.
Rejected Claims
Electronic claims must pass front-end edits prior to entering our processing system. myCGS claims are subject to this same editing. Claims submitted through myCGS that fail these edits are rejected. You may access the rejected claim, make the necessary corrections, and release it to be processed.
- Check for rejected claims by selecting the "Rejected Claims"sub-tab.
- Select the "Edit"link located in the last column of the claim line.

- The details of the rejection will display.

- Scroll down to make the corrections needed and click "Submit"to resend the claim.
- This is considered a new submission, so if documentation was attached to the original claim, you must re-attach the same documents to this submission. A new Transaction ID will be assigned to the claim.
NOTE: The CGS Advance Communication Engine (ACE) Smart Edits are also a part of the pre-adjudication process.
Medicare Secondary Payer (MSP) Claim

When "Secondary" is selected at the top of the claim, the form will display a "Patient Relationship to Insured" field and "Insured Information" section located further down.


Under "Miscellaneous Claim Information," additional fields will display. Be sure to identify the Insurance Type Code.

NOTE: Refer to the Eligibility/MSP section of this user manual to locate the Insurance Type.
- Enter line items individually.
- MSP claims will display "Primary Insurance Paid Amount" and "Adjudication or Payment Date" fields.
- Reason/remark codes from the primary insurance explanation of benefits (EOB) are required in the "Line Adjustments" fields.
- Click "Add Line Adjustments" after entering each line item.
- Select "Edit" to make changes or "Delete" to remove line items.

- Under "Secondary Line Items," the date, procedure code, modifier, and units fields will auto-populate based on the data entered above.
- Complete the place of service, diagnosis pointer, charge, and other applicable fields.

- Click "Add Line Information" after entering each line item.
- Select "Edit" to make changes or "Delete" to remove line items.

- Enter the "Patient Amount Paid" ONLY when the patient paid for the service prior to submitting the claim.
- Enter the name of the person authorized to submit the claim on behalf of the provider. This will serve as an electronic signature.
- Also enter the amount paid by the primary insurance.

NOTE: The primary insurance EOB is NOT required. Include any attachments needed to support allowing the service(s) submitted.
Roster Billing
Roster billing was developed as a simplified process allowing providers to develop mass vaccination programs. If properly licensed, individuals and groups conducting mass immunization programs to administer flu, pneumonia, and/or COVID-19 vaccines may submit claims using this simplified format.
Roster bills may be submitted through myCGS.
- Select the "Claims" tab then the "Roster Billing" sub-tab.

In the Claim Information section:
- Select the type of vaccine from the drop-down box
- Select the applicable administration and/or vaccine code from the drop-down boxes
- NOTE: There will be no vaccine code to select for COVID-19
- Enter the date of service in the MM/DD/YYYY format
- Enter the applicable administration and/or vaccine charges
- NOTE: There will be no charge for the COVID-19 vaccine while it is provided for free by the government
- Select the place of service code from the drop-down box
- Mass immunizers must use POS 60

- Mass immunizers must use POS 60
In the Service Facility Information section:
- Enter the complete facility address

In the Rendering Provider Information section:
- Enter the name and National Provider Identifier (NPI) of the rendering practitioner

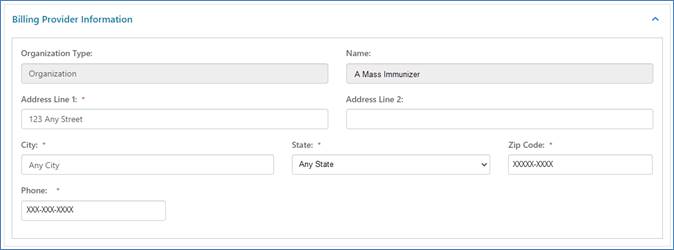
In the Billing Provider Information section:
- Enter the type, name, complete address, and phone number of the billing organization/provider
- Some information may auto-populate based on your myCGS account
To complete the roster, you are required to attach an Excel spreadsheet identifying up to 50 patients who received the same vaccine billed on the claim at the same setting/place of service on the same date of service by the same provider. All of the following must be noted on the spreadsheet:
|
|
|
|
|
|
|
To ensure you capture all required information, we recommend using the Roster Bill Template Worksheet. Select 'Download template' in the Roster Information section.
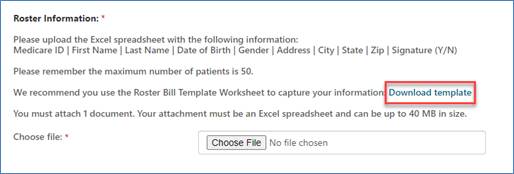
The Roster Bill Template Worksheet will open in Excel for you to complete.
![]()
Select 'Choose File' to attach the completed Excel spreadsheet (up to 40 MB).
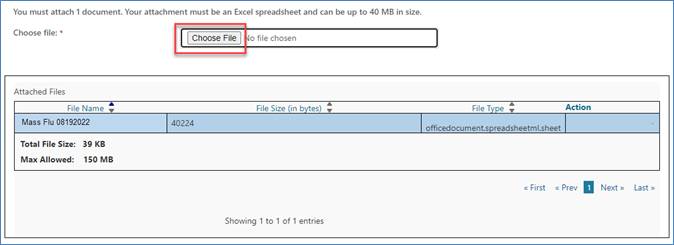
Click "Submit" to send the completed roster bill.
myCGS will default to the "Submitted Roster Bills" sub-tab. Refer here to check the status of roster bills.


 Join Electronic Mailing List
 Print
Print Bookmark
 Email
Email Facebook
 YouTube
 LinkedIn