March 9, 2021 – Updated December 6, 2021
Google Authenticator Provides Instant MFA Codes for myCGS® Users
No more waiting on MFA texts or emails! When myCGS® users have the Google Authenticator app or web browser extension, you can simply enter a 6-digit code, and the MFA process is complete. Watch the video tutorial.
To add Google Authenticator to your myCGS® account, first download the free app on your smart device, or download the web browser extension.
If you are using the Google Authenticator web browser extension, click here for detailed instructions. If you are using the app on your mobile phone, continue reading below. You can effectively install Google Authenticator through either of these options, but not both.
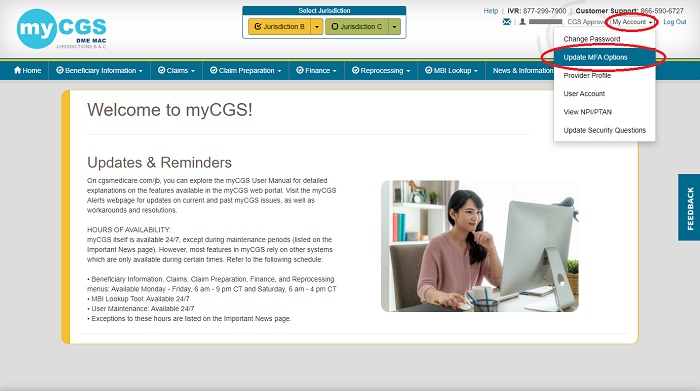
Next, log in to myCGS® and select "Update MFA Options" from the "My Account" menu in the top right corner of your screen.

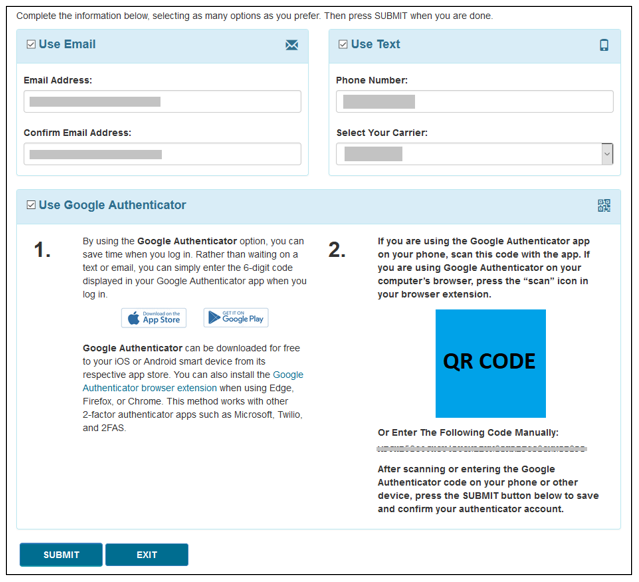
This will take you to the "Set MFA Preferences" screen. Select the checkmark next to "Use Google Authenticator," or press "New Authentication Setup." A QR code will display on screen. Follow the instructions in your Google Authenticator app to scan the QR code, or manually enter the code. After you have successfully added the code to your app or web extension, press SUBMIT.

*NOTE: You must press SUBMIT in myCGS® in order for your account to be saved and linked to your Google Authenticator app.
After pressing SUBMIT, you will be prompted to enter the Google Authenticator code displayed on your mobile app to confirm.
Congrats, you have installed Google Authenticator! The next time you log in to myCGS, you can simply open your Google Authenticator app and enter the MFA code shown without having to wait for an email or text MFA.
You can find additional information in the myCGS User Manual and the myCGS Registration and Account Management Guide. If you have questions about installing Google Authenticator, click on the “FEEDBACK” tab on the right side of your screen, complete the survey, and leave your contact information. We will reach out to you shortly!

