
|
Print |
Bookmark |
Font Size:
+ |
–

Chapter 1 – myCGS Overview
What is myCGS?
The myCGS portal is a web-based application developed by CGS that is available to suppliers of durable medical equipment, prosthetics, orthotics, and supplies (DMEPOS) who serve beneficiaries in Jurisdictions B and C. Using myCGS is a fast and easy way to get Medicare claim and billing information.
myCGS offers suppliers a wide range of functionality and support, such as:
- Beneficiary Eligibility
Find beneficiary eligibility, Medicare Secondary Payer, Medicare Advantage Plan, home health episode, hospice, and inpatient stay information.
- Claim Status
Check on the status of claims you've submitted to Jurisdiction B or C
- Same or Similar Information
Search beneficiary claim history for same or similar items
- Redetermination and Reopening Status and Submission
Check the status of your Redetermination and Reopening requests and submit new requests directly through myCGS
- ADMC and Prior Authorization Status and Submission
Submit ADMC and Prior Authorization requests and check their status directly through myCGS
- Claim Corrections
Make corrections to claims that have been processed by CGS
- And More!
This manual contains the information you need to navigate myCGS and take advantage of its many helpful features. The instructions in this manual assume that you are familiar with basic Medicare rules and regulations as they pertain to DMEPOS suppliers. For a detailed overview of Medicare DMEPOS rules and regulations, refer to our Supplier Manual. The Supplier Manual is the first resource that you should use for Medicare billing questions. You can access the Supplier Manual at the links below (depending on your jurisdiction).
DME MAC Jurisdiction B Supplier Manual
DME MAC Jurisdiction C Supplier Manual
For instructions on myCGS registration and user maintenance, refer to the myCGS Registration & Account Management Guide. For news and updates regarding myCGS, as well as other important DME MAC articles and information, be sure to subscribe to our ListServ, the CGS electronic mailing list.
If you have any questions that cannot be answered in this manual or the Supplier Manual, contact our Customer Service Department at one of the following phone numbers (be sure to call the correct jurisdiction ):
Jurisdiction B: 1.866.590.6727
Jurisdiction C: 1.866.270.4909
 Top Top
Who Can Use myCGS?
Any DMEPOS supplier or affiliate who serves beneficiaries in Jurisdictions B and/or C may register for myCGS. Jurisdiction A and D suppliers may also register for myCGS using the Same/Similar User role. All myCGS users must be approved through the myCGS registration process before receiving the ability to use myCGS. For assistance with registering for myCGS, refer to the myCGS Registration Guide.
There are four different types of myCGS user roles—End User, Designated Approver, Clearinghouse/Billing Agent (CHBA), and Same/Similar User (SSU). The majority of the functionality within myCGS is available to all user roles, except for the SSU role (which is limited to the Same/Similar tool only). The additional feature of being able to maintain user privileges is available only to Designated Approvers.
Top
Logging in to myCGS
Before you can use myCGS, you must complete the registration process and receive a myCGS User ID and password. Refer to the myCGS Registration Guide for instructions on how to register.
Once you have successfully registered, follow these steps to log in to myCGS:
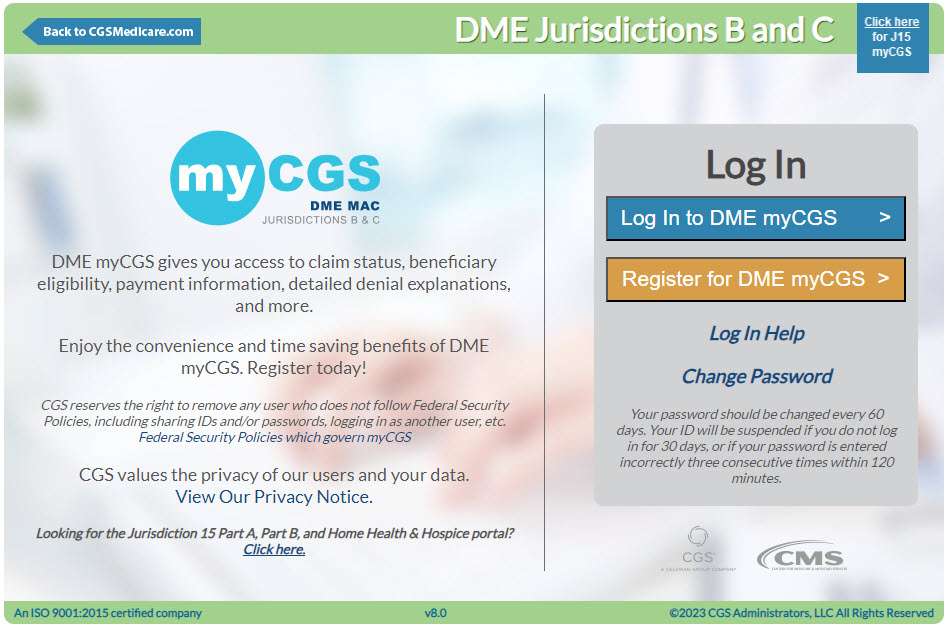
- Open myCGS by going to https://mycgsportal.com.
- Select the Log in to DME myCGS link.
- Log in using your myCGS User ID and Password.
NOTE: Your account will be locked if you enter your password incorrectly three consecutive times within a 120-minute period. Once your account is locked, you must call our Provider Contact Center to have your account unlocked.
- Generate a Multi-Factor Authentication (MFA) code. To generate an MFA code, press the appropriate button (or letter on your keyboard—T, E, or B) for how you would like to receive the code—Text, Email, or Both, or if you have Google Authenticator set up, simply enter your Google Authenticator code. Once you have received the MFA code, enter the code and press Next.
NOTE: Text and email MFA codes are valid for up to 12 hours after they are initially generated and can be reused throughout the entire 12-hour window. Note that if you request another MFA code, only the most recently generated code is valid.
- Read the myCGS Terms and Conditions, and then select your DME Jurisdiction (B or C).
NOTE: You can easily switch back and forth between Jurisdictions B and C without having to log out of myCGS. Refer to the Switching between Jurisdictions section below.
- Once you have successfully logged in, you will be taken to the myCGS Home screen.

Once logged in (as an End User or CHBA), you will see nine menu selections across the top of the myCGS portal—Home, Beneficiary Information, Same/Similar, Claims, Claim Preparation, Finance, Reprocessing, MBI Lookup, and News & Information. To get started, select the menu that contains the information you need. In this manual, you will find a section devoted to each of these menu screens.
NOTE: If you are registered for myCGS as a Designated Approver, then you will be taken directly to the User Management section of myCGS when you first log in. Press the Home menu to go to the End User section. Refer to the Admin section in this manual for additional information. If you are registered as an SSU, you will only see three menu selections: Home, Same/Similar, and News & Information.
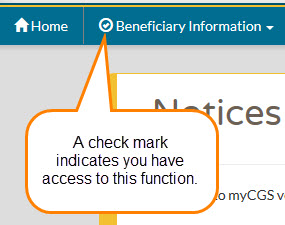
If one or more of your menu options has a locked icon, then you do not have permission to view/use that menu. Request access to any locked menus from your Designated Approver. You will not be able to access a locked menu until your Designated Approver updates your user permissions. Refer to the Locked Menus section below.
NOTE: Be sure to log in regularly and to keep your password up to date. If you do not log in for 30 consecutive days, your account will be suspended—in order to reactivate your account, you must call our Provider Contact Center. If you do not log in for 90 consecutive days, your account will be deactivated, and you will need to re-register for myCGS. In order to qualify as an active login, you must successfully complete the entire myCGS login process, including use of your MFA code.
Top
myCGS Interface Overview
myCGS contains eight primary menu options, as well as account, help, and feedback sections. Use the sections throughout this manual to find detailed information about all of the myCGS functions and capabilities.
The image below shows the main areas of myCGS:
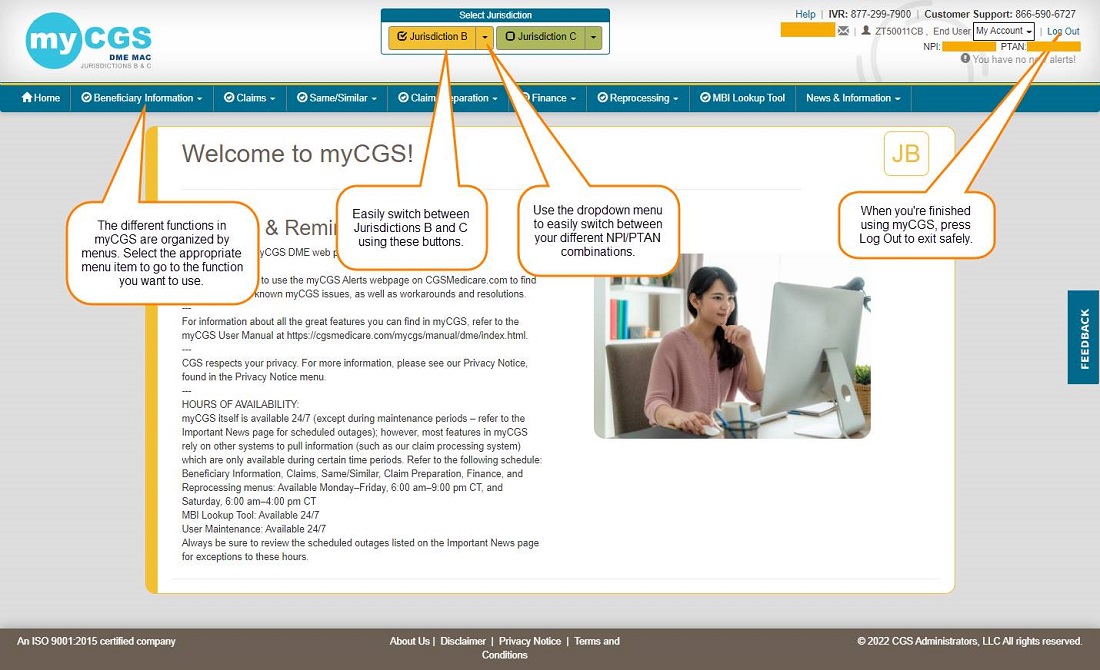
Top
Switching between Jurisdictions
If you are a supplier who services beneficiaries in both Jurisdictions B and C, myCGS allows you to easily switch back and forth between the two jurisdictions. To do so, simply press the appropriate jurisdiction button in the top-center of your screen.
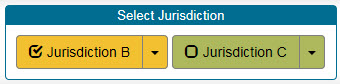
You can always know which jurisdiction you are currently viewing based on the color scheme of myCGS, as well as the JB or JC label in the top-right corner of the main body of myCGS. As you can see in the screen images below, yellow is Jurisdiction B, and green is Jurisdiction C.
Top
Change NPI/PTAN
Most of the functional capabilities in myCGS depend on your supplier information—your NPI and PTAN. If you represent a company that uses only one NPI/PTAN, then you do not need to worry about changing NPI/PTANs—your correct NPI/PTAN information will always populate automatically in any screen that requires supplier information in myCGS. But if you represent a company that has multiple NPI/PTAN combinations, then you need to make sure you are using the appropriate NPI/PTAN for the information you are requesting.
NOTE: myCGS will automatically give you access to all of the NPI/PTAN combinations that are associated with your Tax ID.
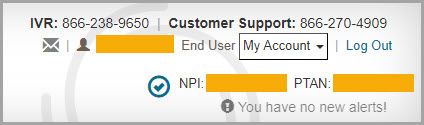
Switching between NPI/PTANs in myCGS is easy. In the upper-right corner of myCGS, you will always see the NPI/PTAN associated with your account that is currently selected. This NPI/PTAN will auto-populate in any functional screen within myCGS that requires supplier information.
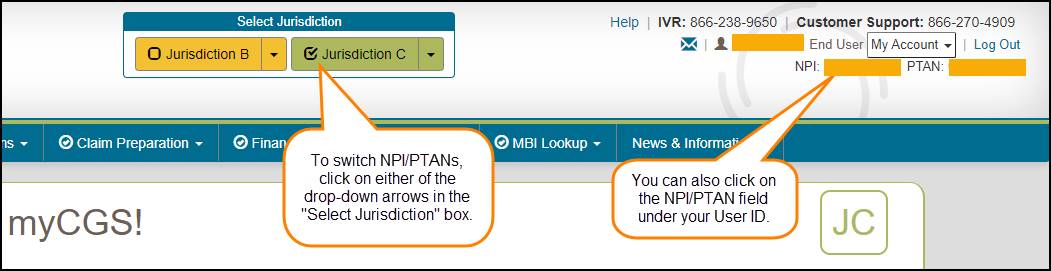
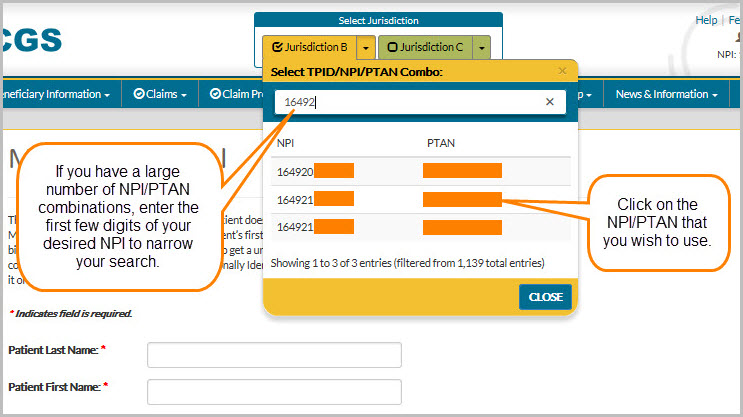
To change to a different NPI/PTAN, use the dropdown arrow found in the "Select Jurisdiction" box---a dropdown menu will appear that allows you to switch to a different NPI/PTAN.
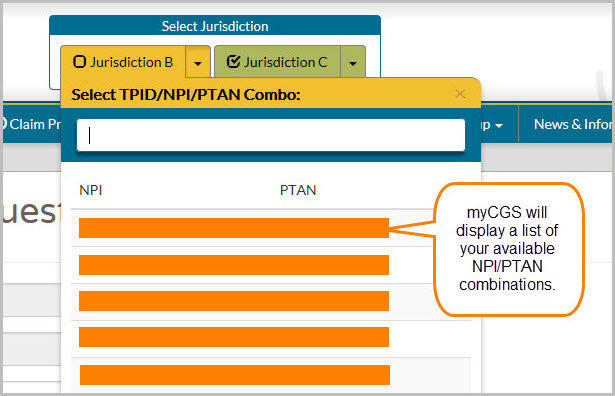
If you have a large number of NPI/PTAN combinations, you can enter the first few digits of your desired NPI to narrow down your search and easily find the NPI/PTAN you need.
Top
Default NPI/PTAN
If you are an End User or Designated Approver and have more than one NPI/PTAN, then you may wish to set a default NPI/PTAN so that myCGS always opens with your default selected. When you log in to myCGS, your currently selected NPI/PTAN will be random unless you’ve selected a default. myCGS allows you to set a default NPI/PTAN for both Jurisdiction B and C. Note that only End Users and Designated Approvers are able to set a default NPI/PTAN.
You can tell if the NPI/PTAN that is currently selected is your default based on the color of the checkmark icon found in the upper-right corner of the screen next to your NPI/PTAN.
- If the icon is gray, then the NPI/PTAN is not your default.
- If the icon is blue, then the NPI/PTAN is your default.
There are two ways to set a default NPI/PTAN in myCGS:
- Use the View NPI/PTAN screen found in the My Account menu.
- Use the checkmark icon, which functions as a toggle switch.
For instructions on using the View NPI/PTAN screen to set a default NPI/PTAN, refer to Chapter 11 of this manual.
To set a default NPI/PTAN using the checkmark icon toggle, follow these steps:
- Select the NPI/PTAN you wish to use as your default from the dropdown menu in the Select Jurisdiction section of your dashboard (refer to the Change NPI/PTAN section in this chapter). The NPI/PTAN you select will then be displayed on the right side of your dashboard.
- Click on the gray checkmark icon next to your NPI/PTAN. This will set your currently selected NPI/PTAN as default for the jurisdiction you are currently using. The checkmark will turn blue, indicating that this NPI/PTAN is now your default in the jurisdiction. Repeat these steps to set a default NPI/PTAN in the other jurisdiction (B or C).
NOTE: Setting a default NPI/PTAN in Jurisdiction B does not affect your default in Jurisdiction C, and vice versa. Each jurisdiction default works independently. You can choose to have a default in one jurisdiction, but not set a default in the other. You can select the same default NPI/PTAN in both jurisdictions. You can also select different default NPI/PTANs for each jurisdiction.
Note that the checkmark icon functions as a toggle. Clicking on a gray checkmark icon will set your current NPI/PTAN as default. Clicking on a blue checkmark will remove the default.
The following image shows a gray checkmark icon, indicating that NPI/PTAN currently selected is not the default NPI/PTAN:

This image shows a blue checkmark icon, meaning that the current NPI/PTAN is set as the default:
Top
Medicare ID
All transactions in myCGS should be completed using the Medicare Beneficiary Identifier (MBI) as the beneficiary's Medicare ID, with limited exceptions. All search screens in myCGS either default to the MBI or are MBI-only.
There are rare occasions in which you may still need to use a Health Insurance Claim Number (HICN) in myCGS. For any screen that allows either MBI or HICN, the default value of the Medicare ID field is MBI. If you need to search by HICN, enter the HICN in the Medicare ID field and then select the HICN radio button.

Top
Locked Menus
Your organization's Designated Approver has the ability to grant or take away user permissions specific to your user profile. These permissions control which features you can and cannot use in myCGS. If one of your function menus shows a closed lock icon, then you do not have permission to use this function and will not be able to access the menu.
NOTE: If you are a CHBA user, your permissions have been set by the DMEPOS supplier in their CEDI authorization agreement.
If you need access to a menu which is currently locked, contact your Designated Approver and request access.

What is myCGS?
The myCGS portal is a web-based application developed by CGS that is available to suppliers of durable medical equipment, prosthetics, orthotics, and supplies (DMEPOS) who serve beneficiaries in Jurisdictions B and C. Using myCGS is a fast and easy way to get Medicare claim and billing information.
myCGS offers suppliers a wide range of functionality and support, such as:
- Beneficiary Eligibility
Find beneficiary eligibility, Medicare Secondary Payer, Medicare Advantage Plan, home health episode, hospice, and inpatient stay information.
- Claim Status
Check on the status of claims you've submitted to Jurisdiction B or C
- Same or Similar Information
Search beneficiary claim history for same or similar items
- Redetermination and Reopening Status and Submission
Check the status of your Redetermination and Reopening requests and submit new requests directly through myCGS
- ADMC and Prior Authorization Status and Submission
Submit ADMC and Prior Authorization requests and check their status directly through myCGS
- Claim Corrections
Make corrections to claims that have been processed by CGS
- And More!
This manual contains the information you need to navigate myCGS and take advantage of its many helpful features. The instructions in this manual assume that you are familiar with basic Medicare rules and regulations as they pertain to DMEPOS suppliers. For a detailed overview of Medicare DMEPOS rules and regulations, refer to our Supplier Manual. The Supplier Manual is the first resource that you should use for Medicare billing questions. You can access the Supplier Manual at the links below (depending on your jurisdiction).
DME MAC Jurisdiction B Supplier Manual
DME MAC Jurisdiction C Supplier Manual
For instructions on myCGS registration and user maintenance, refer to the myCGS Registration & Account Management Guide. For news and updates regarding myCGS, as well as other important DME MAC articles and information, be sure to subscribe to our ListServ, the CGS electronic mailing list.
If you have any questions that cannot be answered in this manual or the Supplier Manual, contact our Customer Service Department at one of the following phone numbers (be sure to call the correct jurisdiction ):
Jurisdiction B: 1.866.590.6727
Jurisdiction C: 1.866.270.4909
Who Can Use myCGS?
Any DMEPOS supplier or affiliate who serves beneficiaries in Jurisdictions B and/or C may register for myCGS. Jurisdiction A and D suppliers may also register for myCGS using the Same/Similar User role. All myCGS users must be approved through the myCGS registration process before receiving the ability to use myCGS. For assistance with registering for myCGS, refer to the myCGS Registration Guide.
There are four different types of myCGS user roles—End User, Designated Approver, Clearinghouse/Billing Agent (CHBA), and Same/Similar User (SSU). The majority of the functionality within myCGS is available to all user roles, except for the SSU role (which is limited to the Same/Similar tool only). The additional feature of being able to maintain user privileges is available only to Designated Approvers.
Logging in to myCGS
Before you can use myCGS, you must complete the registration process and receive a myCGS User ID and password. Refer to the myCGS Registration Guide for instructions on how to register.
Once you have successfully registered, follow these steps to log in to myCGS:
- Open myCGS by going to https://mycgsportal.com.
- Select the Log in to DME myCGS link.
- Log in using your myCGS User ID and Password.
NOTE: Your account will be locked if you enter your password incorrectly three consecutive times within a 120-minute period. Once your account is locked, you must call our Provider Contact Center to have your account unlocked.
- Generate a Multi-Factor Authentication (MFA) code. To generate an MFA code, press the appropriate button (or letter on your keyboard—T, E, or B) for how you would like to receive the code—Text, Email, or Both, or if you have Google Authenticator set up, simply enter your Google Authenticator code. Once you have received the MFA code, enter the code and press Next.
NOTE: Text and email MFA codes are valid for up to 12 hours after they are initially generated and can be reused throughout the entire 12-hour window. Note that if you request another MFA code, only the most recently generated code is valid.
- Read the myCGS Terms and Conditions, and then select your DME Jurisdiction (B or C).
NOTE: You can easily switch back and forth between Jurisdictions B and C without having to log out of myCGS. Refer to the Switching between Jurisdictions section below.
- Once you have successfully logged in, you will be taken to the myCGS Home screen.
Once logged in (as an End User or CHBA), you will see nine menu selections across the top of the myCGS portal—Home, Beneficiary Information, Same/Similar, Claims, Claim Preparation, Finance, Reprocessing, MBI Lookup, and News & Information. To get started, select the menu that contains the information you need. In this manual, you will find a section devoted to each of these menu screens.
NOTE: If you are registered for myCGS as a Designated Approver, then you will be taken directly to the User Management section of myCGS when you first log in. Press the Home menu to go to the End User section. Refer to the Admin section in this manual for additional information. If you are registered as an SSU, you will only see three menu selections: Home, Same/Similar, and News & Information.
If one or more of your menu options has a locked icon, then you do not have permission to view/use that menu. Request access to any locked menus from your Designated Approver. You will not be able to access a locked menu until your Designated Approver updates your user permissions. Refer to the Locked Menus section below.
NOTE: Be sure to log in regularly and to keep your password up to date. If you do not log in for 30 consecutive days, your account will be suspended—in order to reactivate your account, you must call our Provider Contact Center. If you do not log in for 90 consecutive days, your account will be deactivated, and you will need to re-register for myCGS. In order to qualify as an active login, you must successfully complete the entire myCGS login process, including use of your MFA code.
myCGS Interface Overview
myCGS contains eight primary menu options, as well as account, help, and feedback sections. Use the sections throughout this manual to find detailed information about all of the myCGS functions and capabilities.
The image below shows the main areas of myCGS:
Switching between Jurisdictions
If you are a supplier who services beneficiaries in both Jurisdictions B and C, myCGS allows you to easily switch back and forth between the two jurisdictions. To do so, simply press the appropriate jurisdiction button in the top-center of your screen.
You can always know which jurisdiction you are currently viewing based on the color scheme of myCGS, as well as the JB or JC label in the top-right corner of the main body of myCGS. As you can see in the screen images below, yellow is Jurisdiction B, and green is Jurisdiction C.
Change NPI/PTAN
Most of the functional capabilities in myCGS depend on your supplier information—your NPI and PTAN. If you represent a company that uses only one NPI/PTAN, then you do not need to worry about changing NPI/PTANs—your correct NPI/PTAN information will always populate automatically in any screen that requires supplier information in myCGS. But if you represent a company that has multiple NPI/PTAN combinations, then you need to make sure you are using the appropriate NPI/PTAN for the information you are requesting.
NOTE: myCGS will automatically give you access to all of the NPI/PTAN combinations that are associated with your Tax ID.
Switching between NPI/PTANs in myCGS is easy. In the upper-right corner of myCGS, you will always see the NPI/PTAN associated with your account that is currently selected. This NPI/PTAN will auto-populate in any functional screen within myCGS that requires supplier information.
To change to a different NPI/PTAN, use the dropdown arrow found in the "Select Jurisdiction" box---a dropdown menu will appear that allows you to switch to a different NPI/PTAN.
If you have a large number of NPI/PTAN combinations, you can enter the first few digits of your desired NPI to narrow down your search and easily find the NPI/PTAN you need.
Default NPI/PTAN
If you are an End User or Designated Approver and have more than one NPI/PTAN, then you may wish to set a default NPI/PTAN so that myCGS always opens with your default selected. When you log in to myCGS, your currently selected NPI/PTAN will be random unless you’ve selected a default. myCGS allows you to set a default NPI/PTAN for both Jurisdiction B and C. Note that only End Users and Designated Approvers are able to set a default NPI/PTAN.
You can tell if the NPI/PTAN that is currently selected is your default based on the color of the checkmark icon found in the upper-right corner of the screen next to your NPI/PTAN.
- If the icon is gray, then the NPI/PTAN is not your default.
- If the icon is blue, then the NPI/PTAN is your default.
There are two ways to set a default NPI/PTAN in myCGS:
- Use the View NPI/PTAN screen found in the My Account menu.
- Use the checkmark icon, which functions as a toggle switch.
For instructions on using the View NPI/PTAN screen to set a default NPI/PTAN, refer to Chapter 11 of this manual.
To set a default NPI/PTAN using the checkmark icon toggle, follow these steps:
- Select the NPI/PTAN you wish to use as your default from the dropdown menu in the Select Jurisdiction section of your dashboard (refer to the Change NPI/PTAN section in this chapter). The NPI/PTAN you select will then be displayed on the right side of your dashboard.
- Click on the gray checkmark icon next to your NPI/PTAN. This will set your currently selected NPI/PTAN as default for the jurisdiction you are currently using. The checkmark will turn blue, indicating that this NPI/PTAN is now your default in the jurisdiction. Repeat these steps to set a default NPI/PTAN in the other jurisdiction (B or C).
NOTE: Setting a default NPI/PTAN in Jurisdiction B does not affect your default in Jurisdiction C, and vice versa. Each jurisdiction default works independently. You can choose to have a default in one jurisdiction, but not set a default in the other. You can select the same default NPI/PTAN in both jurisdictions. You can also select different default NPI/PTANs for each jurisdiction.
Note that the checkmark icon functions as a toggle. Clicking on a gray checkmark icon will set your current NPI/PTAN as default. Clicking on a blue checkmark will remove the default.
The following image shows a gray checkmark icon, indicating that NPI/PTAN currently selected is not the default NPI/PTAN:
This image shows a blue checkmark icon, meaning that the current NPI/PTAN is set as the default:
Medicare ID
All transactions in myCGS should be completed using the Medicare Beneficiary Identifier (MBI) as the beneficiary's Medicare ID, with limited exceptions. All search screens in myCGS either default to the MBI or are MBI-only.
There are rare occasions in which you may still need to use a Health Insurance Claim Number (HICN) in myCGS. For any screen that allows either MBI or HICN, the default value of the Medicare ID field is MBI. If you need to search by HICN, enter the HICN in the Medicare ID field and then select the HICN radio button.
Locked Menus
Your organization's Designated Approver has the ability to grant or take away user permissions specific to your user profile. These permissions control which features you can and cannot use in myCGS. If one of your function menus shows a closed lock icon, then you do not have permission to use this function and will not be able to access the menu.
NOTE: If you are a CHBA user, your permissions have been set by the DMEPOS supplier in their CEDI authorization agreement.
If you need access to a menu which is currently locked, contact your Designated Approver and request access.

Chapter 2 – Beneficiary Information
Beneficiary Information Overview
There are three main menu options found under Beneficiary Information: Eligibility, SNF/Hospital, and CBA Information. From the Beneficiary Information menu, select the option you wish to use.
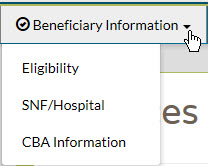
The Beneficiary Information menu gives you access to a variety of information about Medicare beneficiaries, including:
- Medicare Part A and Part B effective and termination dates
- Current year deductible to be met
- Previous year deductible to be met
- The DME MAC jurisdiction in which the beneficiary resides
- Medicare Advantage Plan (MAP) information
- Medicare Secondary Payer (MSP) records
- Hospice records
- Home health episodes
- Skilled nursing facility (SNF) and hospital stays
- Competitive Bidding Area (CBA) information
Top
Eligibility
The Eligibility screen gives you access to basic beneficiary eligibility records, including Medicare Part A and B effective dates, current and previous year deductible, date of death (if applicable), beneficiary address, and the DME MAC jurisdiction in which the beneficiary currently resides. Additionally the Eligibility screen will provide details of any Medicare Advantage Plan (MAP), Medicare Secondary Payer, Hospice, and Home Health Episode records on file for the beneficiary (when applicable).
The Eligibility screen, like all search screens in myCGS, automatically populates your NPI and PTAN; therefore you do not need to manually enter this information. If you have more than one NPI/PTAN and need to use a different NPI/PTAN than what is currently selected, change your NPI/PTAN by following the instructions in the Change NPI/PTAN section in this manual.
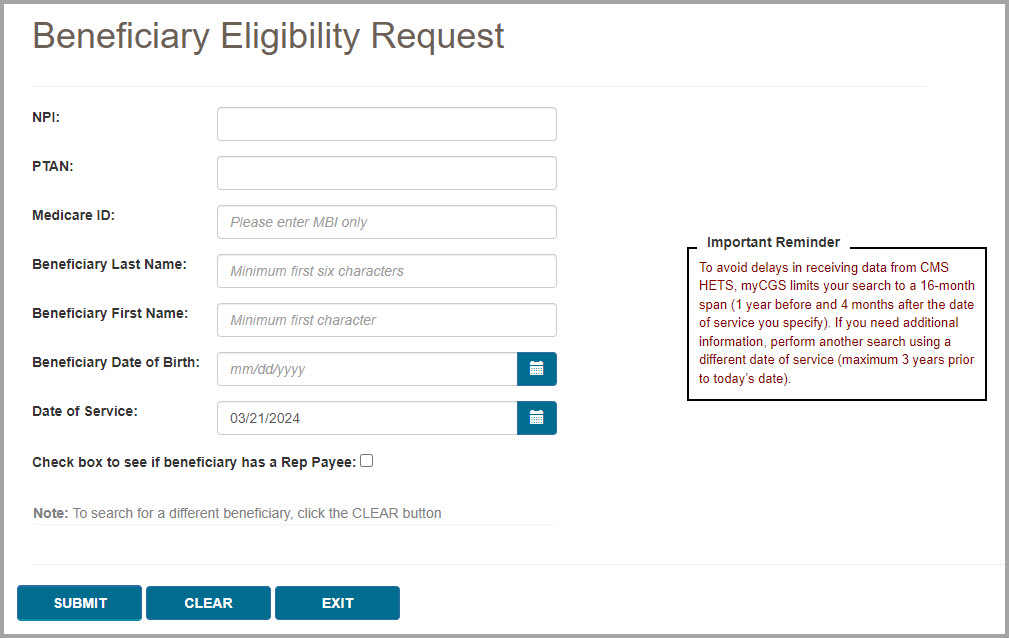
To search for beneficiary eligibility, enter the following beneficiary information, and press the SUBMIT button:
- Medicare ID (MBI only)
- Beneficiary Last Name (first six letters)
NOTE: If the beneficiary’s last name is fewer than six letters, simply enter their entire last name. You do not need to enter six letters if fewer than six letters exist.
- Beneficiary First Name (first initial)
- Beneficiary Date of Birth (eight digits)
NOTE: When entering the beneficiary's date of birth, myCGS will automatically add slashes; you only need to enter the numerical digits of the date of birth. This is true of all date fields in myCGS.
- Date of Service (eight digits)
NOTE: The Date of Service field defaults to today's date. myCGS searches for eligibility information within a 16-month span—one year prior to and four months after—of the date of service entered. You may change this date to search for historic eligibility information. The maximum date of service you may enter is three years prior to today's date (which would give you eligibility data reaching back four years).
Example: You enter a date of service of 12/1/2022. myCGS will return eligibility information that is valid from 12/1/2021 through 4/1/2022.
- Optional checkbox to look for Rep Payee
NOTE: Select the Rep Payee checkbox to see if there is a Rep Payee on file for the beneficiary. If the box is checked, a Rep Payee field will be displayed in the search results. This field will display Yes or No (or will give an unavailable message if the system is not available). Note that myCGS will not provide the name of the Rep Payee. Also note that use of the Rep Payee search means that myCGS will need to go to multiple systems to complete the request, meaning that the eligibility search will take longer when the box is checked.
After pressing the SUBMIT button, myCGS will return basic eligibility information, including Part A effective dates, Part B (or Part B-ID*) effective dates, deductible, date of death (if applicable), beneficiary address, and DME MAC jurisdiction of residence, as well as any Medicare Advantage Plan (MAP), Medicare Secondary Payer (MSP), hospice records, and home health episodes on file. The information returned will include any valid eligibility information found within one year prior to and four months after the date of service entered. For details about these records, refer to the sections below.
The image below shows eligibility results for a beneficiary who has a MAP and MSP on file.

*If a beneficiary is enrolled in the Part B Immunosuppressant Drug (Part B-ID) benefit, then myCGS will display their Part B-ID effective dates in the eligibility response, as shown in the image below.

In addition to the eligibility information shown above, you can also check to see if the beneficiary was billed for a skilled nursing facility (SNF) or hospital stay on a specific date of service. To do so, use the SNF/Hospital menu option. Refer to the SNF/Hospital section below for more information.
Top
Medicare Advantage Plan (MAP)
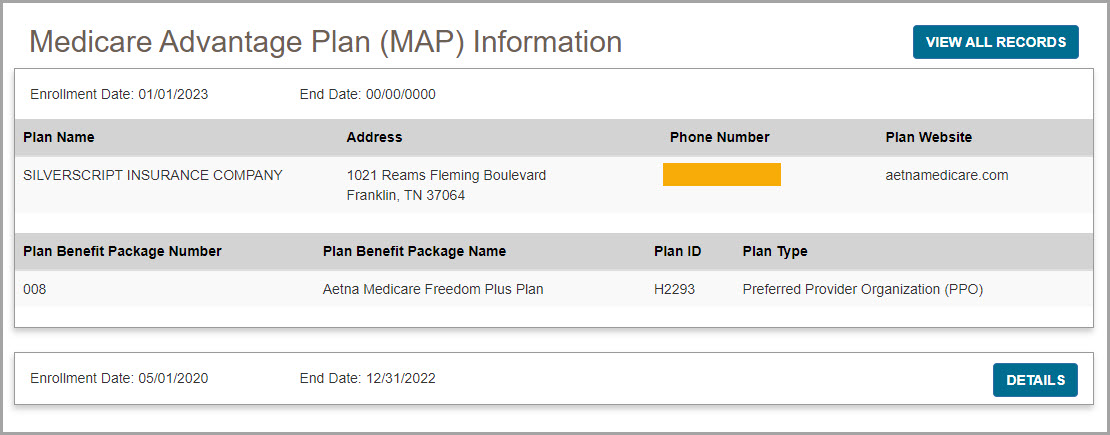
A Medicare Advantage Plan (MAP) is an alternative to the traditional fee-for-service Medicare plan. The Eligibility screen in myCGS allows you to determine if a beneficiary is enrolled in a MAP. To find MAP information, search for beneficiary eligibility as described in the Eligibility section above. When myCGS finds MAP enrollment, the following information will be displayed on the Eligibility screen:
- Enrollment Date
- End Date
- Plan Name
- Address
- Phone Number
- Plan Website
- Plan Benefit Package Number*
- Plan Benefit Package Name*
- Plan ID
- Plan Type
*To find details about the Plan Benefit Package Number/Name, refer to the CMS MAP Monthly Enrollment by Plan webpage . .
myCGS will return results for all MAP information found within a 16-month span—one year prior to and four months after—of the date of service entered. The most recent MAP will display first, with full details shown, while older MAP information will be collapsed (showing only the enrollment and end dates). Press the View All Records button to show the full details of all MAPs found in the 16-month span, or press the Details button in the row of an older plan to show the details of a single record.
The following screen image shows an example of a beneficiary currently enrolled in a MAP:
Top
Medicare Secondary Payer (MSP)
The term Medicare Secondary Payer (MSP) refers to situations when a beneficiary has another form of insurance which would pay a claim before Medicare. When a beneficiary has an MSP plan, you may need to submit his/her claim to the primary insurance before submitting a claim to CGS.
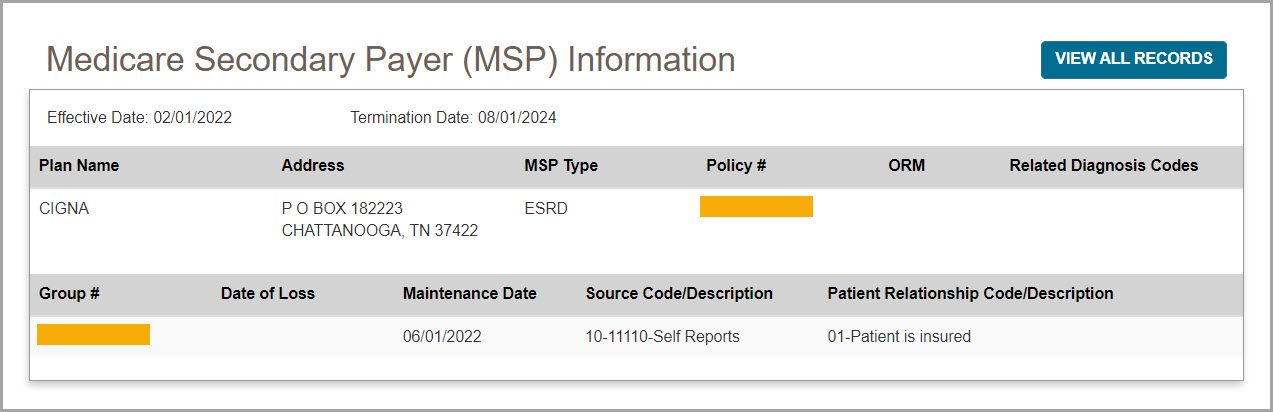
The Eligibility screen in myCGS allows you to determine if a beneficiary has an MSP plan. To find MSP information, search for beneficiary eligibility as described in the Eligibility section above. When myCGS finds an MSP result, the following information will be displayed on the Eligibility screen:
- Effective Date
- Termination Date
- Plan Name
- Address
- MSP Type
- Policy Number
- ORM (Ongoing Responsibility Medicals)
- Related Diagnosis Code (diagnosis driven MSP plans only) (ICD-10 codes only)
- Group Number
- Date of Loss
- Maintenance Date
- Source/Code Description
- Patient Relationship Code/Description
myCGS will return results for all MSP information found within a 16-month span—one year prior to and four months after—of the date of service entered. The most recent MSP data will display first, with full details shown, while older MSP information will be collapsed (showing only the effective and termination dates). Press the View All Records button to show the full details of all MSP records found in the 16-month span, or press the Details button in the row of an older record to show the details of a single record.
Top
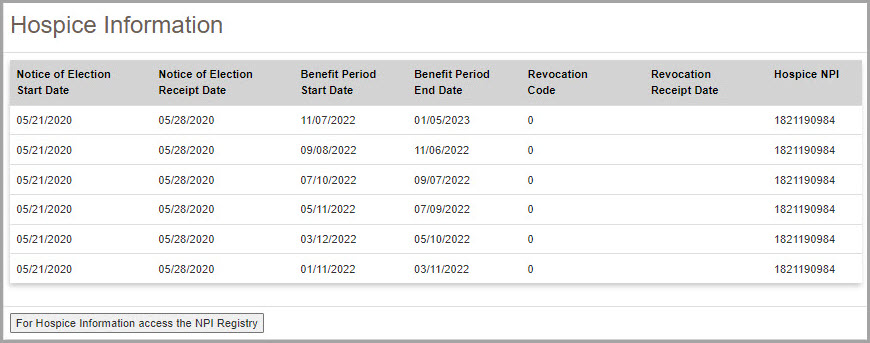
Hospice
When a beneficiary is enrolled in hospice coverage, all DMEPOS claims related to the service must be billed through the hospice, not to the DME MAC.
The Eligibility screen in myCGS allows you to determine if a beneficiary is enrolled in hospice. To find hospice information, search for beneficiary eligibility as described in the Eligibility section. When myCGS finds hospice enrollment, the following information will be displayed on the Eligibility screen:
- Notice of Election Start date
- Notice of Election Receipt Date
- Benefit Period Start Date
- Benefit Period End Date
- Revocation Code1
- Revocation Receipt Date2
- Hospice NPI3
NOTE: myCGS will return all hospice episodes that appear in the beneficiary's records within 16 months (one year prior to and four months after) of the date of service submitted in your request.
1. The Revocation Code indicates the revocation status for the hospice episode listed. Below is a list of Revocation Codes and their definitions:
Medicare Beneficiary in Hospice Care
0 – Not revoked, open spell
Medicare Beneficiary with Hospice Care Revoked
1 – Revoked by notice of revocation
2 – Revoked by notice of revocation with a non-payment code of “N” and an occurrence code of “42”
3 – Revoked by a Hospice claim with an occurrence code of “23” 2. The Revocation Receipt Date will only be populated when there is a Revocation Code of 1, 2, or 3.
3. You can use the NPI to find the name and contact information of the hospice by visiting the NPI Registry.
Top
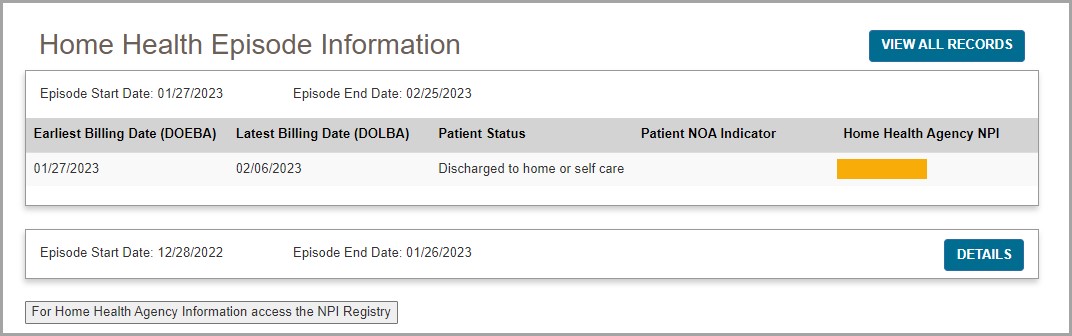
Home Health Episode (HHE)
When a beneficiary is under a home health plan of care, payment for certain items must be made through the home health agency overseeing the home health plan. The Eligibility screen in myCGS allows you to determine if a beneficiary is currently being billed for a home health episode (HHE).
To find HHE information, search for beneficiary eligibility as described in the Eligibility section above. When myCGS finds a home health episode, the following information will be displayed on the Eligibility screen:
- Start date
- End date
- Home Health Agency NPI
You can use the NPI to find the name and contact information of the home health agency by visiting the NPI Registry.
Top
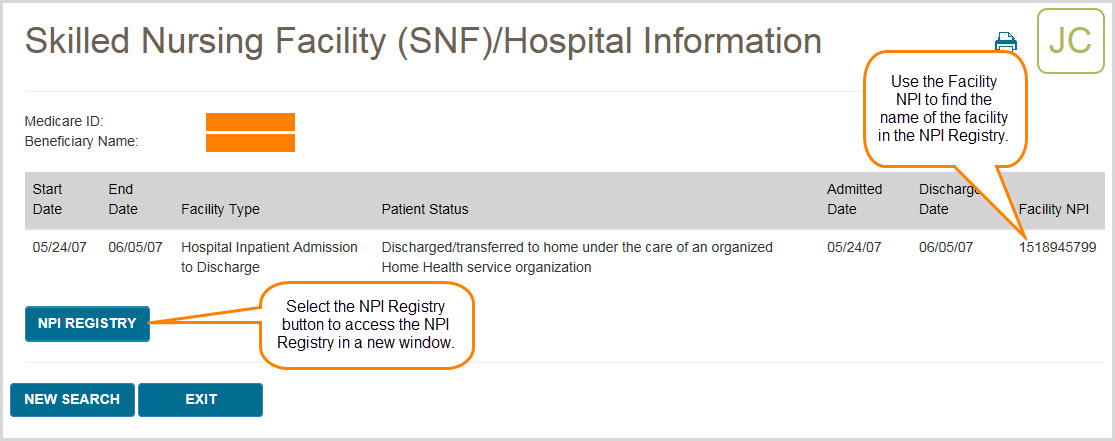
SNF/Hospital
When a beneficiary is enrolled in a Part A covered Skilled Nursing Facility (SNF) or Hospital stay, most claims are not payable by the DME MAC. The Beneficiary Information menu in myCGS allows you to determine if a beneficiary is enrolled in a SNF or hospital stay on a specific date of service. To find SNF/Hospital information, search for beneficiary eligibility as described in the Eligibility section above. Once eligibility is returned, select the SNF/Hospital menu option.
Once you have navigated to the SNF/Hospital screen, enter the date of service in which you wish to check for Part A stay information, and then press the SUBMIT button.
NOTE: myCGS searches for SNF/Hospital information within a 16-month span—one year prior to and four months after—of the date of service entered. You may change this date to search for historic information. The maximum date of service you may enter is three years prior to today’s date (which would give you data reaching back four years). myCGS will display all SNF/Hospital stays found within the 16-month span.
Example: You enter a date of service of 12/1/2022. myCGS will return SNF/Hospital information that is valid from 12/1/2021 through 4/1/2022.
HINT: If the only piece of eligibility information you need is SNF or hospital information, you can go directly to the SNF/Hospital screen without performing a search for beneficiary eligibility. In this case, you must enter all of the appropriate beneficiary data (MBI, last name, first name, and date of birth), along with the date of service you need to check.
When myCGS finds a SNF or hospital stay, the following information will be displayed on the SNF/Hospital Information screen:
- Start Date
- End Date
- Facility Type
- Patient Status
- Admitted Date
- Discharge Date
- Facility NPI
You can use the NPI to find the name and contact information of the SNF/Hospital by visiting the NPI Registry.
Top
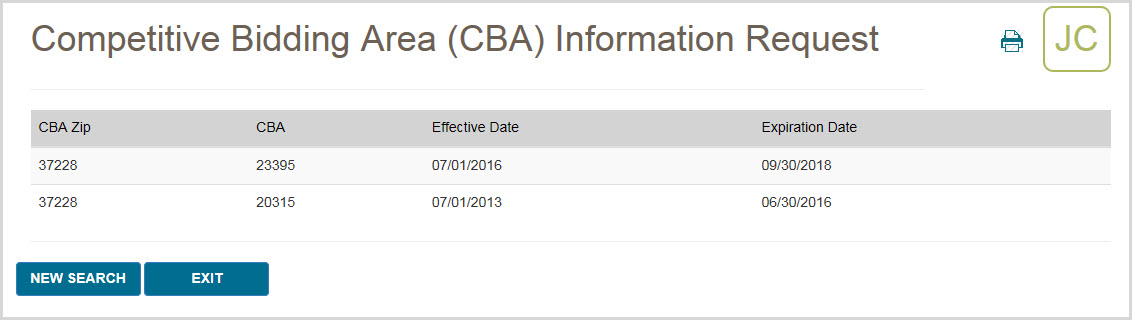
CBA Information
The CBA Information screen allows you to easily determine if a beneficiary resides in a Competitive Bidding Area (CBA). After navigating to the CBA Information screen, simply enter the zip code where the beneficiary resides, and press the SUBMIT button. If the zip code is included in a CBA, then myCGS will display specific information about the CBA, including the CBA number and effective dates.
Top
Beneficiary Information Overview
There are three main menu options found under Beneficiary Information: Eligibility, SNF/Hospital, and CBA Information. From the Beneficiary Information menu, select the option you wish to use.
The Beneficiary Information menu gives you access to a variety of information about Medicare beneficiaries, including:
- Medicare Part A and Part B effective and termination dates
- Current year deductible to be met
- Previous year deductible to be met
- The DME MAC jurisdiction in which the beneficiary resides
- Medicare Advantage Plan (MAP) information
- Medicare Secondary Payer (MSP) records
- Hospice records
- Home health episodes
- Skilled nursing facility (SNF) and hospital stays
- Competitive Bidding Area (CBA) information
Eligibility
The Eligibility screen gives you access to basic beneficiary eligibility records, including Medicare Part A and B effective dates, current and previous year deductible, date of death (if applicable), beneficiary address, and the DME MAC jurisdiction in which the beneficiary currently resides. Additionally the Eligibility screen will provide details of any Medicare Advantage Plan (MAP), Medicare Secondary Payer, Hospice, and Home Health Episode records on file for the beneficiary (when applicable).
The Eligibility screen, like all search screens in myCGS, automatically populates your NPI and PTAN; therefore you do not need to manually enter this information. If you have more than one NPI/PTAN and need to use a different NPI/PTAN than what is currently selected, change your NPI/PTAN by following the instructions in the Change NPI/PTAN section in this manual.
To search for beneficiary eligibility, enter the following beneficiary information, and press the SUBMIT button:
- Medicare ID (MBI only)
- Beneficiary Last Name (first six letters)
NOTE: If the beneficiary’s last name is fewer than six letters, simply enter their entire last name. You do not need to enter six letters if fewer than six letters exist.
- Beneficiary First Name (first initial)
- Beneficiary Date of Birth (eight digits)
NOTE: When entering the beneficiary's date of birth, myCGS will automatically add slashes; you only need to enter the numerical digits of the date of birth. This is true of all date fields in myCGS.
- Date of Service (eight digits)
NOTE: The Date of Service field defaults to today's date. myCGS searches for eligibility information within a 16-month span—one year prior to and four months after—of the date of service entered. You may change this date to search for historic eligibility information. The maximum date of service you may enter is three years prior to today's date (which would give you eligibility data reaching back four years).
Example: You enter a date of service of 12/1/2022. myCGS will return eligibility information that is valid from 12/1/2021 through 4/1/2022.
- Optional checkbox to look for Rep Payee
NOTE: Select the Rep Payee checkbox to see if there is a Rep Payee on file for the beneficiary. If the box is checked, a Rep Payee field will be displayed in the search results. This field will display Yes or No (or will give an unavailable message if the system is not available). Note that myCGS will not provide the name of the Rep Payee. Also note that use of the Rep Payee search means that myCGS will need to go to multiple systems to complete the request, meaning that the eligibility search will take longer when the box is checked.
After pressing the SUBMIT button, myCGS will return basic eligibility information, including Part A effective dates, Part B (or Part B-ID*) effective dates, deductible, date of death (if applicable), beneficiary address, and DME MAC jurisdiction of residence, as well as any Medicare Advantage Plan (MAP), Medicare Secondary Payer (MSP), hospice records, and home health episodes on file. The information returned will include any valid eligibility information found within one year prior to and four months after the date of service entered. For details about these records, refer to the sections below.
The image below shows eligibility results for a beneficiary who has a MAP and MSP on file.
*If a beneficiary is enrolled in the Part B Immunosuppressant Drug (Part B-ID) benefit, then myCGS will display their Part B-ID effective dates in the eligibility response, as shown in the image below.
In addition to the eligibility information shown above, you can also check to see if the beneficiary was billed for a skilled nursing facility (SNF) or hospital stay on a specific date of service. To do so, use the SNF/Hospital menu option. Refer to the SNF/Hospital section below for more information.
Medicare Advantage Plan (MAP)
A Medicare Advantage Plan (MAP) is an alternative to the traditional fee-for-service Medicare plan. The Eligibility screen in myCGS allows you to determine if a beneficiary is enrolled in a MAP. To find MAP information, search for beneficiary eligibility as described in the Eligibility section above. When myCGS finds MAP enrollment, the following information will be displayed on the Eligibility screen:
- Enrollment Date
- End Date
- Plan Name
- Address
- Phone Number
- Plan Website
- Plan Benefit Package Number*
- Plan Benefit Package Name*
- Plan ID
- Plan Type
*To find details about the Plan Benefit Package Number/Name, refer to the CMS MAP Monthly Enrollment by Plan webpage.
myCGS will return results for all MAP information found within a 16-month span—one year prior to and four months after—of the date of service entered. The most recent MAP will display first, with full details shown, while older MAP information will be collapsed (showing only the enrollment and end dates). Press the View All Records button to show the full details of all MAPs found in the 16-month span, or press the Details button in the row of an older plan to show the details of a single record.
The following screen image shows an example of a beneficiary currently enrolled in a MAP:
Medicare Secondary Payer (MSP)
The term Medicare Secondary Payer (MSP) refers to situations when a beneficiary has another form of insurance which would pay a claim before Medicare. When a beneficiary has an MSP plan, you may need to submit his/her claim to the primary insurance before submitting a claim to CGS.
The Eligibility screen in myCGS allows you to determine if a beneficiary has an MSP plan. To find MSP information, search for beneficiary eligibility as described in the Eligibility section above. When myCGS finds an MSP result, the following information will be displayed on the Eligibility screen:
- Effective Date
- Termination Date
- Plan Name
- Address
- MSP Type
- Policy Number
- ORM (Ongoing Responsibility Medicals)
- Related Diagnosis Code (diagnosis driven MSP plans only) (ICD-10 codes only)
- Group Number
- Date of Loss
- Maintenance Date
- Source/Code Description
- Patient Relationship Code/Description
myCGS will return results for all MSP information found within a 16-month span—one year prior to and four months after—of the date of service entered. The most recent MSP data will display first, with full details shown, while older MSP information will be collapsed (showing only the effective and termination dates). Press the View All Records button to show the full details of all MSP records found in the 16-month span, or press the Details button in the row of an older record to show the details of a single record.
Hospice
When a beneficiary is enrolled in hospice coverage, all DMEPOS claims related to the service must be billed through the hospice, not to the DME MAC.
The Eligibility screen in myCGS allows you to determine if a beneficiary is enrolled in hospice. To find hospice information, search for beneficiary eligibility as described in the Eligibility section. When myCGS finds hospice enrollment, the following information will be displayed on the Eligibility screen:
- Notice of Election Start date
- Notice of Election Receipt Date
- Benefit Period Start Date
- Benefit Period End Date
- Revocation Code1
- Revocation Receipt Date2
- Hospice NPI3
NOTE: myCGS will return all hospice episodes that appear in the beneficiary's records within 16 months (one year prior to and four months after) of the date of service submitted in your request.
1. The Revocation Code indicates the revocation status for the hospice episode listed. Below is a list of Revocation Codes and their definitions:
Medicare Beneficiary in Hospice Care
0 – Not revoked, open spell
Medicare Beneficiary with Hospice Care Revoked
1 – Revoked by notice of revocation
2 – Revoked by notice of revocation with a non-payment code of “N” and an occurrence code of “42”
3 – Revoked by a Hospice claim with an occurrence code of “23” 2. The Revocation Receipt Date will only be populated when there is a Revocation Code of 1, 2, or 3.
3. You can use the NPI to find the name and contact information of the hospice by visiting the NPI Registry.
Home Health Episode (HHE)
When a beneficiary is under a home health plan of care, payment for certain items must be made through the home health agency overseeing the home health plan. The Eligibility screen in myCGS allows you to determine if a beneficiary is currently being billed for a home health episode (HHE).
To find HHE information, search for beneficiary eligibility as described in the Eligibility section above. When myCGS finds a home health episode, the following information will be displayed on the Eligibility screen:
- Start date
- End date
- Home Health Agency NPI
You can use the NPI to find the name and contact information of the home health agency by visiting the NPI Registry.
SNF/Hospital
When a beneficiary is enrolled in a Part A covered Skilled Nursing Facility (SNF) or Hospital stay, most claims are not payable by the DME MAC. The Beneficiary Information menu in myCGS allows you to determine if a beneficiary is enrolled in a SNF or hospital stay on a specific date of service. To find SNF/Hospital information, search for beneficiary eligibility as described in the Eligibility section above. Once eligibility is returned, select the SNF/Hospital menu option.
Once you have navigated to the SNF/Hospital screen, enter the date of service in which you wish to check for Part A stay information, and then press the SUBMIT button.
NOTE: myCGS searches for SNF/Hospital information within a 16-month span—one year prior to and four months after—of the date of service entered. You may change this date to search for historic information. The maximum date of service you may enter is three years prior to today’s date (which would give you data reaching back four years). myCGS will display all SNF/Hospital stays found within the 16-month span.
Example: You enter a date of service of 12/1/2022. myCGS will return SNF/Hospital information that is valid from 12/1/2021 through 4/1/2022.
HINT: If the only piece of eligibility information you need is SNF or hospital information, you can go directly to the SNF/Hospital screen without performing a search for beneficiary eligibility. In this case, you must enter all of the appropriate beneficiary data (MBI, last name, first name, and date of birth), along with the date of service you need to check.
When myCGS finds a SNF or hospital stay, the following information will be displayed on the SNF/Hospital Information screen:
- Start Date
- End Date
- Facility Type
- Patient Status
- Admitted Date
- Discharge Date
- Facility NPI
You can use the NPI to find the name and contact information of the SNF/Hospital by visiting the NPI Registry.
CBA Information
The CBA Information screen allows you to easily determine if a beneficiary resides in a Competitive Bidding Area (CBA). After navigating to the CBA Information screen, simply enter the zip code where the beneficiary resides, and press the SUBMIT button. If the zip code is included in a CBA, then myCGS will display specific information about the CBA, including the CBA number and effective dates.

Chapter 3 – Claims
Claims Overview
The Claims menu gives you access to a variety of information about the claims that you have submitted to Jurisdiction B or C, including:
- Claim status
- Explanation of denied/reduced claims
- Additional Documentation Request (ADR) viewing and response submission
- Pending claim information
- Ability to view/order a duplicate Remittance Advice (RA) and view an RA summary
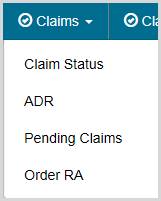
Within the Claims menu, there are four main menu options: Claim Status, ADR, Pending Claims, and Order RA. Use the Claim Status screen to search for claim status and claim explanations. To view and/or respond to an ADR letter, go to the ADR screen. To find the total number of pending claims for your NPI/PTAN, go to the Pending Claims screen. If you need to order a duplicate Remittance Advice (RA) or view an RA summary, go to the Order RA screen (note that you can also order a duplicate RA after performing a claim status search).
All screens within the Claims menu automatically populate your NPI and PTAN; therefore you do not need to manually enter this information. If you have more than one NPI/PTAN and need to use a different NPI/PTAN than what is currently selected, follow the instructions in the Change NPI/PTAN section in this manual.
Top
Claim Status
The Claim Status screen in myCGS allows you to find the status of any claim you have submitted to Jurisdiction B or C (depending on which jurisdiction you have selected). Within the Claim Status screen, you can find detailed information about your individual claims, including claim denial explanations. To access claim status, select the Claim Status option in the Claims menu.
Searching for Claims and Explanations
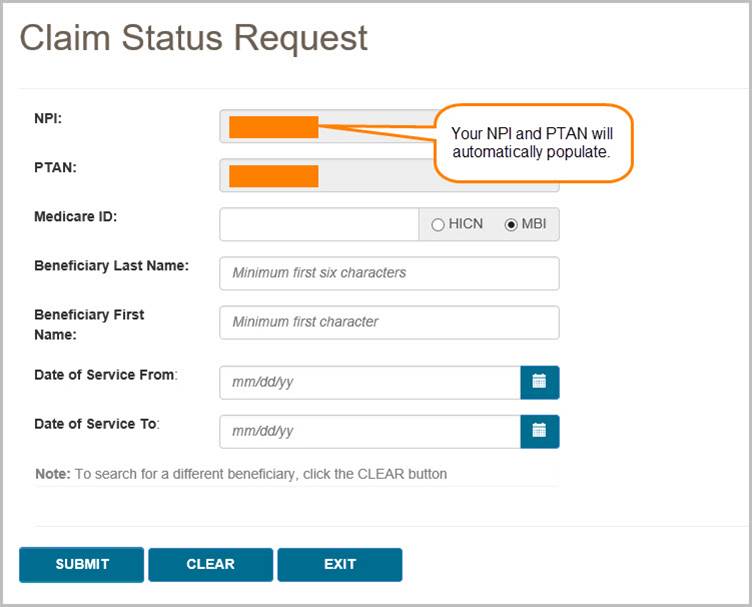
To search for the status of a claim, enter the following information on the Claim Status Request screen:
- Medicare ID
- Beneficiary Last Name
- Beneficiary First Name
- Date of Service From
- Date of Service To (optional)
NOTE: When entering the date of service, myCGS will automatically add slashes; you only need to enter the eight digits of the date of service. This is true of all date fields in myCGS.
Your NPI and PTAN will be auto-filled based on the NPI/PTAN you have selected from your profile. The search results will be limited to only display claim history for the NPI/PTAN listed in the search criteria. If you need to use a different NPI/PTAN than what is currently selected, follow the instructions in the Change NPI/PTAN section in this manual.
Note that the "Date of Service To" field is optional. If you are looking for only one specific date of service, leave this field blank. If you would like to see all claims that you have submitted for a beneficiary over a certain period of time, then use this field to span the date range in your search.
After entering the claim data, press the SUBMIT button.
Claim Status Summary
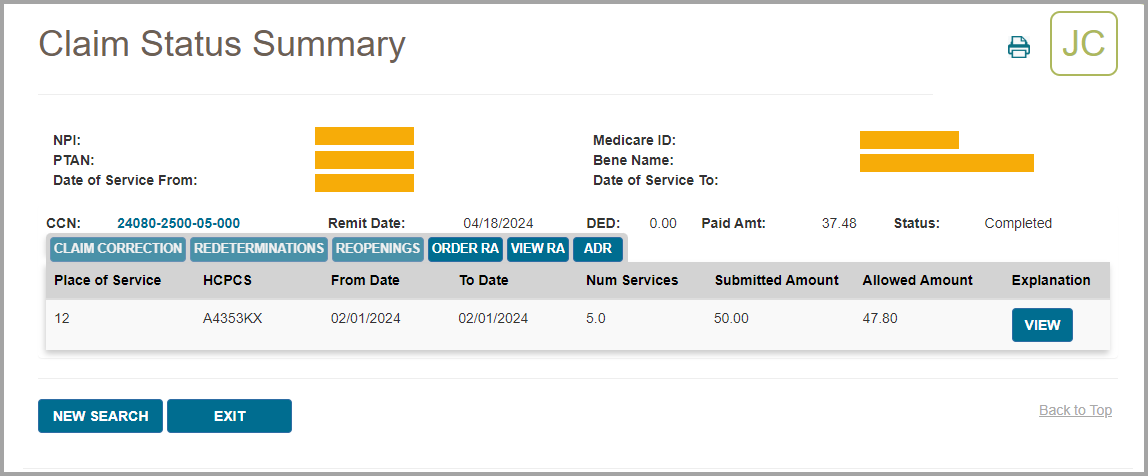
After pressing the SUBMIT button, myCGS will return claim information found for the search criteria. The following information will be displayed on screen:
- Claim Control Number (CCN)
- Remit Date
- Deductible Applied (DED)
- Paid Amount
- Status
- Place of Service
- HCPCS Code
- From Date
- To Date
- Number of Services
- Submitted Amount
- Allowed Amount
- Claim explanation (if applicable)
In addition to the above claim information, the Claim Status screen in myCGS includes several "claim action buttons" which allow you to perform additional tasks related to the claim. Refer to the Claim Actions section below for details.
The image below shows an example of the Claim Status Summary screen:
Claim Actions
On the Claim Status Summary screen in myCGS, there are several claim action buttons that allow you to perform specific tasks associated with the claim. There are six claim action buttons on the Claim Status Summary screen:
- Claim Correction – request a simple correction to the claim
- Redeterminations – submit a Redetermination request form for the claim
- Reopenings – submit a Reopening request form for the claim
- Order RA – order a duplicate Remittance Advice
- View RA – view a copy of your Remittance Advice
- ADR – check to see if an ADR letter was sent regarding the claim

If you need to make a simple correction to a completed claim, you can do so by using the Claim Correction button. Refer to the Claim Correction section in this manual for instructions on using the Claim Correction feature in myCGS.
To submit Redeterminations or Reopenings requests from the Claim Status screen, you can do so via the Redeterminations or Reopenings button (whichever is appropriate). Refer to the Redeterminations Form Submission section and Reopenings Form Submission section for instructions.
If you would like to order a duplicate copy of a Remittance Advice (RA), press the Order RA button. A duplicate RA will then be printed and mailed to your address on file. You can also order a duplicate RA from the Order RA screen (refer to the Order RA section below).
To check to see if an Additional Documentation Request (ADR) letter was sent regarding the claim, press the ADR button. If an ADR letter was indeed sent, a popup box will display the ADR Detail screen, where you can view the ADR letter itself and respond to the ADR if the claim is still pending. Refer to the ADR section below for details and instructions on using the ADR Detail screen and how to respond to an ADR in myCGS.
NOTE: If you are an End User, your default permissions to Claim Corrections, Redeterminations, Reopenings, and ADR are set to off. Your Designated Approver must grant you permission to use these features.
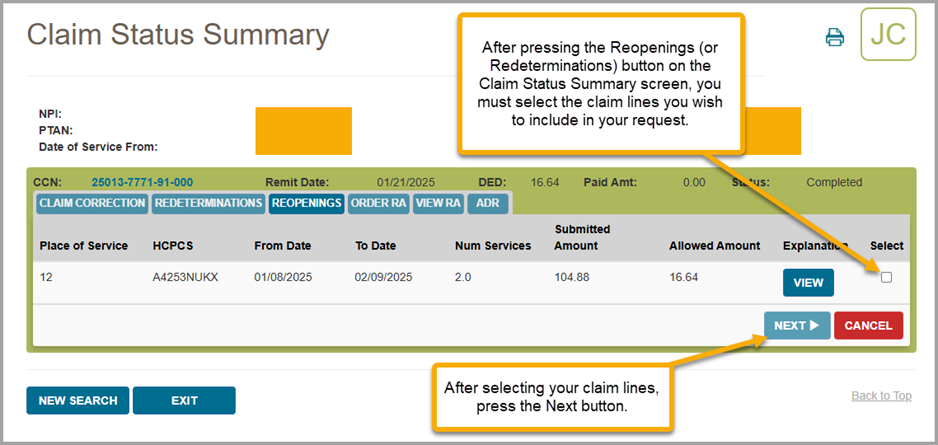
When submitting Redeterminations or Reopenings requests via the Claim Status screen, you will need to select the specific claim line(s) you wish to include in your submission request. To do so, first press the Redeterminations or Reopenings button (as appropriate), and then select the appropriate claim line(s) using the "Select" checkboxes as shown in the image below.
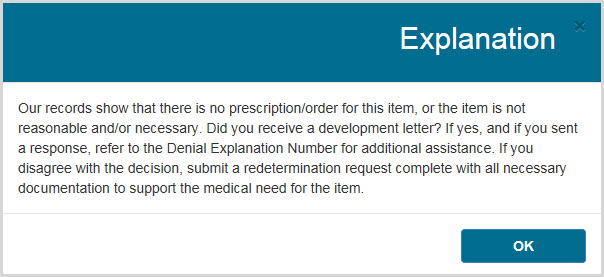
Claim Explanations
If a claim you have submitted has been denied or has paid at less than the submitted amount, myCGS will provide an explanation to help you understand the situation. Press on the View button in the Explanation column in order to see the claim explanation. A new window will pop up showing the explanation, as shown in the image below. Press the OK button to dismiss the message.
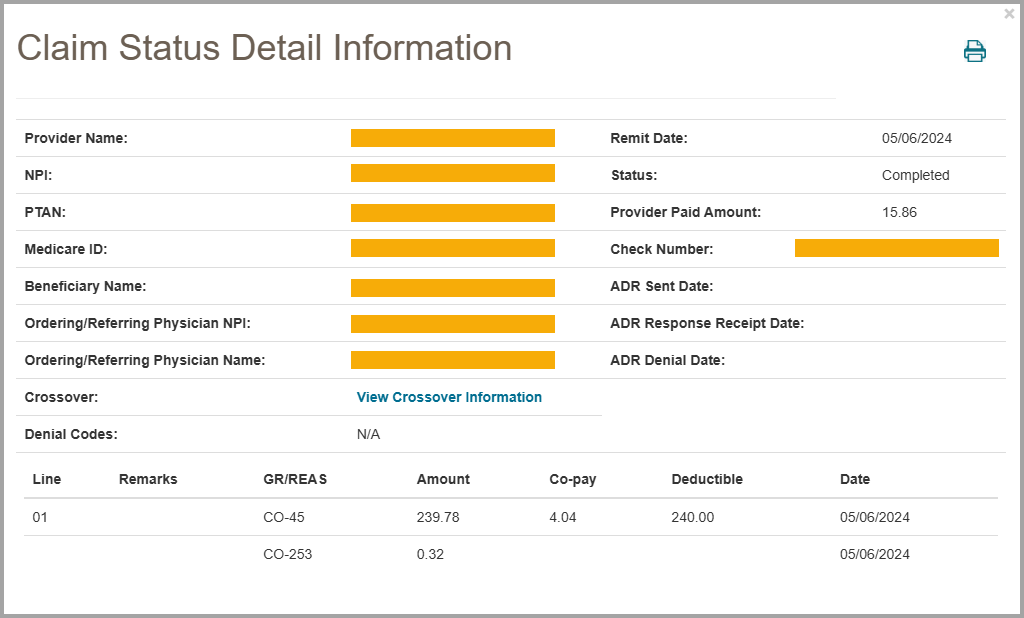
Additional Claim Detail
You can select a displayed claim to get more detail using the CCN link of the claim. After selecting the CCN, the Claim Status Detail Information window will appear. The following additional detail is available:
- Provider Name
- NPI
- PTAN
- Medicare ID
- Beneficiary Name
- Ordering/Referring Physician NPI
- Ordering/Referring Physician Name
- Crossover (to view Crossover information, press on the "View Crossover Information" link) (if applicable)
- Denial Codes (if applicable)
- Remit Date
- Status
- Provider Paid Amount
- Check Number (if applicable)
- ADR Sent Date (if applicable)
- ADR Response Receipt Date (if applicable)
- ADR Denial Date (if applicable)
- Remarks Codes, GR/REAS Codes, and their Corresponding Amounts, as well as Co-pay and Deductible Amounts
The following image shows an example of the Claim Status Detail Information window:
To return to the Claim Summary screen, press the EXIT button.
Top
ADR
When the DME MAC needs additional information to process a claim correctly, we send what is called an Additional Documentation Request (ADR) letter. This may include claims that are currently in process and have not received a payment decision (known as Pre-Pay) or claims that were initially paid but now require additional information to maintain payment (Post-Pay). If you receive an ADR letter, you must respond to the request in the given timeframe in order for your claim to be processed correctly and avoid denial (or recoupment). myCGS gives you the ability to check ADR status, view ADR letters, and submit your response directly within the portal.
The ADR screen in myCGS gives you access to all of your ADR needs. From the ADR screen, which you can access via the ADR option in the Claims menu, you can:
- Find all of your open and/or closed ADR cases (for both Pre-Pay and Post-Pay)
- Check the status of your ADR cases
- View the details of your ADR claims
- View a copy of the ADR letter that was mailed to you
- Submit your response to the ADR
- View a summary of any education provided to you by CGS
The sections below outline each individual ADR screen and function. For a "quick reference" guide on how to respond to an ADR in myCGS, refer to the ADR Response Quick Reference section.
Top
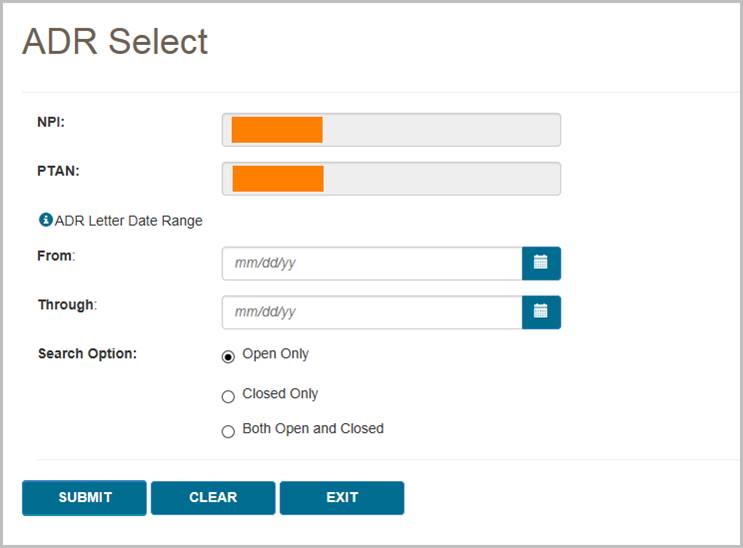
ADR Select
The ADR Select screen allows you to search for ADRs (both Pre-Pay and Post-Pay) over a three-month span. You can search for open cases, closed cases, or both. The search will return results based on the date ADR letters were generated (not the date of service of the claim).
To search for ADRs, enter the following data on the ADR screen:
Your NPI and PTAN will be auto-filled based on the NPI/PTAN you have selected from your profile. The search results will be limited to only display claim history for the NPI/PTAN listed in the search criteria. If you need to use a different NPI/PTAN than what is currently selected, follow the instructions in the Change NPI/PTAN section in this manual.
After entering your ADR search data, press the SUBMIT button.
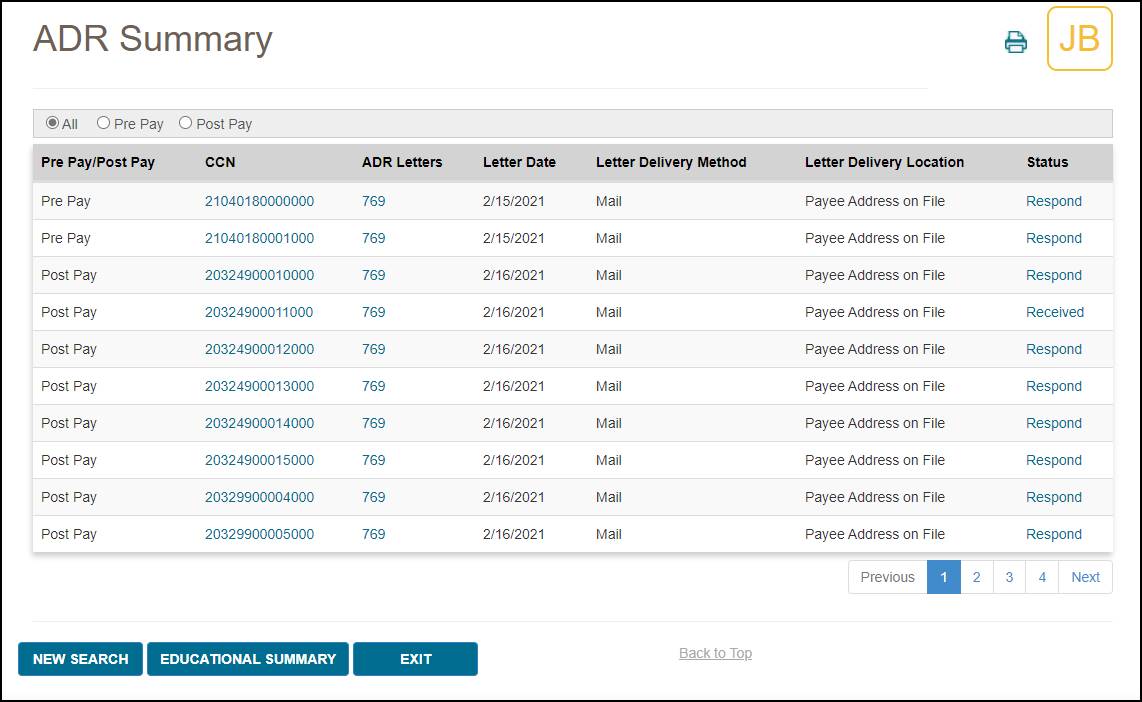
The ADR Summary screen will then display any ADRs that meet your search criteria. Note that you can use the Pre Pay and Post Pay radio buttons at the top of the ADR Summary results screen to filter the ADRs shown.
On the ADR Summary screen, you will find:
- Pre Pay/Post Pay – an indicator of whether the ADR was sent prior to the initial claim's completion (Pre-Pay) or after the initial claim's completion (Post-Pay)
- CCN – the Claim Control Number of the claim associated with the ADR; press the CCN to view the ADR Detail screen
- ADR Letters – the ADR letter number; press the ADR letter number to view a copy of the letter
- Letter Date – the date the ADR letter was generated by CGS
- Letter Delivery Method – the method by which the letter was sent to you (i.e., mail)
- Letter Delivery Location – the location where the ADR letter was sent
- Status – the current status of the ADR and claim; there are three possible statuses:
- Closed – the ADR has completed; press the closed status link to view the ADR Detail screen
- Respond – the claim is waiting a response to the ADR; press the respond status link to respond to the ADR in myCGS
- Received – a response to the ADR has been received and is currently pending; it may take up to 30 days to process the claim once we have received your ADR response
To view a summary of the education that has been provided to you by our Medical Review department, select the Educational Summary button at the bottom of the ADR results (see the Educational Summary section below).
Top
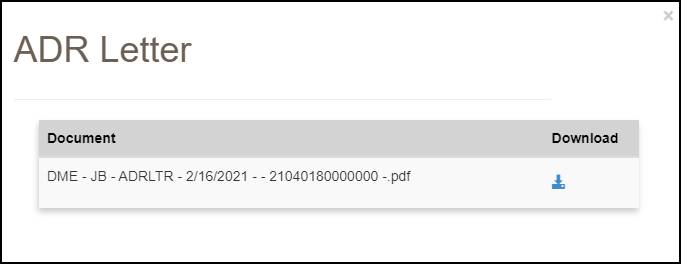
Viewing an ADR Letter
To view a copy of the ADR letter sent by CGS, press the ADR letter number (for instance, "769" in the image above). After pressing the link, a popup window will be displayed showing the letter details. To view the letter itself, press the Download icon. The letter will then open in a new window.
Top
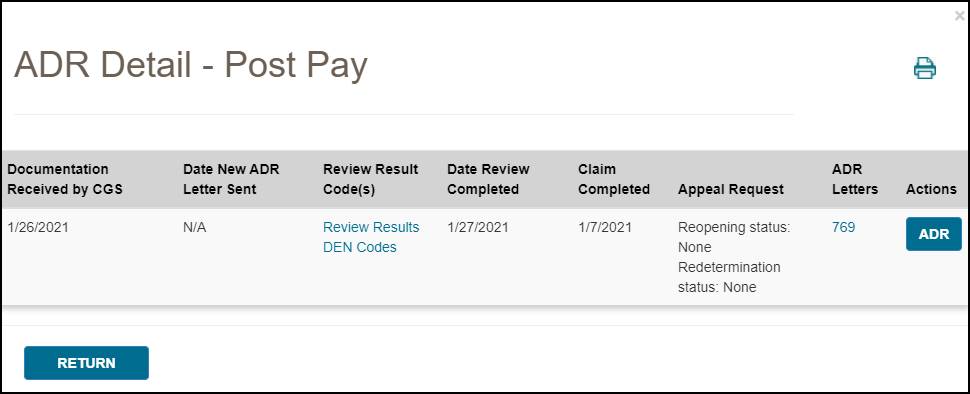
ADR Detail
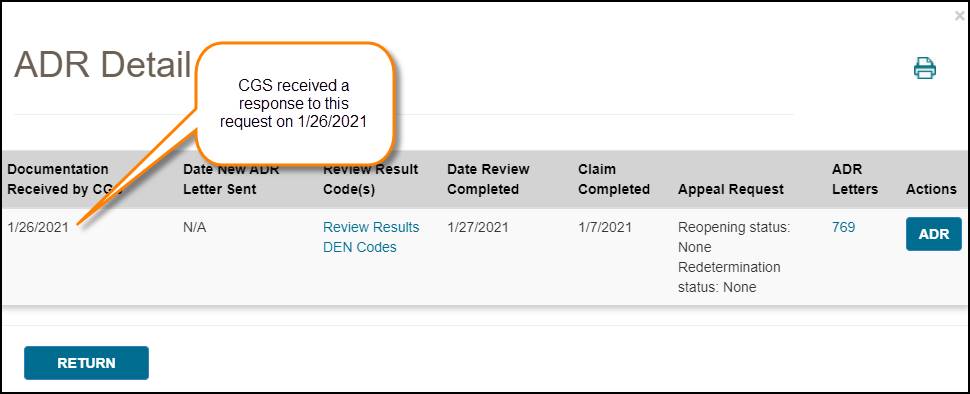
To view details of an ADR, select the CCN link of the claim listed on the ADR Summary screen. The ADR Detail screen will then be displayed with the following information:
- Documentation Received by CGS – the date CGS received a response to the ADR (if applicable); note that this date may not match the ADR Response Receipt Date listed on the Claim Status screen exactly, as these dates are pulled from different systems
- Date New ADR Letter Sent – the date a new ADR letter was sent (if applicable)
- Review Result Code(s) – select the Review Results/DEN Codes to view an explanation of why the claim was denied (if applicable)
- The Review Results link applies to Post-Pay ADR only
- The DEN Codes link applies to Pre-Pay ADR only
- Date Review Completed – the date the ADR review was completed
- Claim Completed – the date the claim was completed
- Appeal Request Status – the status of any related Reopening or Redetermination request (if applicable)
- ADR Letters – the ADR letter number; press the ADR number to view a copy of the ADR letter
- Actions – press the ADR button to view claim status details of the claim in question; press the Respond button (if present) to respond to an open ADR
Top
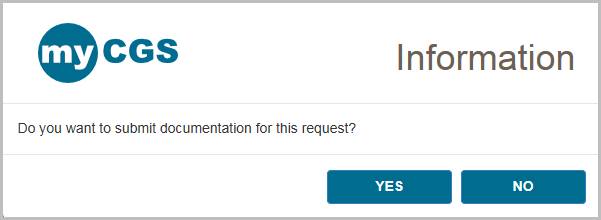
Responding to an ADR
To respond to an ADR in myCGS, press the Respond button on the ADR Detail screen or the ADR Summary screen. A popup window will ask if you wish to submit documentation for the ADR. Press Yes to continue.
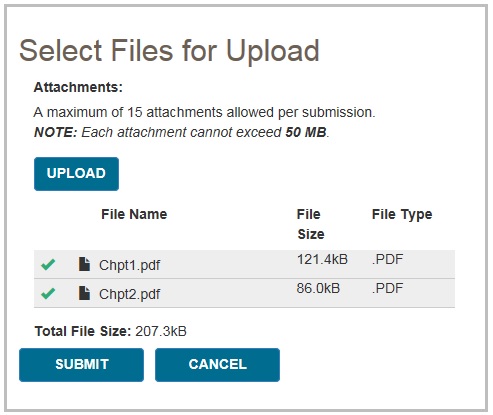
You will then see the ADR Submission screen, which will list details about the claim and provide the ability to upload documentation. Review the screen to be sure that you are responding to the correct claim and then use the Upload button to attach your documentation.
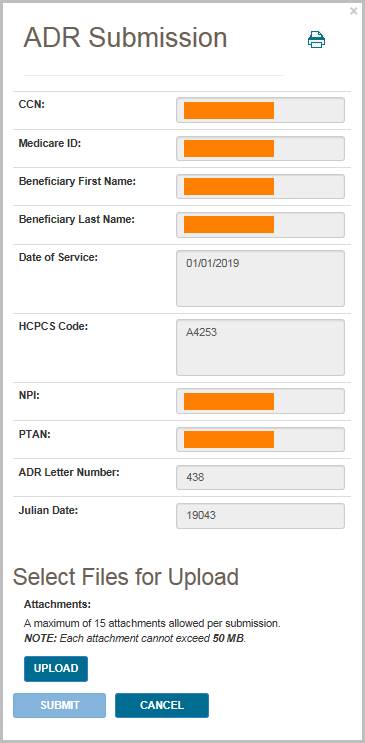
After pressing the Upload button, a navigation window will popup allowing you to select the files you wish to attach and submit to CGS.
NOTE: The maximum size limit for upload is 50 MB per file. A maximum of 15 files may be attached per submission. Only the following files types are permitted for submission in myCGS:
After selecting your documents, myCGS will list the files under the Upload button on the ADR Submission screen. Verify that all of the appropriate files have been selected and then press the Submit button to submit your response.
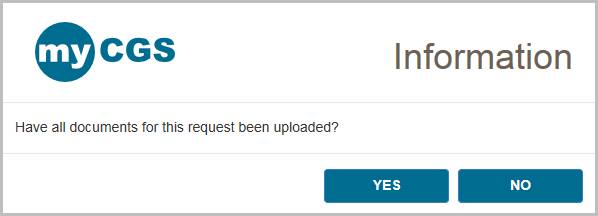
A popup message will appear, asking if you have attached all of your documentation. If you are ready to submit, press Yes. If you need to attach more documents or wish to cancel your response, press No.
NOTE: Any additional submissions for this same ADR will not be considered. You must include all documentation in your initial submission.
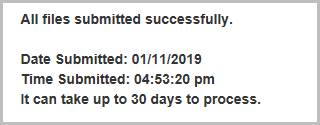
After pressing yes, myCGS will upload your documents into the CGS internal processing system. You will receive a message stating that all files were submitted successfully, with the time and date of the submission. Note that the daily ADR response cut off time is 4:00 pm Central Time—any response submitted after 4:00 pm Central Time is considered to be received the following business day.
After you have submitted a response, you can verify your submission on the ADR Detail screen in the "Documentation Received by CGS" field. Note that this field will not update immediately after document submission, as the request must be processed in our internal systems before the documentation received date is updated.
Top
Educational Summary
The Educational Summary screen provides details and copies of any education provided to you by CGS, either by letter or telephone. To view your educational summary, perform an ADR search as detailed above, and press the Educational Summary button from the ADR Summary screen. The Educational Summary screen will then be displayed, showing any education provided during the date span of your search. Note that Educational Summary documents dated prior to 3/1/2019 are not available for viewing in myCGS.
NOTE: Educational Summary applies to Pre-Pay ADR only.
The Educational Summary screen provides the following information:
- Education Date – the date the education was provided
- Education Type – the type of education, letter or telephone; press the Letter or Teleconference link to view a copy of the letter or teleconference summary (opens in a new window/tab)
- HCPCS Code – the specific HCPCS code which was discussed in the education (if applicable)
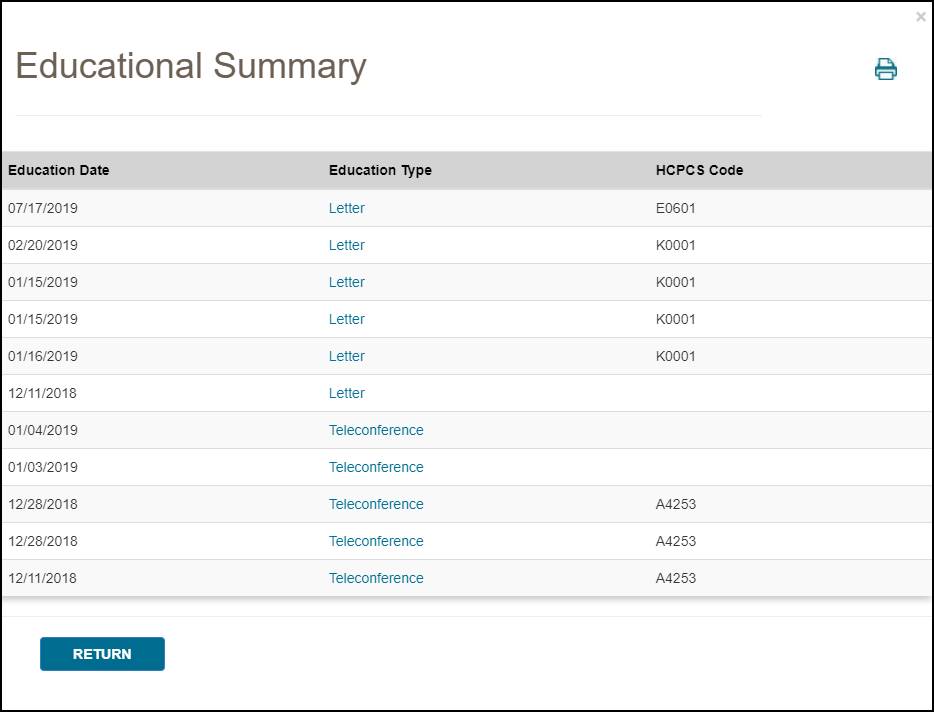
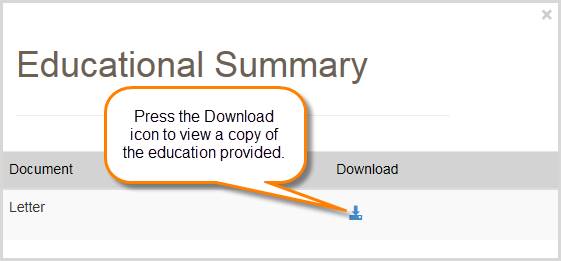
In order to view a PDF of the education provided, press the link found under Education Type (letter or teleconference). A popup window will appear—press the download icon on the popup window to view a copy of the education.
Top
ADR Response Quick Reference
Below are simple step by step instructions on how to submit an ADR response. You can submit ADR responses through either the Claim Status screen or the ADR screen in myCGS.
From the ADR Screen
Follow these steps to submit a response to an ADR letter using the ADR screen in myCGS:
- Go to the ADR screen and perform a search for open cases based on the date of your ADR letter (you can search up to a three-month date span).
- From the ADR Summary screen, press the Respond link listed in the Status column for the CCN in question.
NOTE: If you want to view details of the ADR before submitting your response, you can click on the CCN link of the ADR from the ADR Summary screen. This will open the ADR Detail screen. You can then submit your response from the ADR Detail screen by pressing the Respond button.
- A popup window will ask if you want to submit documentation. Select Yes.
- The ADR submission window will be displayed. Press the Upload button to select your files. Navigate to where your files are stored and select all of your desired documentation. Once you have made all of your file selections, press the Submit button.
- A popup window will ask if you have uploaded all of your documents. If you have selected all of your desired files, select Yes to submit your request. If you forgot to include a file, select No and upload the rest of your files.
- myCGS will then ingest all your documentation into our internal processing system. Once the upload has completed, you will receive a message stating that the files were successfully submitted. Note that it may take up to 30 days for your request to be processed by CGS.
From the Claim Status Screen
If you know the specifics of the claim in question, you can submit an ADR response from the Claim Status screen. Follow these steps:
- Go to the Claim Status screen and perform a search for the claim in question.
- On the Claim Status Summary screen, press the ADR button. The ADR Detail screen will be displayed (if an ADR has been sent).
- On the ADR Detail screen, select the Respond button (note that the Respond button will only be present if the claim is still open).
- A popup window will ask if you want to submit documentation. Select Yes.
- The ADR submission window will be displayed. Press the Upload button to select your files. Navigate to where your files are stored and select all of your desired documentation. Once you have made all of your file selections, press the Submit button.
- A popup window will ask if you have uploaded all of your documents. If you have selected all of your desired files, select Yes to submit your request. If you forgot to include a file, select No and upload the rest of your files.
- myCGS will then ingest all your documentation into our internal processing system. Once the upload has completed, you will receive a message stating that the files were successfully submitted. Note that it may take up to 30 days for your request to be processed by CGS.
Top
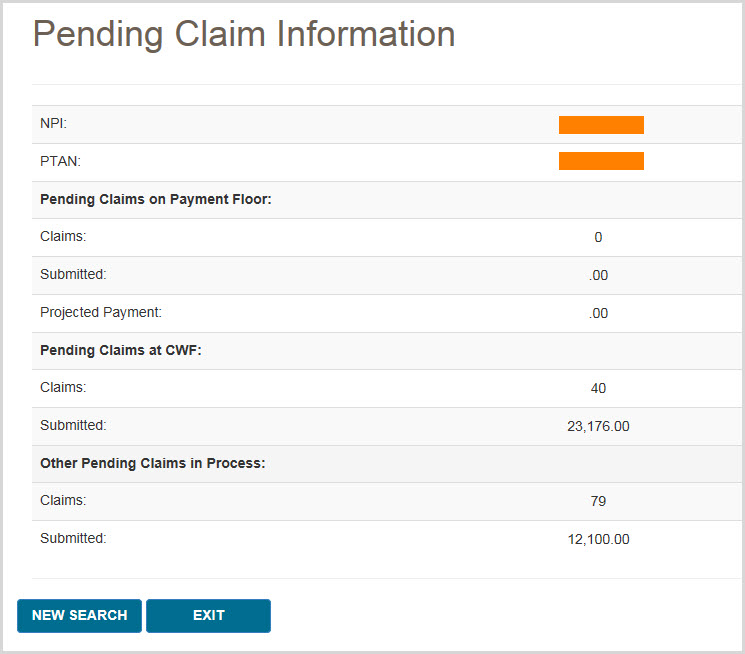
Pending Claims
The Pending Claims screen allows you to view information about the number of claims you have pending on either the payment floor, the Common Working Files (CWF), or in process. To access the pending claims, select the Pending Claims option in the Claims menu.
Your NPI and PTAN will be auto-filled based on the NPI/PTAN you have selected from your profile. If you need to use a different NPI/PTAN than what is currently selected, change your NPI/PTAN following the instructions in the Change NPI/PTAN section in this manual.
To search for your pending claim information, press the SUBMIT button. myCGS will then display three types of pending claim information, as described below.
Pending Claims on Payment Floor
When a claim has been submitted to Medicare, it must wait a certain period of time before payment can be released. When a claim has been approved but has not yet reached the minimum waiting period, it is on the "payment floor." When searching for pending claim information, myCGS will display the number of your claims currently on the payment floor, as well as the dollar amount submitted and the projected payment amount for the claims. Note that the projected payment amount may differ from the actual Medicare payment/check that you will receive.
Pending Claims at CWF
When a claim has been approved for payment by CGS, it then must go to the Common Working Files (CWF) for final approval. Claims that are pending at CWF are one step closer to completion, but have not yet actually been approved.
Pending claim information in myCGS provides you with the total number of claims and dollar amount submitted that are currently pending at CWF.
Other Pending Claims in Process
Before CGS has made a claim decision, your claim is considered to be pending and in process. Pending claim information in myCGS allows you to see the total number of claims and dollar amount submitted that have been received by CGS, but in which a payment determination has not yet been made.
Top
Order RA
The Order RA screen allows you to view a duplicate copy of a Remittance Advice (RA). You can also view a detailed summary of an RA or order a duplicate copy of an RA that will be sent via mail.
To view/order an RA or RA summary, follow these steps:
- In the Claims menu, select the Order RA option.
- Your NPI and PTAN will be auto-filled based on the NPI/PTAN you have selected from your profile. If you need to use a different NPI/PTAN than what is currently selected, change your NPI/PTAN following the instructions in the Change NPI/PTAN section in this manual.
- In the "Remittance Advice Date From" field, enter the date of the RA you wish to view/order, and then press the SUBMIT button.
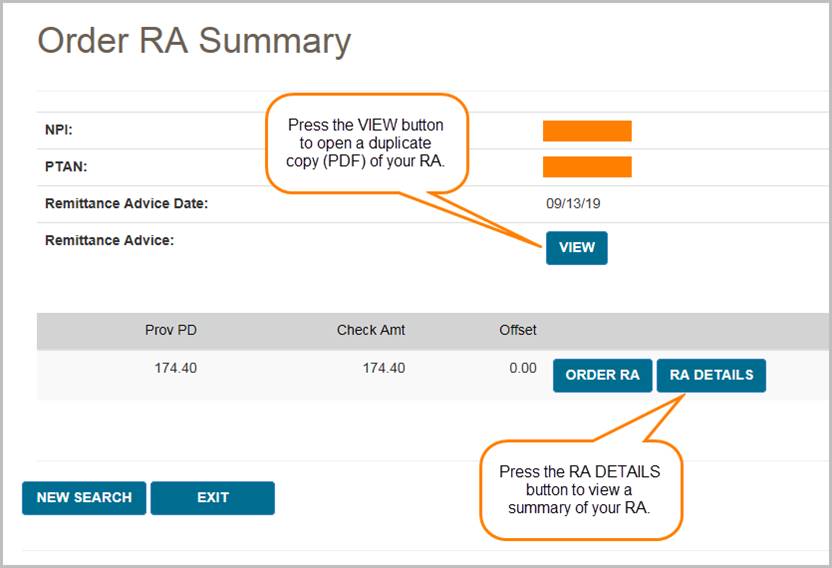
A general summary of your RA will then be displayed, showing the provider paid amount, check amount, and offset amount.
- To view a copy of your RA, press the View button found in the Remittance Advice field. A popup window that includes a Download button will open. Press the Download button, and the RA will open in a new window.
NOTE: RAs are available in myCGS the afternoon following the day they were generated. For instance, if an RA is generated/dated October 7, it will be available for viewing on October 8 in the afternoon. Only electronic RAs generated beginning October 7, 2019, and paper RAs generated beginning September 10, 2019, are viewable in myCGS. For older RAs, use either the Order RA or RA Details option.
- To order a duplicate RA via mail, press the Order RA button.
- To view a detailed summary of your RA, press the RA Details button.
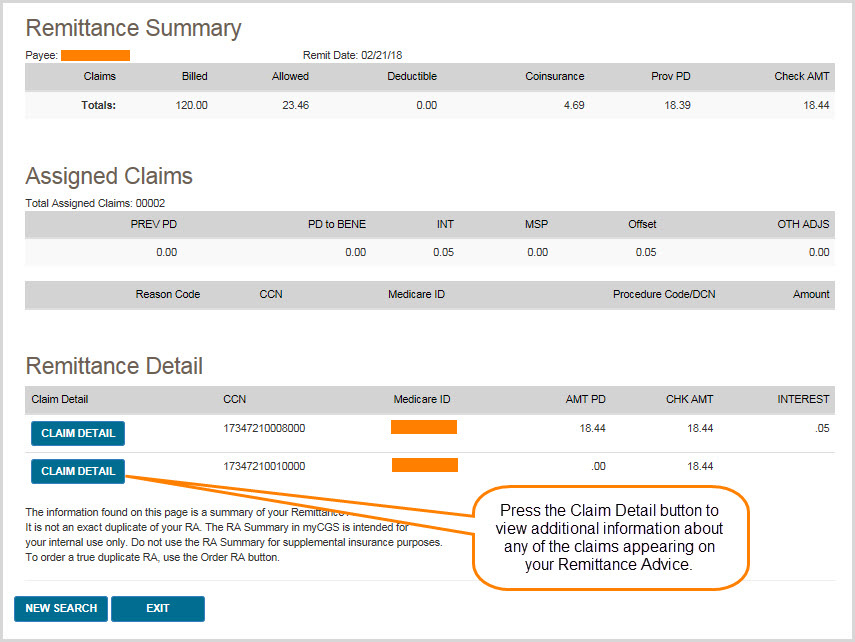
If you choose to view RA Details, your screen will expand to show the following fields:
- Claim totals (billed amount, allowed amount, deductible, coinsurance, provider paid amount, and check amount)
- Total assigned claims
- Financial details (previously paid amount, paid to beneficiary amount, interest, MSP, offset amount, and other adjustments)
- Offsets (CCN, patient number, DCN, and offset amount)
- Claim details (CCN, HICN/MBI, amount paid, check amount, and interest for each individual claim on the RA)
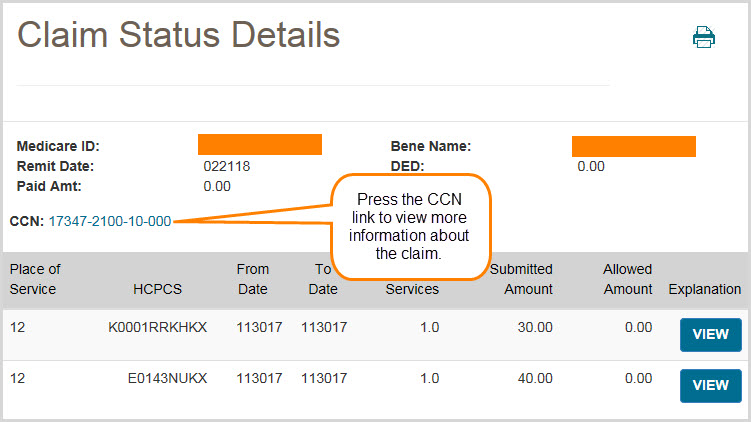
When viewing RA Details, you can also find details for each individual claim on the RA. Simply press the Claim Detail button, as shown in the image below, and a new window will pop up showing a summary of the individual claim.
You can view even more information about the claim using the CCN link from the Claim Detail window, as shown below.
Top
Error processing SSI file
Claims Overview
The Claims menu gives you access to a variety of information about the claims that you have submitted to Jurisdiction B or C, including:
- Claim status
- Explanation of denied/reduced claims
- Additional Documentation Request (ADR) viewing and response submission
- Pending claim information
- Ability to view/order a duplicate Remittance Advice (RA) and view an RA summary
Within the Claims menu, there are four main menu options: Claim Status, ADR, Pending Claims, and Order RA. Use the Claim Status screen to search for claim status and claim explanations. To view and/or respond to an ADR letter, go to the ADR screen. To find the total number of pending claims for your NPI/PTAN, go to the Pending Claims screen. If you need to order a duplicate Remittance Advice (RA) or view an RA summary, go to the Order RA screen (note that you can also order a duplicate RA after performing a claim status search).
All screens within the Claims menu automatically populate your NPI and PTAN; therefore you do not need to manually enter this information. If you have more than one NPI/PTAN and need to use a different NPI/PTAN than what is currently selected, follow the instructions in the Change NPI/PTAN section in this manual.
Claim Status
The Claim Status screen in myCGS allows you to find the status of any claim you have submitted to Jurisdiction B or C (depending on which jurisdiction you have selected). Within the Claim Status screen, you can find detailed information about your individual claims, including claim denial explanations. To access claim status, select the Claim Status option in the Claims menu.
Searching for Claims and Explanations
To search for the status of a claim, enter the following information on the Claim Status Request screen:
- Medicare ID
- Beneficiary Last Name
- Beneficiary First Name
- Date of Service From
- Date of Service To (optional)
NOTE: When entering the date of service, myCGS will automatically add slashes; you only need to enter the eight digits of the date of service. This is true of all date fields in myCGS.
Your NPI and PTAN will be auto-filled based on the NPI/PTAN you have selected from your profile. The search results will be limited to only display claim history for the NPI/PTAN listed in the search criteria. If you need to use a different NPI/PTAN than what is currently selected, follow the instructions in the Change NPI/PTAN section in this manual.
Note that the "Date of Service To" field is optional. If you are looking for only one specific date of service, leave this field blank. If you would like to see all claims that you have submitted for a beneficiary over a certain period of time, then use this field to span the date range in your search.
After entering the claim data, press the SUBMIT button.
Claim Status Summary
After pressing the SUBMIT button, myCGS will return claim information found for the search criteria. The following information will be displayed on screen:
- Claim Control Number (CCN)
- Remit Date
- Deductible Applied (DED)
- Paid Amount
- Status
- Place of Service
- HCPCS Code
- From Date
- To Date
- Number of Services
- Submitted Amount
- Allowed Amount
- Claim explanation (if applicable)
In addition to the above claim information, the Claim Status screen in myCGS includes several "claim action buttons" which allow you to perform additional tasks related to the claim. Refer to the Claim Actions section below for details.
The image below shows an example of the Claim Status Summary screen:
Claim Actions
On the Claim Status Summary screen in myCGS, there are several claim action buttons that allow you to perform specific tasks associated with the claim. There are six claim action buttons on the Claim Status Summary screen:
- Claim Correction – request a simple correction to the claim
- Redeterminations – submit a Redetermination request form for the claim
- Reopenings – submit a Reopening request form for the claim
- Order RA – order a duplicate Remittance Advice
- View RA – view a copy of your Remittance Advice
- ADR – check to see if an ADR letter was sent regarding the claim
If you need to make a simple correction to a completed claim, you can do so by using the Claim Correction button. Refer to the Claim Correction section in this manual for instructions on using the Claim Correction feature in myCGS.
To submit Redeterminations or Reopenings requests from the Claim Status screen, you can do so via the Redeterminations or Reopenings button (whichever is appropriate). Refer to the Redeterminations Form Submission section and Reopenings Form Submission section for instructions.
If you would like to order a duplicate copy of a Remittance Advice (RA), press the Order RA button. A duplicate RA will then be printed and mailed to your address on file. You can also order a duplicate RA from the Order RA screen (refer to the Order RA section below).
To check to see if an Additional Documentation Request (ADR) letter was sent regarding the claim, press the ADR button. If an ADR letter was indeed sent, a popup box will display the ADR Detail screen, where you can view the ADR letter itself and respond to the ADR if the claim is still pending. Refer to the ADR section below for details and instructions on using the ADR Detail screen and how to respond to an ADR in myCGS.
NOTE: If you are an End User, your default permissions to Claim Corrections, Redeterminations, Reopenings, and ADR are set to off. Your Designated Approver must grant you permission to use these features.
When submitting Redeterminations or Reopenings requests via the Claim Status screen, you will need to select the specific claim line(s) you wish to include in your submission request. To do so, first press the Redeterminations or Reopenings button (as appropriate), and then select the appropriate claim line(s) using the "Select" checkboxes as shown in the image below.
Claim Explanations
If a claim you have submitted has been denied or has paid at less than the submitted amount, myCGS will provide an explanation to help you understand the situation. Press on the View button in the Explanation column in order to see the claim explanation. A new window will pop up showing the explanation, as shown in the image below. Press the OK button to dismiss the message.
Additional Claim Detail
You can select a displayed claim to get more detail using the CCN link of the claim. After selecting the CCN, the Claim Status Detail Information window will appear. The following additional detail is available:
- Provider Name
- NPI
- PTAN
- Medicare ID
- Beneficiary Name
- Ordering/Referring Physician NPI
- Ordering/Referring Physician Name
- Crossover (to view Crossover information, press on the "View Crossover Information" link) (if applicable)
- Denial Codes (if applicable)
- Remit Date
- Status
- Provider Paid Amount
- Check Number (if applicable)
- ADR Sent Date (if applicable)
- ADR Response Receipt Date (if applicable)
- ADR Denial Date (if applicable)
- Remarks Codes, GR/REAS Codes, and their Corresponding Amounts, as well as Co-pay and Deductible Amounts
The following image shows an example of the Claim Status Detail Information window:
To return to the Claim Summary screen, press the EXIT button.
ADR
When the DME MAC needs additional information to process a claim correctly, we send what is called an Additional Documentation Request (ADR) letter. This may include claims that are currently in process and have not received a payment decision (known as Pre-Pay) or claims that were initially paid but now require additional information to maintain payment (Post-Pay). If you receive an ADR letter, you must respond to the request in the given timeframe in order for your claim to be processed correctly and avoid denial (or recoupment). myCGS gives you the ability to check ADR status, view ADR letters, and submit your response directly within the portal.
The ADR screen in myCGS gives you access to all of your ADR needs. From the ADR screen, which you can access via the ADR option in the Claims menu, you can:
- Find all of your open and/or closed ADR cases (for both Pre-Pay and Post-Pay)
- Check the status of your ADR cases
- View the details of your ADR claims
- View a copy of the ADR letter that was mailed to you
- Submit your response to the ADR
- View a summary of any education provided to you by CGS
The sections below outline each individual ADR screen and function. For a "quick reference" guide on how to respond to an ADR in myCGS, refer to the ADR Response Quick Reference section.
ADR Select
The ADR Select screen allows you to search for ADRs (both Pre-Pay and Post-Pay) over a three-month span. You can search for open cases, closed cases, or both. The search will return results based on the date ADR letters were generated (not the date of service of the claim).
To search for ADRs, enter the following data on the ADR screen:
Your NPI and PTAN will be auto-filled based on the NPI/PTAN you have selected from your profile. The search results will be limited to only display claim history for the NPI/PTAN listed in the search criteria. If you need to use a different NPI/PTAN than what is currently selected, follow the instructions in the Change NPI/PTAN section in this manual.
After entering your ADR search data, press the SUBMIT button.
The ADR Summary screen will then display any ADRs that meet your search criteria. Note that you can use the Pre Pay and Post Pay radio buttons at the top of the ADR Summary results screen to filter the ADRs shown.
On the ADR Summary screen, you will find:
- Pre Pay/Post Pay – an indicator of whether the ADR was sent prior to the initial claim's completion (Pre-Pay) or after the initial claim's completion (Post-Pay)
- CCN – the Claim Control Number of the claim associated with the ADR; press the CCN to view the ADR Detail screen
- ADR Letters – the ADR letter number; press the ADR letter number to view a copy of the letter
- Letter Date – the date the ADR letter was generated by CGS
- Letter Delivery Method – the method by which the letter was sent to you (i.e., mail)
- Letter Delivery Location – the location where the ADR letter was sent
- Status – the current status of the ADR and claim; there are three possible statuses:
- Closed – the ADR has completed; press the closed status link to view the ADR Detail screen
- Respond – the claim is waiting a response to the ADR; press the respond status link to respond to the ADR in myCGS
- Received – a response to the ADR has been received and is currently pending; it may take up to 30 days to process the claim once we have received your ADR response
To view a summary of the education that has been provided to you by our Medical Review department, select the Educational Summary button at the bottom of the ADR results (see the Educational Summary section below).
Viewing an ADR Letter
To view a copy of the ADR letter sent by CGS, press the ADR letter number (for instance, "769" in the image above). After pressing the link, a popup window will be displayed showing the letter details. To view the letter itself, press the Download icon. The letter will then open in a new window.
ADR Detail
To view details of an ADR, select the CCN link of the claim listed on the ADR Summary screen. The ADR Detail screen will then be displayed with the following information:
- Documentation Received by CGS – the date CGS received a response to the ADR (if applicable); note that this date may not match the ADR Response Receipt Date listed on the Claim Status screen exactly, as these dates are pulled from different systems
- Date New ADR Letter Sent – the date a new ADR letter was sent (if applicable)
- Review Result Code(s) – select the Review Results/DEN Codes to view an explanation of why the claim was denied (if applicable)
- The Review Results link applies to Post-Pay ADR only
- The DEN Codes link applies to Pre-Pay ADR only
- Date Review Completed – the date the ADR review was completed
- Claim Completed – the date the claim was completed
- Appeal Request Status – the status of any related Reopening or Redetermination request (if applicable)
- ADR Letters – the ADR letter number; press the ADR number to view a copy of the ADR letter
- Actions – press the ADR button to view claim status details of the claim in question; press the Respond button (if present) to respond to an open ADR
Responding to an ADR
To respond to an ADR in myCGS, press the Respond button on the ADR Detail screen or the ADR Summary screen. A popup window will ask if you wish to submit documentation for the ADR. Press Yes to continue.
You will then see the ADR Submission screen, which will list details about the claim and provide the ability to upload documentation. Review the screen to be sure that you are responding to the correct claim and then use the Upload button to attach your documentation.
After pressing the Upload button, a navigation window will popup allowing you to select the files you wish to attach and submit to CGS.
NOTE: The maximum size limit for upload is 50 MB per file. A maximum of 15 files may be attached per submission. Only the following files types are permitted for submission in myCGS:
After selecting your documents, myCGS will list the files under the Upload button on the ADR Submission screen. Verify that all of the appropriate files have been selected and then press the Submit button to submit your response.
A popup message will appear, asking if you have attached all of your documentation. If you are ready to submit, press Yes. If you need to attach more documents or wish to cancel your response, press No.
NOTE: Any additional submissions for this same ADR will not be considered. You must include all documentation in your initial submission.
After pressing yes, myCGS will upload your documents into the CGS internal processing system. You will receive a message stating that all files were submitted successfully, with the time and date of the submission. Note that the daily ADR response cut off time is 4:00 pm Central Time—any response submitted after 4:00 pm Central Time is considered to be received the following business day.
After you have submitted a response, you can verify your submission on the ADR Detail screen in the "Documentation Received by CGS" field. Note that this field will not update immediately after document submission, as the request must be processed in our internal systems before the documentation received date is updated.
Educational Summary
The Educational Summary screen provides details and copies of any education provided to you by CGS, either by letter or telephone. To view your educational summary, perform an ADR search as detailed above, and press the Educational Summary button from the ADR Summary screen. The Educational Summary screen will then be displayed, showing any education provided during the date span of your search. Note that Educational Summary documents dated prior to 3/1/2019 are not available for viewing in myCGS.
NOTE: Educational Summary applies to Pre-Pay ADR only.
The Educational Summary screen provides the following information:
- Education Date – the date the education was provided
- Education Type – the type of education, letter or telephone; press the Letter or Teleconference link to view a copy of the letter or teleconference summary (opens in a new window/tab)
- HCPCS Code – the specific HCPCS code which was discussed in the education (if applicable)
In order to view a PDF of the education provided, press the link found under Education Type (letter or teleconference). A popup window will appear—press the download icon on the popup window to view a copy of the education.
ADR Response Quick Reference
Below are simple step by step instructions on how to submit an ADR response. You can submit ADR responses through either the Claim Status screen or the ADR screen in myCGS.
From the ADR Screen
Follow these steps to submit a response to an ADR letter using the ADR screen in myCGS:
- Go to the ADR screen and perform a search for open cases based on the date of your ADR letter (you can search up to a three-month date span).
- From the ADR Summary screen, press the Respond link listed in the Status column for the CCN in question.
NOTE: If you want to view details of the ADR before submitting your response, you can click on the CCN link of the ADR from the ADR Summary screen. This will open the ADR Detail screen. You can then submit your response from the ADR Detail screen by pressing the Respond button.
- A popup window will ask if you want to submit documentation. Select Yes.
- The ADR submission window will be displayed. Press the Upload button to select your files. Navigate to where your files are stored and select all of your desired documentation. Once you have made all of your file selections, press the Submit button.
- A popup window will ask if you have uploaded all of your documents. If you have selected all of your desired files, select Yes to submit your request. If you forgot to include a file, select No and upload the rest of your files.
- myCGS will then ingest all your documentation into our internal processing system. Once the upload has completed, you will receive a message stating that the files were successfully submitted. Note that it may take up to 30 days for your request to be processed by CGS.
From the Claim Status Screen
If you know the specifics of the claim in question, you can submit an ADR response from the Claim Status screen. Follow these steps:
- Go to the Claim Status screen and perform a search for the claim in question.
- On the Claim Status Summary screen, press the ADR button. The ADR Detail screen will be displayed (if an ADR has been sent).
- On the ADR Detail screen, select the Respond button (note that the Respond button will only be present if the claim is still open).
- A popup window will ask if you want to submit documentation. Select Yes.
- The ADR submission window will be displayed. Press the Upload button to select your files. Navigate to where your files are stored and select all of your desired documentation. Once you have made all of your file selections, press the Submit button.
- A popup window will ask if you have uploaded all of your documents. If you have selected all of your desired files, select Yes to submit your request. If you forgot to include a file, select No and upload the rest of your files.
- myCGS will then ingest all your documentation into our internal processing system. Once the upload has completed, you will receive a message stating that the files were successfully submitted. Note that it may take up to 30 days for your request to be processed by CGS.
Pending Claims
The Pending Claims screen allows you to view information about the number of claims you have pending on either the payment floor, the Common Working Files (CWF), or in process. To access the pending claims, select the Pending Claims option in the Claims menu.
Your NPI and PTAN will be auto-filled based on the NPI/PTAN you have selected from your profile. If you need to use a different NPI/PTAN than what is currently selected, change your NPI/PTAN following the instructions in the Change NPI/PTAN section in this manual.
To search for your pending claim information, press the SUBMIT button. myCGS will then display three types of pending claim information, as described below.
Pending Claims on Payment Floor
When a claim has been submitted to Medicare, it must wait a certain period of time before payment can be released. When a claim has been approved but has not yet reached the minimum waiting period, it is on the "payment floor." When searching for pending claim information, myCGS will display the number of your claims currently on the payment floor, as well as the dollar amount submitted and the projected payment amount for the claims. Note that the projected payment amount may differ from the actual Medicare payment/check that you will receive.
Pending Claims at CWF
When a claim has been approved for payment by CGS, it then must go to the Common Working Files (CWF) for final approval. Claims that are pending at CWF are one step closer to completion, but have not yet actually been approved.
Pending claim information in myCGS provides you with the total number of claims and dollar amount submitted that are currently pending at CWF.
Other Pending Claims in Process
Before CGS has made a claim decision, your claim is considered to be pending and in process. Pending claim information in myCGS allows you to see the total number of claims and dollar amount submitted that have been received by CGS, but in which a payment determination has not yet been made.
Order RA
The Order RA screen allows you to view a duplicate copy of a Remittance Advice (RA). You can also view a detailed summary of an RA or order a duplicate copy of an RA that will be sent via mail.
To view/order an RA or RA summary, follow these steps:
- In the Claims menu, select the Order RA option.
- Your NPI and PTAN will be auto-filled based on the NPI/PTAN you have selected from your profile. If you need to use a different NPI/PTAN than what is currently selected, change your NPI/PTAN following the instructions in the Change NPI/PTAN section in this manual.
- In the "Remittance Advice Date From" field, enter the date of the RA you wish to view/order, and then press the SUBMIT button.
A general summary of your RA will then be displayed, showing the provider paid amount, check amount, and offset amount.
- To view a copy of your RA, press the View button found in the Remittance Advice field. A popup window that includes a Download button will open. Press the Download button, and the RA will open in a new window.
NOTE: RAs are available in myCGS the afternoon following the day they were generated. For instance, if an RA is generated/dated October 7, it will be available for viewing on October 8 in the afternoon. Only electronic RAs generated beginning October 7, 2019, and paper RAs generated beginning September 10, 2019, are viewable in myCGS. For older RAs, use either the Order RA or RA Details option.
- To order a duplicate RA via mail, press the Order RA button.
- To view a detailed summary of your RA, press the RA Details button.
If you choose to view RA Details, your screen will expand to show the following fields:
- Claim totals (billed amount, allowed amount, deductible, coinsurance, provider paid amount, and check amount)
- Total assigned claims
- Financial details (previously paid amount, paid to beneficiary amount, interest, MSP, offset amount, and other adjustments)
- Offsets (CCN, patient number, DCN, and offset amount)
- Claim details (CCN, HICN/MBI, amount paid, check amount, and interest for each individual claim on the RA)
When viewing RA Details, you can also find details for each individual claim on the RA. Simply press the Claim Detail button, as shown in the image below, and a new window will pop up showing a summary of the individual claim.
You can view even more information about the claim using the CCN link from the Claim Detail window, as shown below.

Chapter 4 – Same/Similar
Same/Similar Overview
The Same/Similar screen in myCGS allows you to view a complete picture of a beneficiary's prior equipment history for a specific product category (i.e., wheelchairs, oxygen, etc.) or HCPCS code(s). A beneficiary's Same/Similar history is important to know because it can help you avoid potential denials. For instance, if you need to know if a beneficiary has previously received oxygen equipment, you can use the Same/Similar screen to search for all related oxygen claims and CMNs that we have on record in Jurisdiction B and/or C.
To search for Same/Similar history, select Same/Similar from the Same/Similar menu. You will then be presented with the Same/Similar Request screen, where you can enter the specific data for your search.
To perform a Same/Similar search, enter the following information, and then press SUBMIT:
- Medicare ID (MBI only)
- Beneficiary Last Name (first six letters)
- Beneficiary First Name (first initial)
- Beneficiary Date of Birth (eight digits)
- Date of Service (eight digits)
Note that myCGS will search for claims and CMNs eight years prior to and six months after the date of service you enter*. Also note that only CMNs with an initial date within 10 years from the current date will be displayed in myCGS.
- Jurisdiction (current Jurisdiction only or both JB and JC)
Note that if you select the Current Jurisdiction option (which is the default option), myCGS will only display results from the Jurisdiction page where you are currently located in myCGS (JB or JC). If you select Both JB and JC then you will receive results for both JB and JC.
- Product Category or HCPCS
See the Product Category vs HCPCS section in this chapter for details about using the Product Category or HCPCS search.
*There is an exception to the eight-year/six-month rule for certain diabetic supply and shoe searches. If you search using the Diabetic Equipment, Supplies, and Shoes product category or using a single HCPCS search for a specific diabetic supply or shoe code, then myCGS will check for claims based on the rules listed below. Note that all searches using a partial HCPCS or HCPCS range will follow the eight-year/six-month rule, including diabetic supplies and shoes.
- A4253 and A4259: 90 days before and 90 days after the date or service
- Other diabetic testing supplies: six months before and six months after the date of service
- Diabetic shoes and inserts: the calendar year of the date of service
You can also specify whether or not you want to include denied CMNs in your search. Refer to the Denied CMNs section in this chapter for additional information.
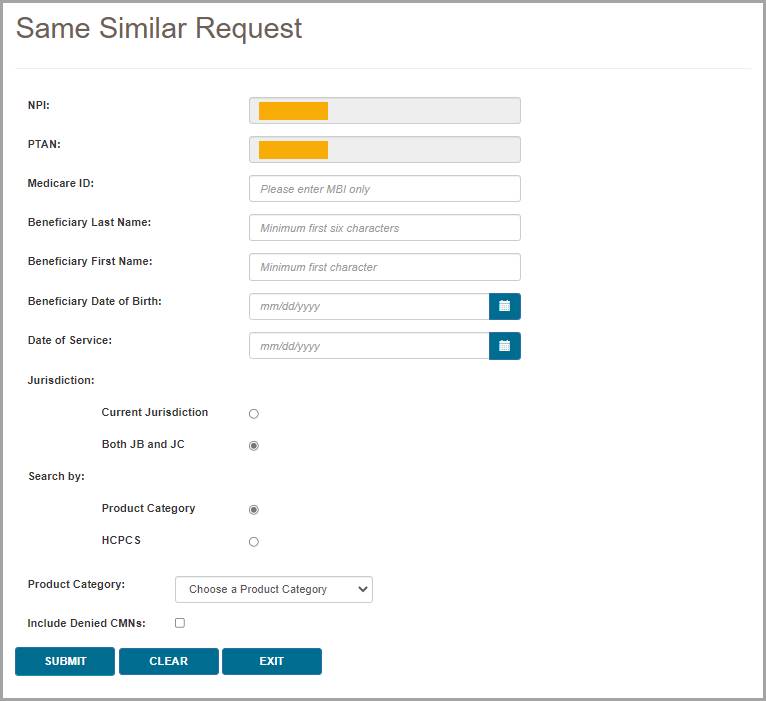
Top
Product Category vs HCPCS
myCGS gives the option to search for same/similar history either by choosing a product category (such as oxygen or wheelchairs, with the option to select certain subcategories) or by entering a HCPCS code (full, partial, or range). The sections below detail each of these types of searches.
Top
Searching by Product Category
When you search by product category on the Same/Similar screen, myCGS will return all claim and CMN history for any HCPCS code that falls under the category you select. You can choose to search by general categories, such as wheelchairs, or by specific sub-categories, such as manual wheelchairs.
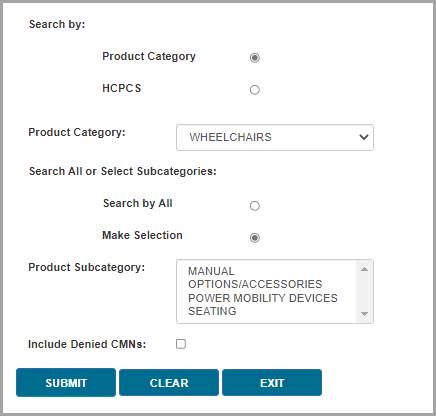
To perform a product category search:
- Ensure that Product Category is selected in the Search by field (which is the default value).
- In the Product Category drop-down menu, select the appropriate category for the type of equipment you are researching.
- In the Search All or Select Subcategories option (if available*), chose whether you want to search for all items in the product category you've selected or if you want to search for a specific subcategory (or multiple subcategories). For instance, if you want to find information about any type of wheelchair and wheelchair accessory, then select the wheelchair product category and select the Search by All option. On the other hand, if you only want to know about manual wheelchairs, then choose the Make Selection option and then select MANUAL from the Product Subcategory field.
*Only certain product categories include subcategory options. The Search All or Select Subcategories option will only be displayed when there are subcategory options for the product category you've selected.
HINT: You can choose more than one subcategory by holding down the CTRL button on your keyboard while clicking on multiple subcategories in the Product Subcategory field.
myCGS includes the following product category options:
- AFO/KAFO
- Automatic External Defibrillator
- Bowel Management Devices
- Canes and Crutches*
- Cervical Traction Devices
- Commodes
- Diabetic Equipment, Supplies, and Shoes*
- External Breast Prothesis
- External Infusion Pumps*
- Eye Prosthesis
- Facial Prosthesis
- Heating Pads and Heat Lamps
- HFCO
- Hospital Beds*
- Immunosuppressive Drugs
- Infrared Heating Pad Systems
- Intrapulmonary Percussive Ventilation System
- IVIG
- Knee Orthoses
- Lower Limb Prosthesis
- Mechanical In-exsufflation Devices
- Nebulizers*
- Negative Pressure Wound Therapy
- Nutrition*
- Oxygen and Oxygen Equipment*
- Positive Airway (PAP) Devices*
- Refractive Lenses*
- Seat Lift Mechanism
- Speech Generating Devices
- Spinal Orthoses
- Suction Pumps
- Support Surfaces*
- Surgical Dressings
- Tracheostomy Care
- Transcutaneous Electrical Nerve Stimulators (TENS)*
- Tumor Treatment Field Therapy
- Urological Supplies
- Walkers*
- Wheelchairs*
*These product categories include subcategory options.
If there is no product category for the type of item you need, then use the HCPCS search option.
Top
Searching by HCPCS
myCGS allows you to search for same/similar equipment by HCPCS code, using either a single code, partial code, or range of codes. Each of these three HCPCS options has its own unique functionality, so it's important to understand how each of these searches works.
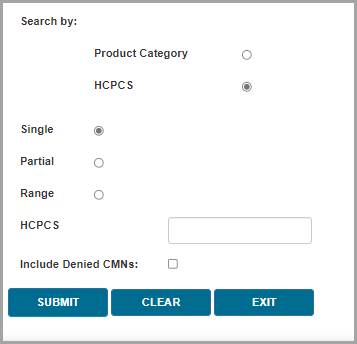
Single HCPCS
For a single HCPCS search, enter a complete (five-digit) HCPCS code (no modifiers). myCGS will return claim and CMN history for the HCPCS code you enter, as well as any related codes. For instance, if you search for E1390 (oxygen concentrator), myCGS will show results for not only the E1390, but also any other type of related oxygen equipment. A single HCPCS search essentially works the same way as a Product Category search, except that you enter a HCPCS code instead of a category.
Partial HCPCS
A partial HCPCS search requires that you enter only the first 1-4 digits of a HCPCS code. myCGS will then return claim and CMN history for any codes that match the specific digits of the code you entered. It will not return results for related codes (unless they also meet your search criterion). For instance, if you enter "E" in the search, myCGS will return results for any HCPCS code that begins with an E. If you enter "E139", the search will bring back any code that begins with E139, such as E1390 (oxygen concentrator). Note that a partial HCPCS search will not display related items the way that a single HCPCS search does—only codes that specifically match your partial HCPCS search will be displayed.
Range
For a HCPCS range search, you must enter two complete (five-digit) HCPCS codes. Enter the lower alphanumeric code first, followed by the higher code (for instance, from K0001 to K0009). myCGS will return claim and CMN history for any HCPCS codes that fall into the range you entered, but it will not return results for related codes (unless they also fall into the range you entered). For instance, if you enter a range from K0001 to K0009, all of which are types of wheelchairs, myCGS will return only codes in that specific range, but not any related wheelchairs or accessories that fall outside that range.
Note that if you enter a HCPCS range that is out of order (such as from K0009 to K0001), myCGS will not return any results. Please be sure that your range is listed in the correct alphanumeric order.
To perform a HCPCS search:
- Select HCPCS in the Search by field.
- Choose which type of HCPCS search you wish to use, Single, Partial, or Range. See the definitions of each of these types of searches above.
- Enter the HCPCS code(s) you wish to find.
Top
Same/Similar Results
After performing your search, myCGS will display the results of your search in two sections: Claim History Summary, which will be displayed on the left, and CMN Summary (plus Denied CMNs, if you included Denied CMNs in your search), displayed on the right. Both of these sections can be expanded so that you can zoom in and see the section in full if you are using a smaller screen. To expand a section, press the Max/Min button (which looks like four arrows pointing in opposite directions) found in the upper-right corner of the section.
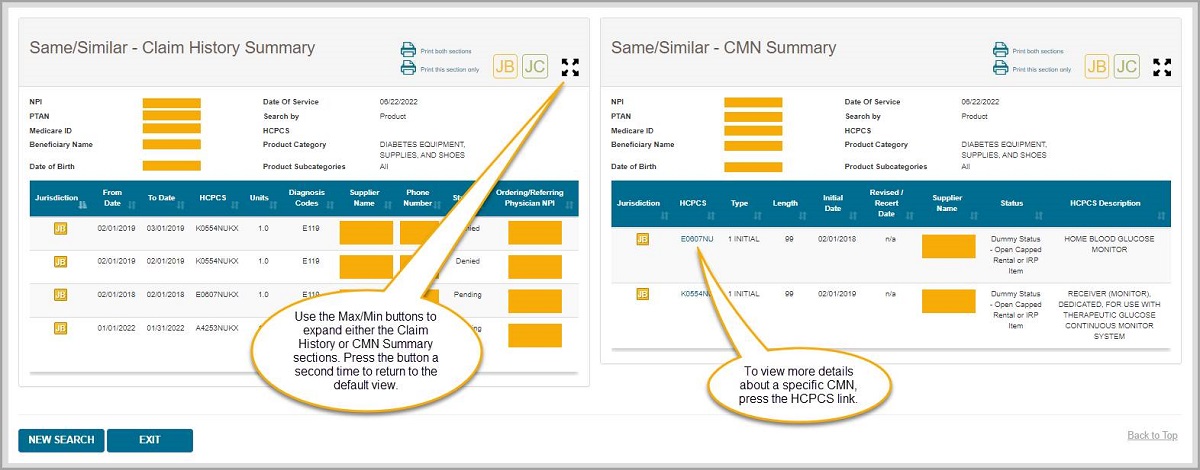
Top
Claim History Summary
The Claim History Summary section on the Same/Similar screen will display any claims in Jurisdiction B and/or C that meet your search criteria and are within eight years prior to and six months after the date of service you entered*. Depending on your search, this list could be quite long, so be sure to scroll down to see all of the results.
*There is an exception to the eight-year/six-month rule for certain diabetic supply and shoe searches. If you search using the Diabetic Equipment, Supplies, and Shoes product category or using a single HCPCS search for a specific diabetic supply or shoe code, then myCGS will check for claims based on the rules listed below. Note that all searches using a partial HCPCS or HCPCS range will follow the eight-year/six-month rule, including diabetic supplies and shoes.
- A4253 and A4259: 90 days before and 90 days after the date or service
- Other diabetic testing supplies: six months before and six months after the date of service
- Diabetic shoes and inserts: the calendar year of the date of service
Within the Claim History Summary section, you can find the following information:
- An indication of whether your results are for JB, JC, or both (indicated via the JB and/or JC symbols in the upper-right corner)
- A list of your search criteria
- A list of the claims that meet your search criteria, containing the following information:
- Jurisdiction
- From Date of Service
- To Date of Service
- HCPCS
- Number of Units
- Diagnosis Codes
- Supplier Name
- Supplier Phone Number
- Status of the Claim (Allowed, Denied, or Pending)
- Ordering/Referring Physician NPI
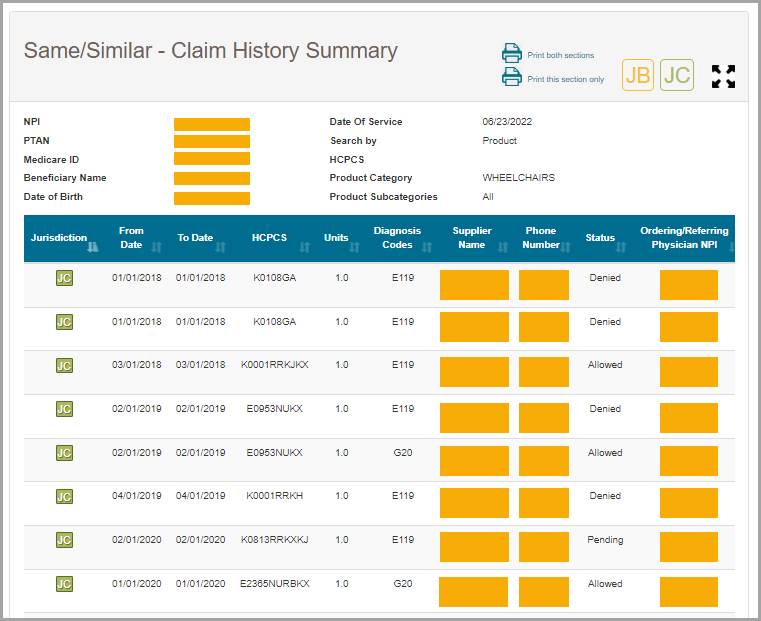
Top
CMN Summary
The CMN Summary section on the Same/Similar screen will display any CMNs in Jurisdiction B and/or C that meet your search criteria and are within eight years prior to and six months after the date of service you entered.
Within the CMN Summary section, you can find the following information:
- An indication of whether your results are for JB, JC, or both (indicated via the JB and/or JC symbols in the upper-right corner)
- A list of your search criteria
- A list of the CMNs that meet your search criteria, containing the following information:
- Jurisdiction
- HCPCS
- Type (Initial, Revised, or Recertification)
- Length
- Initial Date
- Revised/Recert Date
- Supplier Name
- Status
- HCPCS Description
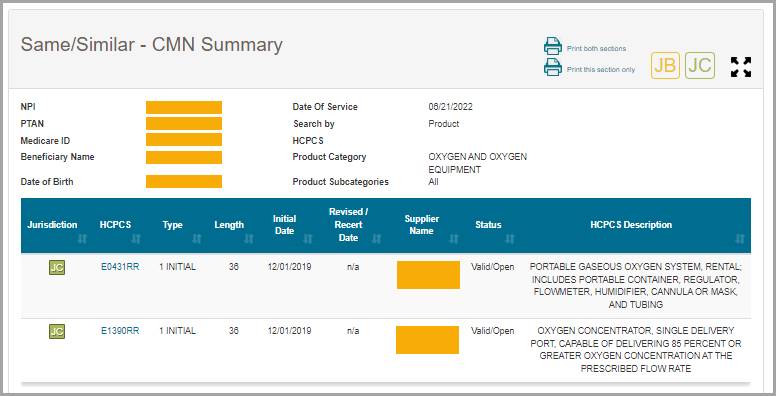
You can view additional details about a CMN by pressing the HCPCS hyperlink found in the HCPCS column. After pressing the HCPCS hyperlink, the CMN Detail Information window will appear with the following CMN details:
- Medicare ID
- Beneficiary Name
- Submitted HCPCS
- Approved HCPCS
- Rental Months Paid*
- Supplier Phone Number
- Last Rental Date
*The rental months paid displayed in myCGS account for payments made by Jurisdiction B or C (depending on which jurisdiction is listed on the CMN), but not for other DME MACs. If a beneficiary has resided in another jurisdiction, it is possible that additional rental months have been paid. Note that oxygen rental months are an exception—the Rental Months Paid field accounts for all oxygen rental payments found in the Common Working Files (CWF), which can include all four DME MAC jurisdictions.
Top
Denied CMNs
When you perform a Same/Similar search, you have the option of including denied CMNs in the results. Denied CMNs denote items that are currently in an unpayable state. Note that including denied CMNs will lengthen the amount of time it takes myCGS to pull data from our systems; therefore, if you don't need to see denied CMNs, you should leave the option unchecked in order to speed up your Same/Similar search.
If you do include denied CMNs in your search, myCGS will display the denied CMNs in a separate grouping underneath the CMN History section. The information available in the Denied CMNs section is identical to what can be found in the regular CMN Summary section; the difference between the two groupings is that the denied CMNs are sectioned off by themselves so that you can more easily identify that a CMN is denied.
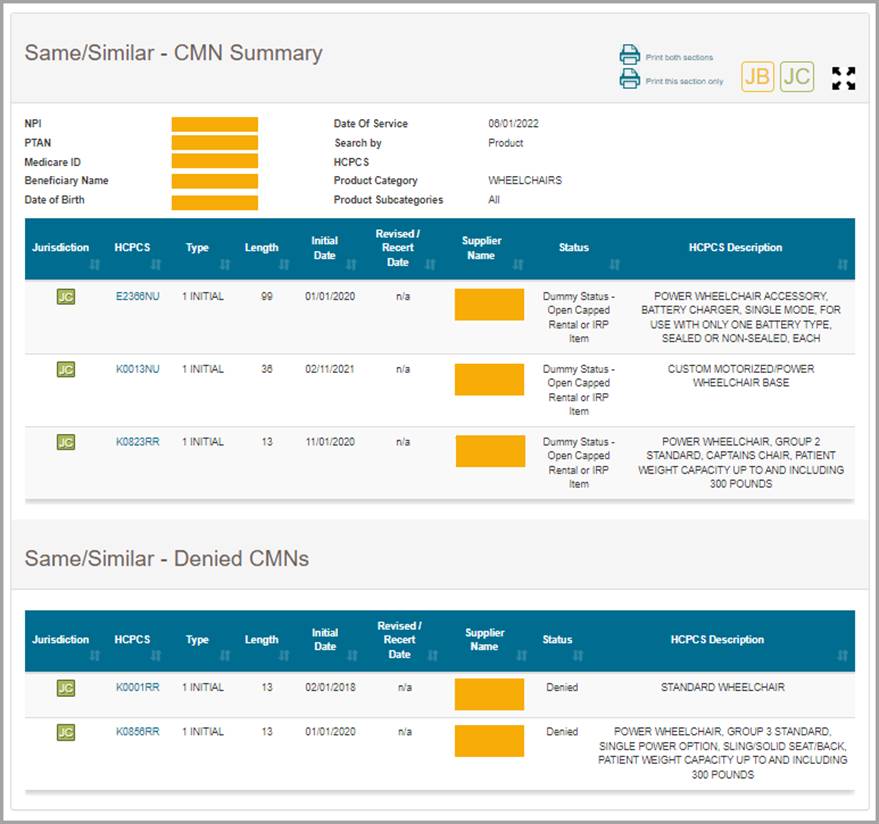
Top
A Few Notes about CMNs
CMNs that appear in myCGS may be true CMNs or "dummy" CMNs. A true CMN is a CMN or DIF that was completed by a physician/supplier and submitted to Jurisdiction B or C with a claim. A dummy CMN is a CMN set up for the purposes of tracking payments on capped rental items or inexpensive and routinely purchased (IRP) items.
When a capped rental item has been extended beyond the initial 13-month rental period due to a break in billing, it will appear as a revised CMN in myCGS.
Accessories which are capped rental items or IRP items will be shown as their own CMN within myCGS for the sake of tracking payments, even if the accessory was listed on the same CMN as the base equipment.
For additional information about CMNs, refer to the Supplier Manual, Chapter 4 . .
Top
Same/Similar Overview
The Same/Similar screen in myCGS allows you to view a complete picture of a beneficiary's prior equipment history for a specific product category (i.e., wheelchairs, oxygen, etc.) or HCPCS code(s). A beneficiary's Same/Similar history is important to know because it can help you avoid potential denials. For instance, if you need to know if a beneficiary has previously received oxygen equipment, you can use the Same/Similar screen to search for all related oxygen claims and CMNs that we have on record in Jurisdiction B and/or C.
To search for Same/Similar history, select Same/Similar from the Same/Similar menu. You will then be presented with the Same/Similar Request screen, where you can enter the specific data for your search.
To perform a Same/Similar search, enter the following information, and then press SUBMIT:
- Medicare ID (MBI only)
- Beneficiary Last Name (first six letters)
- Beneficiary First Name (first initial)
- Beneficiary Date of Birth (eight digits)
- Date of Service (eight digits)
Note that myCGS will search for claims and CMNs eight years prior to and six months after the date of service you enter*. Also note that only CMNs with an initial date within 10 years from the current date will be displayed in myCGS.
- Jurisdiction (current Jurisdiction only or both JB and JC)
Note that if you select the Current Jurisdiction option (which is the default option), myCGS will only display results from the Jurisdiction page where you are currently located in myCGS (JB or JC). If you select Both JB and JC then you will receive results for both JB and JC.
- Product Category or HCPCS
See the Product Category vs HCPCS section in this chapter for details about using the Product Category or HCPCS search.
*There is an exception to the eight-year/six-month rule for certain diabetic supply and shoe searches. If you search using the Diabetic Equipment, Supplies, and Shoes product category or using a single HCPCS search for a specific diabetic supply or shoe code, then myCGS will check for claims based on the rules listed below. Note that all searches using a partial HCPCS or HCPCS range will follow the eight-year/six-month rule, including diabetic supplies and shoes.
- A4253 and A4259: 90 days before and 90 days after the date or service
- Other diabetic testing supplies: six months before and six months after the date of service
- Diabetic shoes and inserts: the calendar year of the date of service
You can also specify whether or not you want to include denied CMNs in your search. Refer to the Denied CMNs section in this chapter for additional information.
Product Category vs HCPCS
myCGS gives the option to search for same/similar history either by choosing a product category (such as oxygen or wheelchairs, with the option to select certain subcategories) or by entering a HCPCS code (full, partial, or range). The sections below detail each of these types of searches.
Searching by Product Category
When you search by product category on the Same/Similar screen, myCGS will return all claim and CMN history for any HCPCS code that falls under the category you select. You can choose to search by general categories, such as wheelchairs, or by specific sub-categories, such as manual wheelchairs.
To perform a product category search:
- Ensure that Product Category is selected in the Search by field (which is the default value).
- In the Product Category drop-down menu, select the appropriate category for the type of equipment you are researching.
- In the Search All or Select Subcategories option (if available*), chose whether you want to search for all items in the product category you've selected or if you want to search for a specific subcategory (or multiple subcategories). For instance, if you want to find information about any type of wheelchair and wheelchair accessory, then select the wheelchair product category and select the Search by All option. On the other hand, if you only want to know about manual wheelchairs, then choose the Make Selection option and then select MANUAL from the Product Subcategory field.
*Only certain product categories include subcategory options. The Search All or Select Subcategories option will only be displayed when there are subcategory options for the product category you've selected.
HINT: You can choose more than one subcategory by holding down the CTRL button on your keyboard while clicking on multiple subcategories in the Product Subcategory field.
myCGS includes the following product category options:
- AFO/KAFO
- Automatic External Defibrillator
- Bowel Management Devices
- Canes and Crutches*
- Cervical Traction Devices
- Commodes
- Diabetic Equipment, Supplies, and Shoes*
- External Breast Prothesis
- External Infusion Pumps*
- Eye Prosthesis
- Facial Prosthesis
- Heating Pads and Heat Lamps
- HFCO
- Hospital Beds*
- Immunosuppressive Drugs
- Infrared Heating Pad Systems
- Intrapulmonary Percussive Ventilation System
- IVIG
- Knee Orthoses
- Lower Limb Prosthesis
- Mechanical In-exsufflation Devices
- Nebulizers*
- Negative Pressure Wound Therapy
- Nutrition*
- Oxygen and Oxygen Equipment*
- Positive Airway (PAP) Devices*
- Refractive Lenses*
- Seat Lift Mechanism
- Speech Generating Devices
- Spinal Orthoses
- Suction Pumps
- Support Surfaces*
- Surgical Dressings
- Tracheostomy Care
- Transcutaneous Electrical Nerve Stimulators (TENS)*
- Tumor Treatment Field Therapy
- Urological Supplies
- Walkers*
- Wheelchairs*
*These product categories include subcategory options.
If there is no product category for the type of item you need, then use the HCPCS search option.
Searching by HCPCS
myCGS allows you to search for same/similar equipment by HCPCS code, using either a single code, partial code, or range of codes. Each of these three HCPCS options has its own unique functionality, so it's important to understand how each of these searches works.
Single HCPCS
For a single HCPCS search, enter a complete (five-digit) HCPCS code (no modifiers). myCGS will return claim and CMN history for the HCPCS code you enter, as well as any related codes. For instance, if you search for E1390 (oxygen concentrator), myCGS will show results for not only the E1390, but also any other type of related oxygen equipment. A single HCPCS search essentially works the same way as a Product Category search, except that you enter a HCPCS code instead of a category.
Partial HCPCS
A partial HCPCS search requires that you enter only the first 1-4 digits of a HCPCS code. myCGS will then return claim and CMN history for any codes that match the specific digits of the code you entered. It will not return results for related codes (unless they also meet your search criterion). For instance, if you enter "E" in the search, myCGS will return results for any HCPCS code that begins with an E. If you enter "E139", the search will bring back any code that begins with E139, such as E1390 (oxygen concentrator). Note that a partial HCPCS search will not display related items the way that a single HCPCS search does—only codes that specifically match your partial HCPCS search will be displayed.
Range
For a HCPCS range search, you must enter two complete (five-digit) HCPCS codes. Enter the lower alphanumeric code first, followed by the higher code (for instance, from K0001 to K0009). myCGS will return claim and CMN history for any HCPCS codes that fall into the range you entered, but it will not return results for related codes (unless they also fall into the range you entered). For instance, if you enter a range from K0001 to K0009, all of which are types of wheelchairs, myCGS will return only codes in that specific range, but not any related wheelchairs or accessories that fall outside that range.
Note that if you enter a HCPCS range that is out of order (such as from K0009 to K0001), myCGS will not return any results. Please be sure that your range is listed in the correct alphanumeric order.
To perform a HCPCS search:
- Select HCPCS in the Search by field.
- Choose which type of HCPCS search you wish to use, Single, Partial, or Range. See the definitions of each of these types of searches above.
- Enter the HCPCS code(s) you wish to find.
Same/Similar Results
After performing your search, myCGS will display the results of your search in two sections: Claim History Summary, which will be displayed on the left, and CMN Summary (plus Denied CMNs, if you included Denied CMNs in your search), displayed on the right. Both of these sections can be expanded so that you can zoom in and see the section in full if you are using a smaller screen. To expand a section, press the Max/Min button (which looks like four arrows pointing in opposite directions) found in the upper-right corner of the section.
Claim History Summary
The Claim History Summary section on the Same/Similar screen will display any claims in Jurisdiction B and/or C that meet your search criteria and are within eight years prior to and six months after the date of service you entered*. Depending on your search, this list could be quite long, so be sure to scroll down to see all of the results.
*There is an exception to the eight-year/six-month rule for certain diabetic supply and shoe searches. If you search using the Diabetic Equipment, Supplies, and Shoes product category or using a single HCPCS search for a specific diabetic supply or shoe code, then myCGS will check for claims based on the rules listed below. Note that all searches using a partial HCPCS or HCPCS range will follow the eight-year/six-month rule, including diabetic supplies and shoes.
- A4253 and A4259: 90 days before and 90 days after the date or service
- Other diabetic testing supplies: six months before and six months after the date of service
- Diabetic shoes and inserts: the calendar year of the date of service
Within the Claim History Summary section, you can find the following information:
- An indication of whether your results are for JB, JC, or both (indicated via the JB and/or JC symbols in the upper-right corner)
- A list of your search criteria
- A list of the claims that meet your search criteria, containing the following information:
- Jurisdiction
- From Date of Service
- To Date of Service
- HCPCS
- Number of Units
- Diagnosis Codes
- Supplier Name
- Supplier Phone Number
- Status of the Claim (Allowed, Denied, or Pending)
- Ordering/Referring Physician NPI
CMN Summary
The CMN Summary section on the Same/Similar screen will display any CMNs in Jurisdiction B and/or C that meet your search criteria and are within eight years prior to and six months after the date of service you entered.
Within the CMN Summary section, you can find the following information:
- An indication of whether your results are for JB, JC, or both (indicated via the JB and/or JC symbols in the upper-right corner)
- A list of your search criteria
- A list of the CMNs that meet your search criteria, containing the following information:
- Jurisdiction
- HCPCS
- Type (Initial, Revised, or Recertification)
- Length
- Initial Date
- Revised/Recert Date
- Supplier Name
- Status
- HCPCS Description
You can view additional details about a CMN by pressing the HCPCS hyperlink found in the HCPCS column. After pressing the HCPCS hyperlink, the CMN Detail Information window will appear with the following CMN details:
- Medicare ID
- Beneficiary Name
- Submitted HCPCS
- Approved HCPCS
- Rental Months Paid*
- Supplier Phone Number
- Last Rental Date
*The rental months paid displayed in myCGS account for payments made by Jurisdiction B or C (depending on which jurisdiction is listed on the CMN), but not for other DME MACs. If a beneficiary has resided in another jurisdiction, it is possible that additional rental months have been paid. Note that oxygen rental months are an exception—the Rental Months Paid field accounts for all oxygen rental payments found in the Common Working Files (CWF), which can include all four DME MAC jurisdictions.
Denied CMNs
When you perform a Same/Similar search, you have the option of including denied CMNs in the results. Denied CMNs denote items that are currently in an unpayable state. Note that including denied CMNs will lengthen the amount of time it takes myCGS to pull data from our systems; therefore, if you don't need to see denied CMNs, you should leave the option unchecked in order to speed up your Same/Similar search.
If you do include denied CMNs in your search, myCGS will display the denied CMNs in a separate grouping underneath the CMN History section. The information available in the Denied CMNs section is identical to what can be found in the regular CMN Summary section; the difference between the two groupings is that the denied CMNs are sectioned off by themselves so that you can more easily identify that a CMN is denied.
A Few Notes about CMNs
CMNs that appear in myCGS may be true CMNs or "dummy" CMNs. A true CMN is a CMN or DIF that was completed by a physician/supplier and submitted to Jurisdiction B or C with a claim. A dummy CMN is a CMN set up for the purposes of tracking payments on capped rental items or inexpensive and routinely purchased (IRP) items.
When a capped rental item has been extended beyond the initial 13-month rental period due to a break in billing, it will appear as a revised CMN in myCGS.
Accessories which are capped rental items or IRP items will be shown as their own CMN within myCGS for the sake of tracking payments, even if the accessory was listed on the same CMN as the base equipment.
For additional information about CMNs, refer to the Supplier Manual, Chapter 4.

Chapter 5 – Claim Preparation
Claim Preparation Overview
The Claim Preparation menu gives you access to a variety of information that you may need before filing a claim to CGS, including submission and status of Prior Authorization (PA or Prior Auth) and Advance Determination of Medicare Coverage (ADMC).
There are three main menu options in the Claim Preparation menu:
- Ordering/Referring Physician – allows you to determine the status of a physician's NPI
- Prior Auth
- Status – allows you to view the status of Prior Authorization requests
- Smart Submission – allows you to submit a Prior Authorization request via myCGS
- Exemption Opt-Out Form – gives eligible suppliers the ability to opt out of the Prior Authorization Exemption Process
- ADMC
- Status – allows you to view the status of ADMC requests
- Form Submission – allows you to submit an ADMC request via myCGS
Refer to the sections below for detailed information about each of these menu options.
All screens within the Claim Preparation menu automatically populate your NPI and PTAN; therefore, you do not need to manually enter this information. If you have more than one NPI/PTAN and need to use a different NPI/PTAN than what is currently selected, follow the instructions in the Change NPI/PTAN section in this manual.
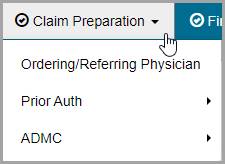
Top
Ordering/Referring Physician
Claims submitted to a DME MAC must include the ordering/referring physician's NPI. The physician's NPI must be enrolled in the Medicare Provider Enrollment, Chain, and Ownership System (PECOS) to be valid. You can use myCGS to check a physician's NPI for valid PECOS enrollment.
To search for ordering/referring physician status, select the Ordering/Referring Physician option in the Claim Preparation menu, and enter the following information:
- Ordering/Referring Physician NPI
- Physician Last Name (first six letters only)
After entering the information, press the SUBMIT button.
myCGS will return a statement regarding the ordering/referring physician status found for the search criteria. There are three possible outcomes:
- The provider has a valid enrollment record in PECOS.
- The provider has a deactivated record in PECOS. myCGS will display the provider’s deactivation date, as well as the capped-rental deactivation date (only if applicable).
- The provider has no enrollment record in PECOS. If you receive this message, check to be sure you entered the correct NPI and physician name.
The image below shows a response for a physician who is currently enrolled in PECOS:
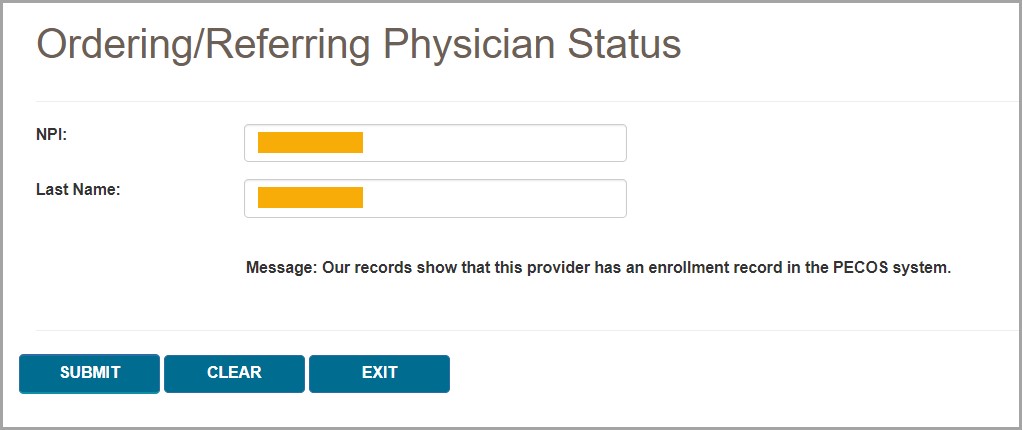
The following image shows a response for a physician with a deactivated record:
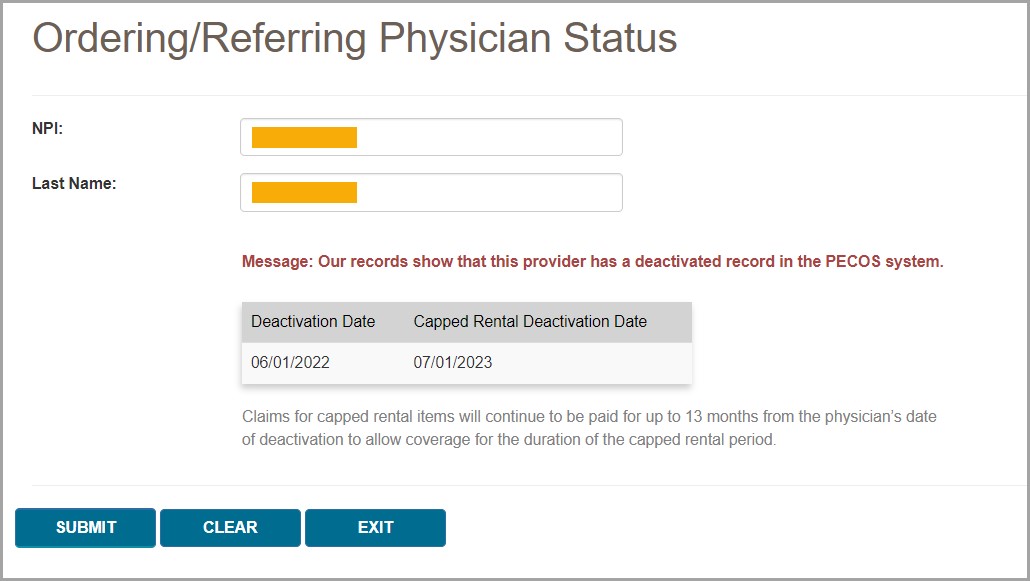
If you need to perform another physician NPI search, press the CLEAR button, and then enter the next physician's information.
Top
Prior Authorization
The Prior Authorization screens in myCGS allow you to view the status of Prior Authorization requests you've submitted to Jurisdiction B or C, as well as to submit new Prior Authorization requests. To view status of a Prior Authorization request, go to the Claim Preparation menu, choose Prior Auth, and then select the Status sub-menu. To submit a Prior Authorization request, choose Form Submission from the Prior Auth sub-menu.
For information about Prior Authorization, refer to the Prior Authorization pages found on our Jurisdiction B or C website—go to www.cgsmedicare.com, select either JB or JC DME, and then go to Prior Authorization. Prior Authorization information is also available in Chapter 9 of the Supplier Manual.
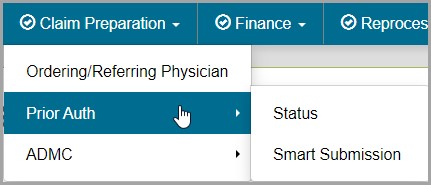
Top
Prior Authorization Status
The Prior Authorization Status screen in myCGS allows you to view the status of any Prior Authorization request you have submitted to Jurisdiction B or C (depending on which jurisdiction you have selected). To search for Prior Authorization status, select Prior Auth from the Claim Preparation menu, choose Status in the Prior Auth sub-menu, and then enter the following information:
- Search By: Base Equipment (if you are searching for Prior Authorization status; if you want to view your Prior Authorization Exemption Letters, refer to the Prior Authorization Exemption Letters section below)
- Medicare ID (MBI only)
- Beneficiary Last Name (first six letters)
- Beneficiary First Name (first initial)
- Beneficiary Date of Birth (eight digits)
- HCPCS Code
NOTE: Please allow five business days after submission for requests to appear in myCGS.
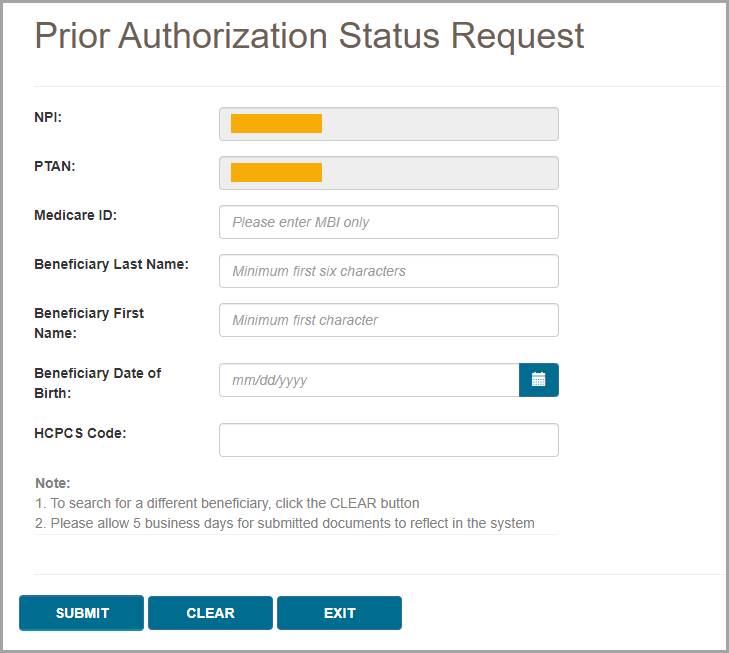
After pressing the Submit button, myCGS will return the following information:
- HCPCS
- Status (Received, Pending, Affirmed, Non-Affirmed, Rejected)
- UTN
- Date of Receipt
- Date of Decision
- Documents
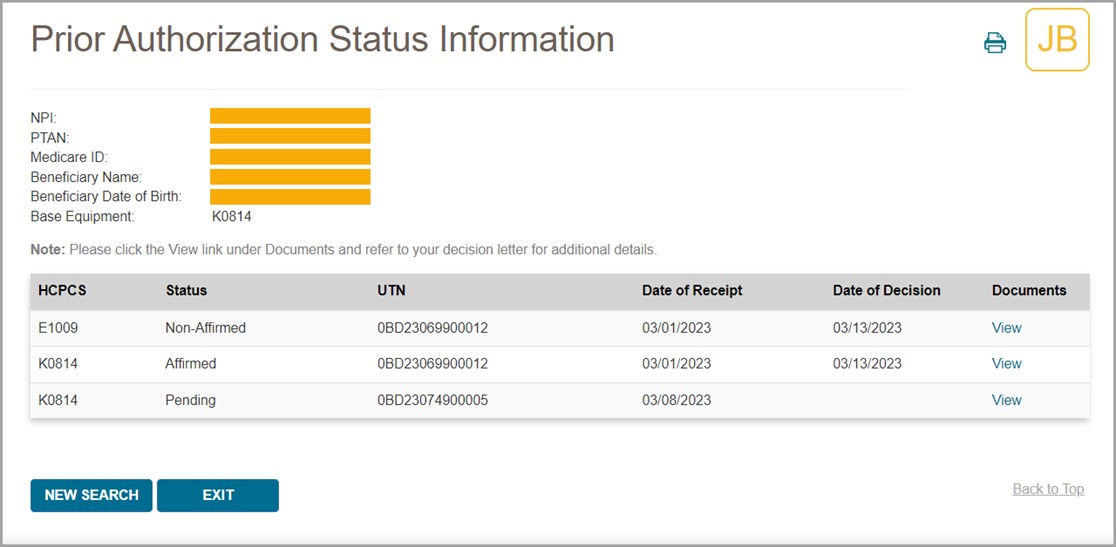
NOTE: Accessory codes submitted with a Prior Authorization request will only display on the status screen if the related base equipment is affirmed.
To view the Prior Authorization decision letter, press the View link in the Documents column. myCGS will then open a document window where you can view and print the letter by pressing the Download icon.
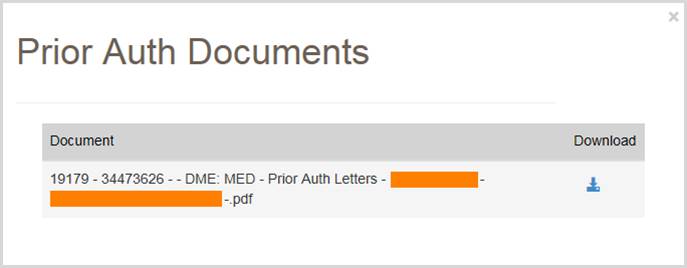
Prior Authorization Exemption Letters
CMS may grant an exemption from submitting Prior Authorization requests to DMEPOS suppliers that demonstrate consistent compliance with Medicare coverage, coding, and payment rules.
If you have qualified for Prior Authorization exemption, myCGS allows you to view your Notice of Exemption, Notice of Continued Exemption, and Notice of Withdrawal of Exemption letters.
To view your Prior Authorization exemption letters on the Prior Authorization Status screen, select the Search By: Exemption Letter radio button, and then press the Submit button. myCGS will then display the exemption letters available for your NPI/PTAN.
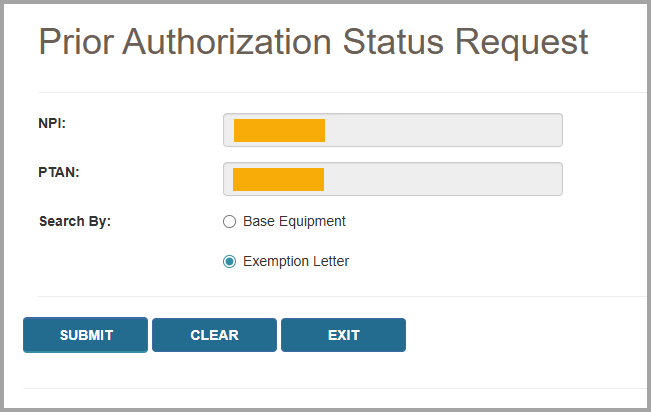
Top
Prior Authorization Smart Submission
The Prior Authorization Smart Submission (PASS) screen in myCGS is a guided, step-by-step submission process that makes it easy to send Prior Authorization requests to Jurisdiction B or C. PASS makes it simple to submit all the information you need for a Prior Authorization, ensuring a decision will be completed as quickly as possible while reducing the chances that your request will be rejected.
For information about the DME MAC Prior Authorization program, visit the JB or JC Prior Authorization page on www.cgsmedicare.com:
JB Prior Authorization Webpage
JC Prior Authorization Webpage
To submit a Prior Authorization request in myCGS, select Prior Auth from the Claim Preparation menu, and choose Smart Submission in the Prior Auth sub-menu.
Step 1 – Supplier Information
The first screen you will see in the Prior Authorization Smart Submission process is the Supplier Information screen. This screen will auto-populate your NPI, PTAN, name, myCGS User ID, and more. Confirm that the NPI/PTAN displayed is the correct NPI/PTAN for your submission. For instructions on changing your NPI/PTAN, refer to Chapter 1 of this manual.
Once you’ve confirmed the NPI/PTAN, enter the appropriate contact information for your Prior Authorization request (contact name, phone, and email). This information is important in case CGS needs to contact you (or the appropriate contact person at your company) regarding your request.
After completing the appropriate contact fields, press the NEXT button to continue.
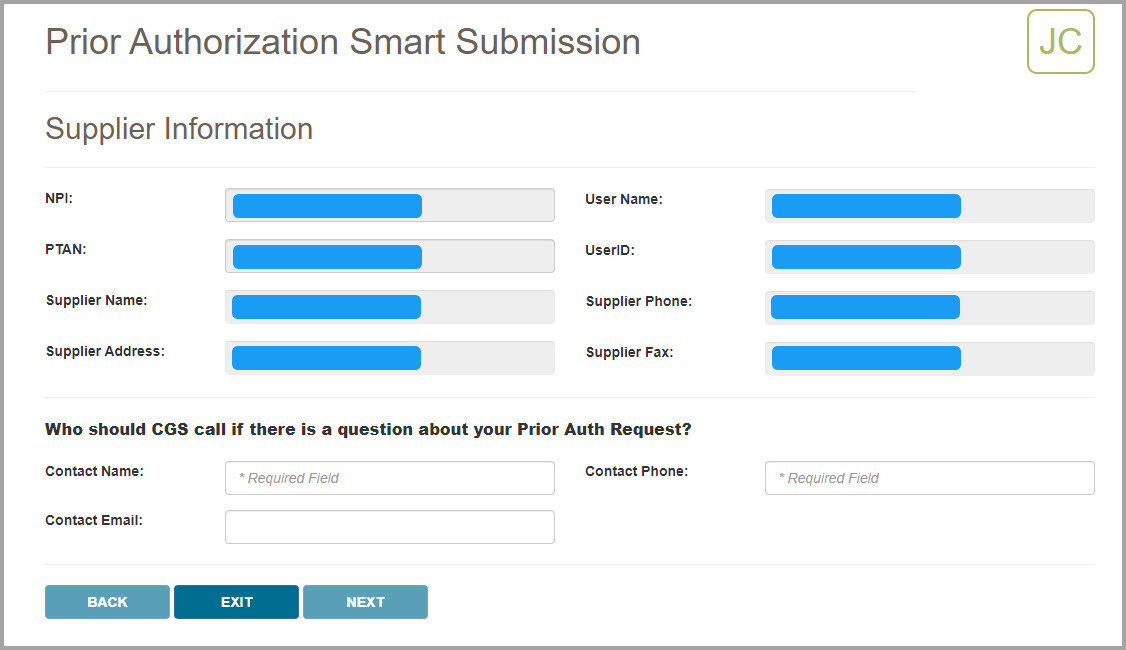
Step 2 – Delivery Confirmation and Beneficiary Information
After confirming your supplier information and entering your contact information, you will be asked if the item has been delivered to the beneficiary. Select the Yes or No radio button as appropriate. Note that if you select “Yes” you will be presented with a follow-up question
Next enter the beneficiary’s Medicare number (MBI), last name, first name, and date of birth. Be sure that this information is accurate.
After entering the beneficiary’s information, press NEXT to continue.
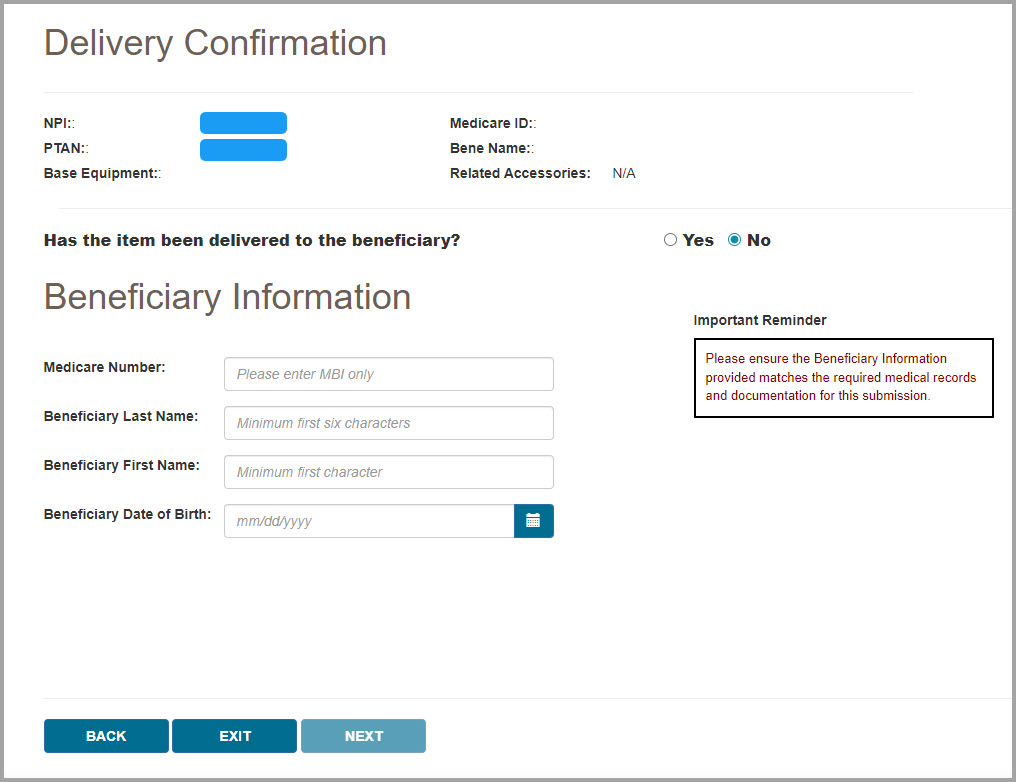
Step 3 – Program Codes
After verifying the beneficiary information you entered matches our records, myCGS will display the Program Codes screen. Choose which Prior Authorization Program Category you are submitting by selecting one of the programs listed on the screen. Currently there are four program categories that are eligible for Prior Authorization submissions to the DME MAC:
- Lower Limb Prosthetics (LLP)
- Orthoses
- Power Mobility Devices (PMD)
- Pressure Reducing Support Surfaces (PRSS)
Select the appropriate program category for the type of equipment that your beneficiary has been prescribed.
After selecting a program category, use the Base Equipment menu to select the specific HCPCS code for your Prior Authorization request.
When applicable, you will then be asked whether or not the base equipment code is an upgrade (only certain program categories are eligible for upgrades). Select the appropriate radio button (yes or no) and press NEXT to continue.
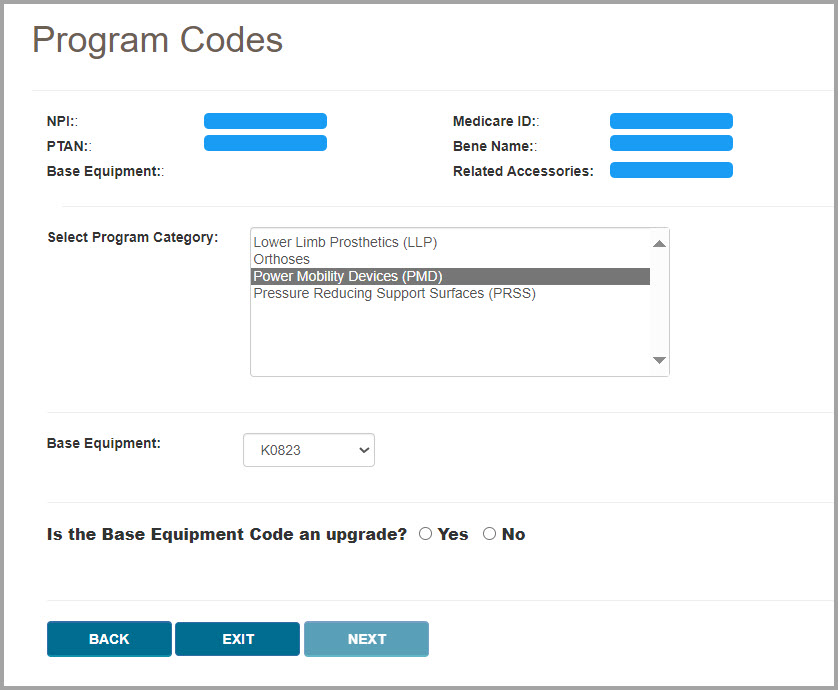
Step 4 – Voluntary Accessory Codes (if applicable)
If voluntary accessories are eligible for Prior Authorization for the base equipment HCPCS code you selected, you will then be presented with the Voluntary Accessory Codes screen. First you will be asked if you wish to include voluntary accessories in your request. Select either the yes or no radio button.
NOTE: If the base equipment HCPCS code you select is not eligible for voluntary accessories, then you will not see this screen. Go to the next step.
If you choose yes to include voluntary accessories, you will then be presented with a list of HCPCS codes that are eligible for submission as voluntary accessories. Select as many codes as are applicable for your request. To do so, select a code in the list and press the ADD button. To add multiple codes at once, press and hold the Ctrl key on your keyboard while clicking on each code that you wish to include, then press the ADD button. myCGS will display a visual confirmation of the codes that you’ve added. If you’ve added a code by mistake, press the DELETE button next the code to remove it.
After adding your accessory codes, press NEXT to continue.
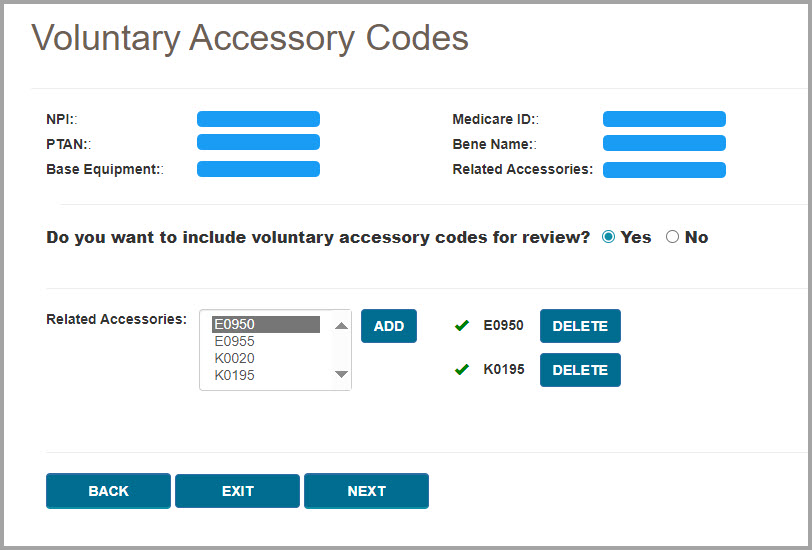
Step 5 – Expedited Request/Ordering/Referring Physician Information/Decision Letters
Next you will be asked for several more pieces of information about your request, including whether or not your request needs to be expedited, the ordering/referring physician information, and whether or not to send the beneficiary and/or physician a copy of the decision letter.
An expedited request is allowed when the beneficiary’s health/life is in jeopardy without the use of the equipment that has been prescribed. Select either the yes or no radio button as appropriate. If you select yes for an expedited request, you will then need to choose a reason from the drop-down menu and add comments to support the need for an expedited request.
Next enter the ordering/referring physician’s first and last name, address, and NPI.
After entering the treating physician’s information, select the appropriate yes or no radio buttons to indicate if you would like copies of the Prior Authorization decision letter to be sent to the beneficiary and/or the treating physician.
Note that if you wish to send a copy of the decision letter to the treating physician, then you will need to attach a completed PA Decision Letter Request Form. Use the link shown on the screen to open the form. You will need to complete and save the form, and then include the saved file in your support documentation (which you will upload in Step 6).
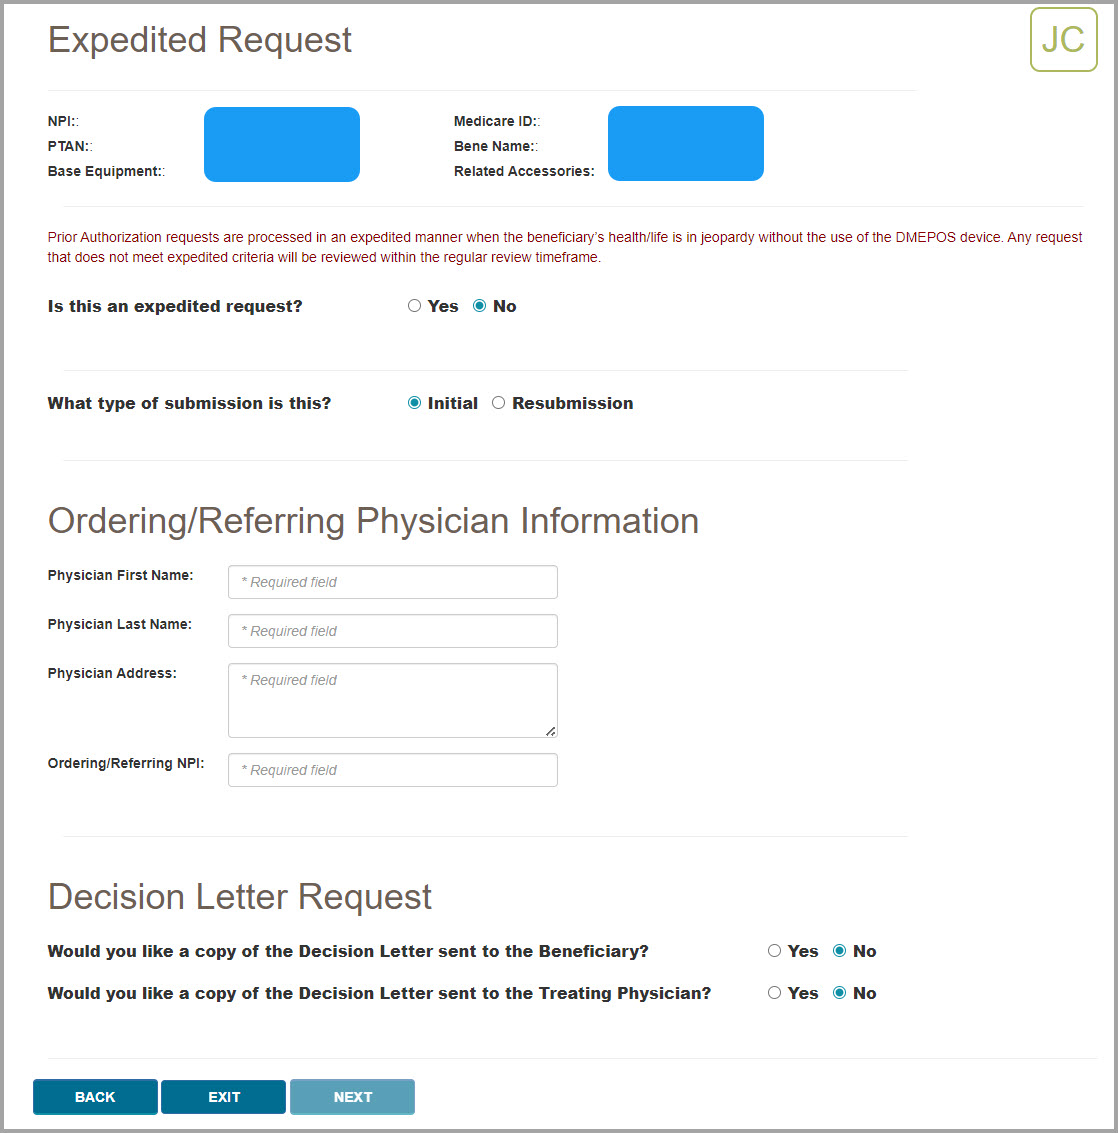
Step 6 – Support Documentation and Final Submission
The final step in the Prior Authorization Smart Submission process is to attach the required documentation to your submission. myCGS will present you with a checklist of required documents for your request. Ensure that your files contain each item on the list, and then select the checkboxes next to each item. You must check off every item on the list to continue.
myCGS will also display a list of applicable program resource links, each of which will take you to an educational resource on our website. These educational resources will help to ensure that you have all the necessary documentation to support your claim once your Prior Authorization request has been approved.

After confirming that you have all the required documentation, you must attach the documentation to your request. To do so, press the UPLOAD button.
After pressing the UPLOAD button, a navigation window will pop up allowing you to select the files on your computer that you wish to attach and submit with your request.
NOTE: The maximum size limit for upload is 50 MB per file. A maximum of 15 files may be attached per submission. Only the following file types are permitted for submission in myCGS:
After selecting your documents, myCGS will list the files under the UPLOAD button on the screen. Verify that all the appropriate files have been added.
If you’ve added a file by mistake which you wish to remove from your request, hover your cursor over the File Type field on the row you need to delete. The File Type field will turn into an X—press the X to remove the file.
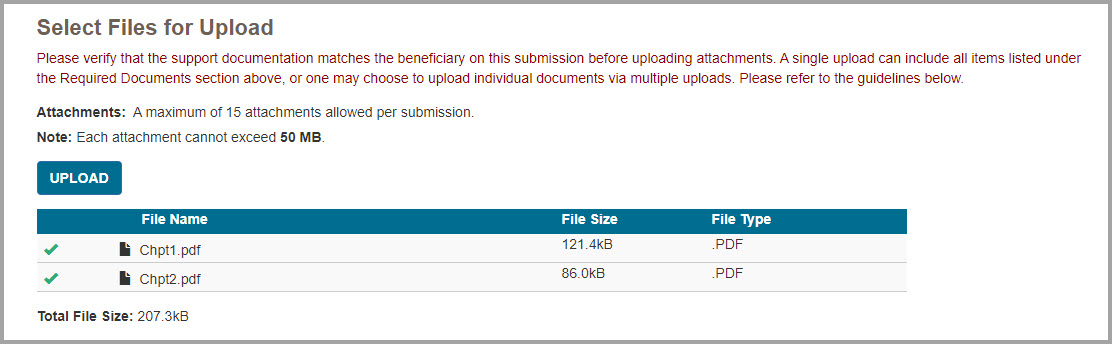
After attaching your documents, you can preview your submission by pressing the PREVIEW button. This will display a summary of your submission that will be submitted to CGS for processing. Note that previewing your submission is optional. Once you have verified that all the information you have entered is correct and that you’ve attached all the necessary documentation, press the SUBMIT button to submit your request.
NOTE: Please ensure all required documents are included in your submission. Duplicate portal submissions are not allowed. Any documents submitted later by fax cannot be tied to the submission and will not be included in the review.
After pressing SUBMIT, myCGS will upload your request into the CGS internal processing system. You will receive a message stating that your request was submitted successfully, with the time and date of the submission.
After submitting your request, you can use the Prior Authorization Status screen to check the status of your request.

Top
Prior Authorization Exemption Opt-Out Form
NOTE: The 2026 Prior Authorization (PA) Exemption Opt-Out period ended on April 30, 2026. Therefore, the Opt-Out Form is not currently available. The next PA Exemption Opt-Out period is scheduled to open in 2027.
The Prior Authorization Supplier Exemption Process allows certain suppliers to be exempt from Prior Authorization requirements under specific conditions. If your company has qualified for Prior Authorization exemption, but you would like to opt out of exemption and continue to submit Prior Authorization requests, then you can submit a Prior Authorization Exemption Opt-Out Form. You must submit this form by April 30, 2026, to opt out.
To access and submit the Prior Authorization Exemption Opt-Out Form in myCGS, select Prior Auth from the Claim Preparation menu, choose Exemption Opt-Out Form in the Prior Auth sub-menu, and then complete all required fields on the form, including the eSignature section. After entering all your information, press the Submit button to submit the form.
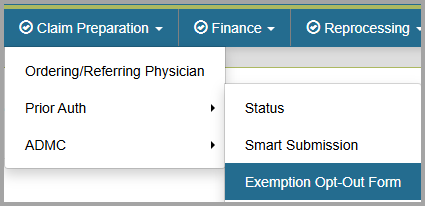
NOTE: The Exemption Opt-Out Form will only display as an option in myCGS if you meet the following criteria:
- Your NPI/PTAN has received a Prior Authorization Notice of Exemption, meaning you have qualified for exemption.
- You are a Designed Approver (DA) or an End User who has been granted access by your DA to submit the Prior Authorization Exemption Opt-Out Form.
Top
ADMC
The ADMC screens in myCGS allow you to view the status of Advanced Determination of Medicare Coverage (ADMC) requests you've submitted to Jurisdiction B or C, as well as to submit new ADMC requests. To view status of an ADMC request, go to the Claim Preparation menu, choose ADMC, and then select the Status sub-menu. To submit an ADMC request, choose Form Submission from the ADMC sub-menu.
For information about ADMC, refer to the Medical Review pages found on our Jurisdiction B or C website—go to www.cgsmedicare.com, select either JB or JC DME, and then go to Medical Review. ADMC information is also available in Chapter 9 of the Supplier Manual.
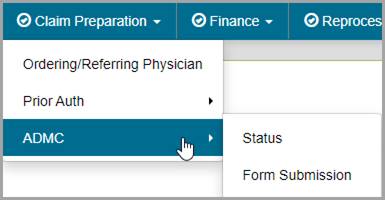
Top
ADMC Status
The ADMC Status screen in myCGS allows you to view the status of any ADMC request you have submitted to Jurisdiction B or C (depending on which jurisdiction you have selected). To search for ADMC status, select ADMCfrom the Claim Preparation menu, choose Status in the ADMC sub-menu, and then enter the following information:
- Medicare ID (MBI only)
- Beneficiary Last Name (first six letters)
- Beneficiary First Name (first initial)
- Beneficiary Date of Birth (eight digits)
- HCPCS Code
NOTE: Please allow three business days after submission for requests to appear in myCGS.
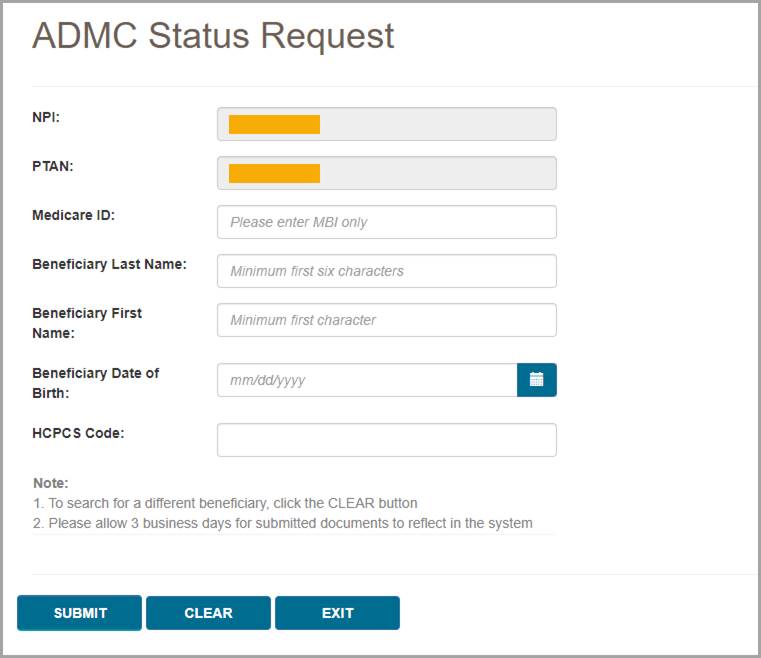
After pressing the Submit button, myCGS will return the following information:
- Status
- Date of Receipt
- Date of Decision
- Action Taken (Affirmed or Non-Affirmed)
- Denial Reason (if the request was non-affirmed)
- DCN
- Documents

To view the ADMC decision letter, press the View link in the Documents column. myCGS will then open a document window where you can view and print the letter by pressing the Download icon.

Top
ADMC Form Submission
The ADMC Form Submission screen in myCGS allows you to submit ADMC requests to Jurisdiction B or C. To submit an ADMC status, select ADMC from the Claim Preparation menu, choose Form Submission in the ADMC sub-menu, and then enter the following information:
- Medicare ID (MBI only)
- Beneficiary Last Name
- Beneficiary First Name
- Beneficiary Date of Birth (eight digits)
- HCPCS Code
Note that myCGS will only accept HCPCS codes which are valid for ADMC submission (a list of codes is available on our website and in the Supplier Manual, Chapter 9).
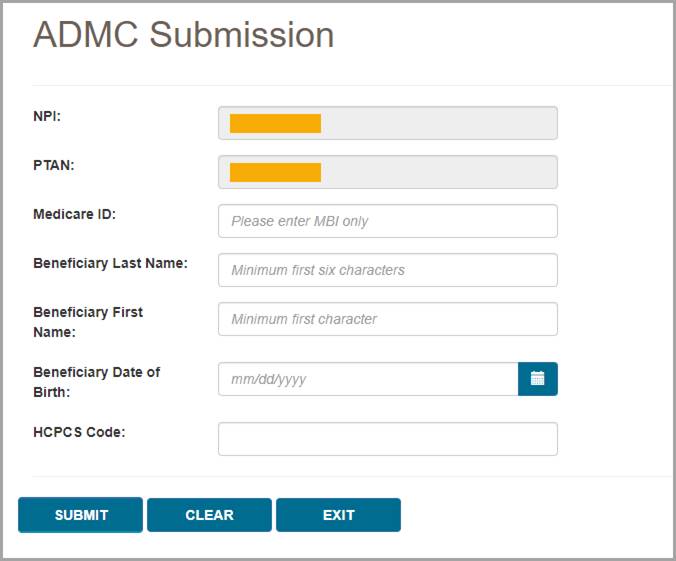
After pressing the Submit button, myCGS will verify the beneficiary and HCPCS information you have entered and then will take you to the ADMC Submission Form screen.
On the ADMC Submission Form, complete all of the required information, and attach your supporting documentation. To attach documents, press the Upload button.
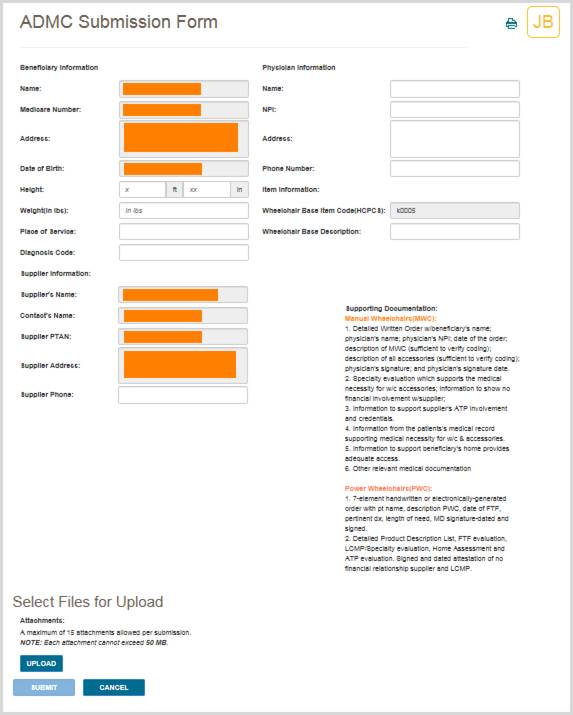
After pressing the Upload button, a navigation window will pop up allowing you to select the files you wish to attach and submit with your request.
NOTE: The maximum size limit for upload is 50 MB per file. A maximum of 15 files may be attached per submission. Only the following files types are permitted for submission in myCGS:
After selecting your documents, myCGS will list the files under the Upload button on the screen. Verify that all of the appropriate files have been selected and then press the Submit button to submit your request.
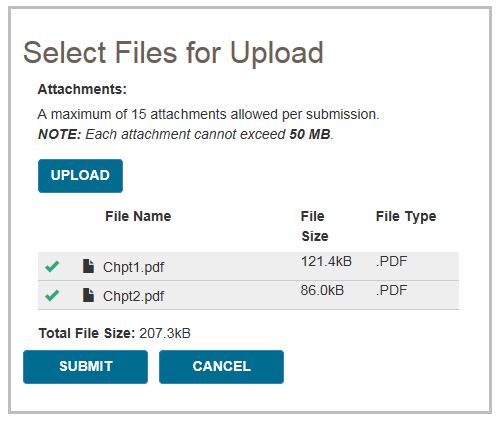
A popup message will appear, asking if you have attached all of your documentation. If you are ready to submit, press Yes. If you need to attach more documents or wish to cancel your request, press No.
After pressing yes, myCGS will upload your request into the CGS internal processing system. You will receive a message stating that your request was submitted successfully, with the time and date of the submission.
After submitting your request, you can use the ADMC Status screen to check the status of your request; however, it will take up to three business days after submission before the status of your request is available.
Top
Claim Preparation Overview
The Claim Preparation menu gives you access to a variety of information that you may need before filing a claim to CGS, including submission and status of Prior Authorization (PA or Prior Auth) and Advance Determination of Medicare Coverage (ADMC).
There are three main menu options in the Claim Preparation menu:
- Ordering/Referring Physician – allows you to determine the status of a physician's NPI
- Prior Auth
- Status – allows you to view the status of Prior Authorization requests
- Smart Submission – allows you to submit a Prior Authorization request via myCGS
- Exemption Opt-Out Form – gives eligible suppliers the ability to opt out of the Prior Authorization Exemption Process
- ADMC
- Status – allows you to view the status of ADMC requests
- Form Submission – allows you to submit an ADMC request via myCGS
Refer to the sections below for detailed information about each of these menu options.
All screens within the Claim Preparation menu automatically populate your NPI and PTAN; therefore, you do not need to manually enter this information. If you have more than one NPI/PTAN and need to use a different NPI/PTAN than what is currently selected, follow the instructions in the Change NPI/PTAN section in this manual.
Ordering/Referring Physician
Claims submitted to a DME MAC must include the ordering/referring physician's NPI. The physician's NPI must be enrolled in the Medicare Provider Enrollment, Chain, and Ownership System (PECOS) to be valid. You can use myCGS to check a physician's NPI for valid PECOS enrollment.
To search for ordering/referring physician status, select the Ordering/Referring Physician option in the Claim Preparation menu, and enter the following information:
- Ordering/Referring Physician NPI
- Physician Last Name (first six letters only)
After entering the information, press the SUBMIT button.
myCGS will return a statement regarding the ordering/referring physician status found for the search criteria. There are three possible outcomes:
- The provider has a valid enrollment record in PECOS.
- The provider has a deactivated record in PECOS. myCGS will display the provider’s deactivation date, as well as the capped-rental deactivation date (only if applicable).
- The provider has no enrollment record in PECOS. If you receive this message, check to be sure you entered the correct NPI and physician name.
The image below shows a response for a physician who is currently enrolled in PECOS:
The following image shows a response for a physician with a deactivated record:
If you need to perform another physician NPI search, press the CLEAR button, and then enter the next physician's information.
Prior Authorization
The Prior Authorization screens in myCGS allow you to view the status of Prior Authorization requests you've submitted to Jurisdiction B or C, as well as to submit new Prior Authorization requests. To view status of a Prior Authorization request, go to the Claim Preparation menu, choose Prior Auth, and then select the Status sub-menu. To submit a Prior Authorization request, choose Form Submission from the Prior Auth sub-menu.
For information about Prior Authorization, refer to the Prior Authorization pages found on our Jurisdiction B or C website—go to www.cgsmedicare.com, select either JB or JC DME, and then go to Prior Authorization. Prior Authorization information is also available in Chapter 9 of the Supplier Manual.
Prior Authorization Status
The Prior Authorization Status screen in myCGS allows you to view the status of any Prior Authorization request you have submitted to Jurisdiction B or C (depending on which jurisdiction you have selected). To search for Prior Authorization status, select Prior Auth from the Claim Preparation menu, choose Status in the Prior Auth sub-menu, and then enter the following information:
- Search By: Base Equipment (if you are searching for Prior Authorization status; if you want to view your Prior Authorization Exemption Letters, refer to the Prior Authorization Exemption Letters section below)
- Medicare ID (MBI only)
- Beneficiary Last Name (first six letters)
- Beneficiary First Name (first initial)
- Beneficiary Date of Birth (eight digits)
- HCPCS Code
NOTE: Please allow five business days after submission for requests to appear in myCGS.
After pressing the Submit button, myCGS will return the following information:
- HCPCS
- Status (Received, Pending, Affirmed, Non-Affirmed, Rejected)
- UTN
- Date of Receipt
- Date of Decision
- Documents
NOTE: Accessory codes submitted with a Prior Authorization request will only display on the status screen if the related base equipment is affirmed.
To view the Prior Authorization decision letter, press the View link in the Documents column. myCGS will then open a document window where you can view and print the letter by pressing the Download icon.
Prior Authorization Exemption Letters
CMS may grant an exemption from submitting Prior Authorization requests to DMEPOS suppliers that demonstrate consistent compliance with Medicare coverage, coding, and payment rules.
If you have qualified for Prior Authorization exemption, myCGS allows you to view your Notice of Exemption, Notice of Continued Exemption, and Notice of Withdrawal of Exemption letters.
To view your Prior Authorization exemption letters on the Prior Authorization Status screen, select the Search By: Exemption Letter radio button, and then press the Submit button. myCGS will then display the exemption letters available for your NPI/PTAN.
Prior Authorization Smart Submission
The Prior Authorization Smart Submission (PASS) screen in myCGS is a guided, step-by-step submission process that makes it easy to send Prior Authorization requests to Jurisdiction B or C. PASS makes it simple to submit all the information you need for a Prior Authorization, ensuring a decision will be completed as quickly as possible while reducing the chances that your request will be rejected.
For information about the DME MAC Prior Authorization program, visit the JB or JC Prior Authorization page on www.cgsmedicare.com:
JB Prior Authorization Webpage
JC Prior Authorization Webpage
To submit a Prior Authorization request in myCGS, select Prior Auth from the Claim Preparation menu, and choose Smart Submission in the Prior Auth sub-menu.
Step 1 – Supplier Information
The first screen you will see in the Prior Authorization Smart Submission process is the Supplier Information screen. This screen will auto-populate your NPI, PTAN, name, myCGS User ID, and more. Confirm that the NPI/PTAN displayed is the correct NPI/PTAN for your submission. For instructions on changing your NPI/PTAN, refer to Chapter 1 of this manual.
Once you’ve confirmed the NPI/PTAN, enter the appropriate contact information for your Prior Authorization request (contact name, phone, and email). This information is important in case CGS needs to contact you (or the appropriate contact person at your company) regarding your request.
After completing the appropriate contact fields, press the NEXT button to continue.
Step 2 – Delivery Confirmation and Beneficiary Information
After confirming your supplier information and entering your contact information, you will be asked if the item has been delivered to the beneficiary. Select the Yes or No radio button as appropriate. Note that if you select “Yes” you will be presented with a follow-up question
Next enter the beneficiary’s Medicare number (MBI), last name, first name, and date of birth. Be sure that this information is accurate.
After entering the beneficiary’s information, press NEXT to continue.
Step 3 – Program Codes
After verifying the beneficiary information you entered matches our records, myCGS will display the Program Codes screen. Choose which Prior Authorization Program Category you are submitting by selecting one of the programs listed on the screen. Currently there are four program categories that are eligible for Prior Authorization submissions to the DME MAC:
- Lower Limb Prosthetics (LLP)
- Orthoses
- Power Mobility Devices (PMD)
- Pressure Reducing Support Surfaces (PRSS)
Select the appropriate program category for the type of equipment that your beneficiary has been prescribed.
After selecting a program category, use the Base Equipment menu to select the specific HCPCS code for your Prior Authorization request.
When applicable, you will then be asked whether or not the base equipment code is an upgrade (only certain program categories are eligible for upgrades). Select the appropriate radio button (yes or no) and press NEXT to continue.
Step 4 – Voluntary Accessory Codes (if applicable)
If voluntary accessories are eligible for Prior Authorization for the base equipment HCPCS code you selected, you will then be presented with the Voluntary Accessory Codes screen. First you will be asked if you wish to include voluntary accessories in your request. Select either the yes or no radio button.
NOTE: If the base equipment HCPCS code you select is not eligible for voluntary accessories, then you will not see this screen. Go to the next step.
If you choose yes to include voluntary accessories, you will then be presented with a list of HCPCS codes that are eligible for submission as voluntary accessories. Select as many codes as are applicable for your request. To do so, select a code in the list and press the ADD button. To add multiple codes at once, press and hold the Ctrl key on your keyboard while clicking on each code that you wish to include, then press the ADD button. myCGS will display a visual confirmation of the codes that you’ve added. If you’ve added a code by mistake, press the DELETE button next the code to remove it.
After adding your accessory codes, press NEXT to continue.
Step 5 – Expedited Request/Ordering/Referring Physician Information/Decision Letters
Next you will be asked for several more pieces of information about your request, including whether or not your request needs to be expedited, the ordering/referring physician information, and whether or not to send the beneficiary and/or physician a copy of the decision letter.
An expedited request is allowed when the beneficiary’s health/life is in jeopardy without the use of the equipment that has been prescribed. Select either the yes or no radio button as appropriate. If you select yes for an expedited request, you will then need to choose a reason from the drop-down menu and add comments to support the need for an expedited request.
Next enter the ordering/referring physician’s first and last name, address, and NPI.
After entering the treating physician’s information, select the appropriate yes or no radio buttons to indicate if you would like copies of the Prior Authorization decision letter to be sent to the beneficiary and/or the treating physician.
Note that if you wish to send a copy of the decision letter to the treating physician, then you will need to attach a completed PA Decision Letter Request Form. Use the link shown on the screen to open the form. You will need to complete and save the form, and then include the saved file in your support documentation (which you will upload in Step 6).
Step 6 – Support Documentation and Final Submission
The final step in the Prior Authorization Smart Submission process is to attach the required documentation to your submission. myCGS will present you with a checklist of required documents for your request. Ensure that your files contain each item on the list, and then select the checkboxes next to each item. You must check off every item on the list to continue.
myCGS will also display a list of applicable program resource links, each of which will take you to an educational resource on our website. These educational resources will help to ensure that you have all the necessary documentation to support your claim once your Prior Authorization request has been approved.
After confirming that you have all the required documentation, you must attach the documentation to your request. To do so, press the UPLOAD button.
After pressing the UPLOAD button, a navigation window will pop up allowing you to select the files on your computer that you wish to attach and submit with your request.
NOTE: The maximum size limit for upload is 50 MB per file. A maximum of 15 files may be attached per submission. Only the following file types are permitted for submission in myCGS:
After selecting your documents, myCGS will list the files under the UPLOAD button on the screen. Verify that all the appropriate files have been added.
If you’ve added a file by mistake which you wish to remove from your request, hover your cursor over the File Type field on the row you need to delete. The File Type field will turn into an X—press the X to remove the file.
After attaching your documents, you can preview your submission by pressing the PREVIEW button. This will display a summary of your submission that will be submitted to CGS for processing. Note that previewing your submission is optional. Once you have verified that all the information you have entered is correct and that you’ve attached all the necessary documentation, press the SUBMIT button to submit your request.
NOTE: Please ensure all required documents are included in your submission. Duplicate portal submissions are not allowed. Any documents submitted later by fax cannot be tied to the submission and will not be included in the review.
After pressing SUBMIT, myCGS will upload your request into the CGS internal processing system. You will receive a message stating that your request was submitted successfully, with the time and date of the submission.
After submitting your request, you can use the Prior Authorization Status screen to check the status of your request.
Prior Authorization Exemption Opt-Out Form
NOTE: The 2026 Prior Authorization (PA) Exemption Opt-Out period ended on April 30, 2026. Therefore, the Opt-Out Form is not currently available. The next PA Exemption Opt-Out period is scheduled to open in 2027.
The Prior Authorization Supplier Exemption Process allows certain suppliers to be exempt from Prior Authorization requirements under specific conditions. If your company has qualified for Prior Authorization exemption, but you would like to opt out of exemption and continue to submit Prior Authorization requests, then you can submit a Prior Authorization Exemption Opt-Out Form. You must submit this form by April 30, 2026, to opt out.
To access and submit the Prior Authorization Exemption Opt-Out Form in myCGS, select Prior Auth from the Claim Preparation menu, choose Exemption Opt-Out Form in the Prior Auth sub-menu, and then complete all required fields on the form, including the eSignature section. After entering all your information, press the Submit button to submit the form.
NOTE: The Exemption Opt-Out Form will only display as an option in myCGS if you meet the following criteria:
- Your NPI/PTAN has received a Prior Authorization Notice of Exemption, meaning you have qualified for exemption.
- You are a Designed Approver (DA) or an End User who has been granted access by your DA to submit the Prior Authorization Exemption Opt-Out Form.
ADMC
The ADMC screens in myCGS allow you to view the status of Advanced Determination of Medicare Coverage (ADMC) requests you've submitted to Jurisdiction B or C, as well as to submit new ADMC requests. To view status of an ADMC request, go to the Claim Preparation menu, choose ADMC, and then select the Status sub-menu. To submit an ADMC request, choose Form Submission from the ADMC sub-menu.
For information about ADMC, refer to the Medical Review pages found on our Jurisdiction B or C website—go to www.cgsmedicare.com, select either JB or JC DME, and then go to Medical Review. ADMC information is also available in Chapter 9 of the Supplier Manual.
ADMC Status
The ADMC Status screen in myCGS allows you to view the status of any ADMC request you have submitted to Jurisdiction B or C (depending on which jurisdiction you have selected). To search for ADMC status, select ADMCfrom the Claim Preparation menu, choose Status in the ADMC sub-menu, and then enter the following information:
- Medicare ID (MBI only)
- Beneficiary Last Name (first six letters)
- Beneficiary First Name (first initial)
- Beneficiary Date of Birth (eight digits)
- HCPCS Code
NOTE: Please allow three business days after submission for requests to appear in myCGS.
After pressing the Submit button, myCGS will return the following information:
- Status
- Date of Receipt
- Date of Decision
- Action Taken (Affirmed or Non-Affirmed)
- Denial Reason (if the request was non-affirmed)
- DCN
- Documents
To view the ADMC decision letter, press the View link in the Documents column. myCGS will then open a document window where you can view and print the letter by pressing the Download icon.
ADMC Form Submission
The ADMC Form Submission screen in myCGS allows you to submit ADMC requests to Jurisdiction B or C. To submit an ADMC status, select ADMC from the Claim Preparation menu, choose Form Submission in the ADMC sub-menu, and then enter the following information:
- Medicare ID (MBI only)
- Beneficiary Last Name
- Beneficiary First Name
- Beneficiary Date of Birth (eight digits)
- HCPCS Code
Note that myCGS will only accept HCPCS codes which are valid for ADMC submission (a list of codes is available on our website and in the Supplier Manual, Chapter 9).
After pressing the Submit button, myCGS will verify the beneficiary and HCPCS information you have entered and then will take you to the ADMC Submission Form screen.
On the ADMC Submission Form, complete all of the required information, and attach your supporting documentation. To attach documents, press the Upload button.
After pressing the Upload button, a navigation window will pop up allowing you to select the files you wish to attach and submit with your request.
NOTE: The maximum size limit for upload is 50 MB per file. A maximum of 15 files may be attached per submission. Only the following files types are permitted for submission in myCGS:
After selecting your documents, myCGS will list the files under the Upload button on the screen. Verify that all of the appropriate files have been selected and then press the Submit button to submit your request.
A popup message will appear, asking if you have attached all of your documentation. If you are ready to submit, press Yes. If you need to attach more documents or wish to cancel your request, press No.
After pressing yes, myCGS will upload your request into the CGS internal processing system. You will receive a message stating that your request was submitted successfully, with the time and date of the submission.
After submitting your request, you can use the ADMC Status screen to check the status of your request; however, it will take up to three business days after submission before the status of your request is available.
Prior Authorization
The Prior Authorization screens in myCGS allow you to view the status of Prior Authorization requests you've submitted to Jurisdiction B or C, as well as to submit new Prior Authorization requests. To view status of a Prior Authorization request, go to the Claim Preparation menu, choose Prior Auth, and then select the Status sub-menu. To submit a Prior Authorization request, choose Form Submission from the Prior Auth sub-menu.
For information about Prior Authorization, refer to the Medical Review pages found on our Jurisdiction B or C website—go to www.cgsmedicare.com, select either JB or JC DME, and then go to Medical Review. Prior Authorization information is also available in Chapter 9 of the Supplier Manual.
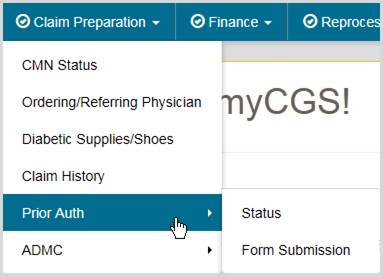
Prior Authorization Status
The Prior Authorization Status screen in myCGS allows you to view the status of any Prior Authorization request you have submitted to Jurisdiction B or C (depending on which jurisdiction you have selected). To search for Prior Authorization status, select Prior Auth from the Claim Preparation menu, choose Status in the Prior Auth sub-menu, and then enter the following information:
- Medicare ID (MBI only)
- Beneficiary Last Name (first six letters)
- Beneficiary First Name (first initial)
- Beneficiary Date of Birth (six digits)
- HCPCS Code
NOTE: Please allow three business days after submission for requests to appear in myCGS.
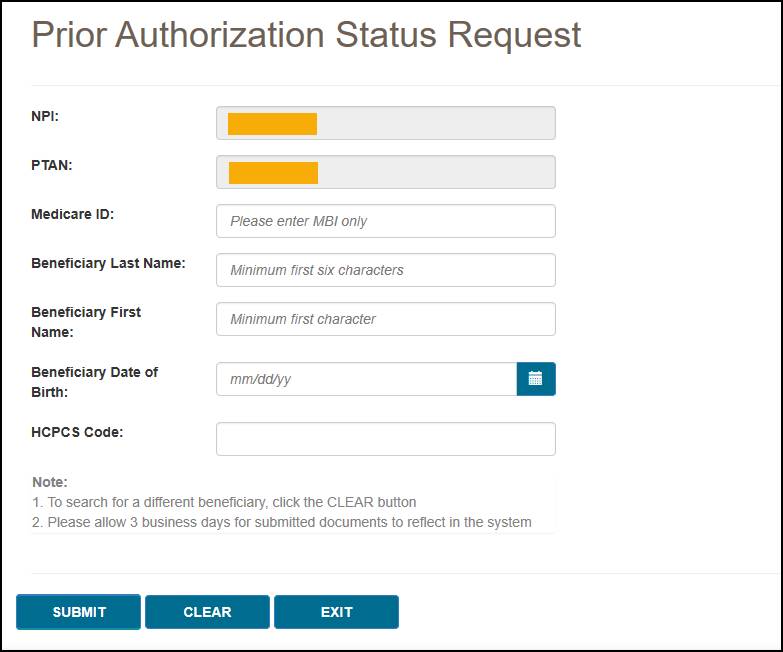
After pressing the Submit button, myCGS will return the following information:
- Status
- Date of Receipt
- Date of Decision
- Action Taken (Affirmed or Non-Affirmed)
- Denial Reason (if the request was non-affirmed)
- UTN
- Documents
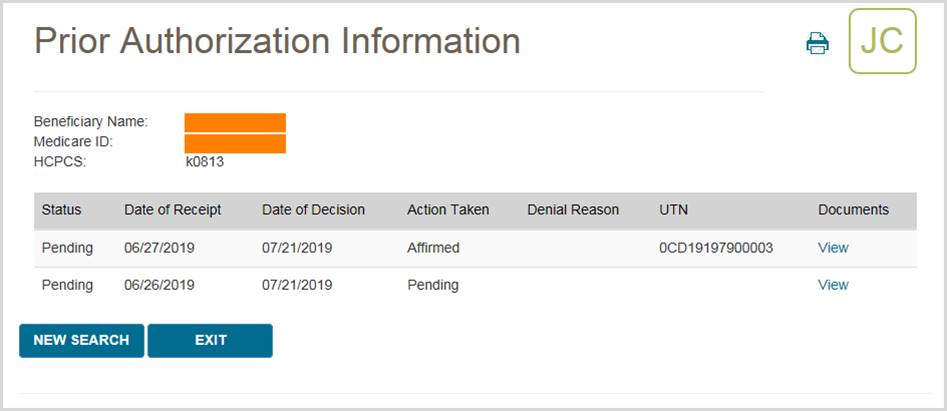
To view the Prior Authorization decision letter, press the View link in the documents column. myCGS will then open a document window where you can view and print the letter by pressing the Download icon.

Prior Authorization Form Submission
The Prior Authorization Form Submission screen in myCGS allows you to submit Prior Authorization requests to Jurisdiction B or C. To submit a Prior Authorization request, select Prior Auth from the Claim Preparation menu, choose Form Submission in the Prior Auth sub-menu, and then enter the following information:
- Medicare ID (MBI only)
- Beneficiary Last Name
- Beneficiary First Name
- Beneficiary Date of Birth (six digits)
- HCPCS Code
Note that myCGS will only accept HCPCS codes which are valid for Prior Authorization submission (a list of codes is available on our website and in the Supplier Manual, Chapter 9).
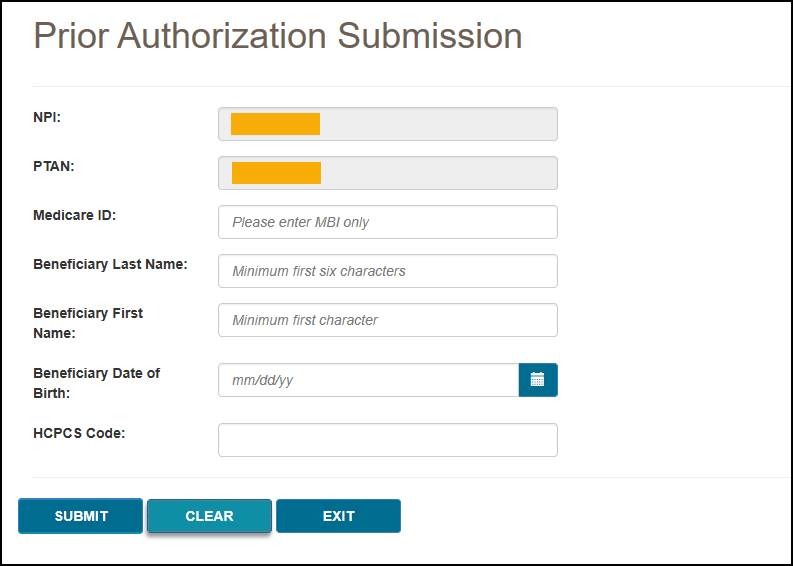
After pressing the Submit button, myCGS will verify the beneficiary and HCPCS information you have entered, and then will take you to the Prior Authorization Request (PAR) Coversheet screen.
On the PAR Coversheet, complete all of the required information, and attach your supporting documentation. To attach documents, press the Upload button.
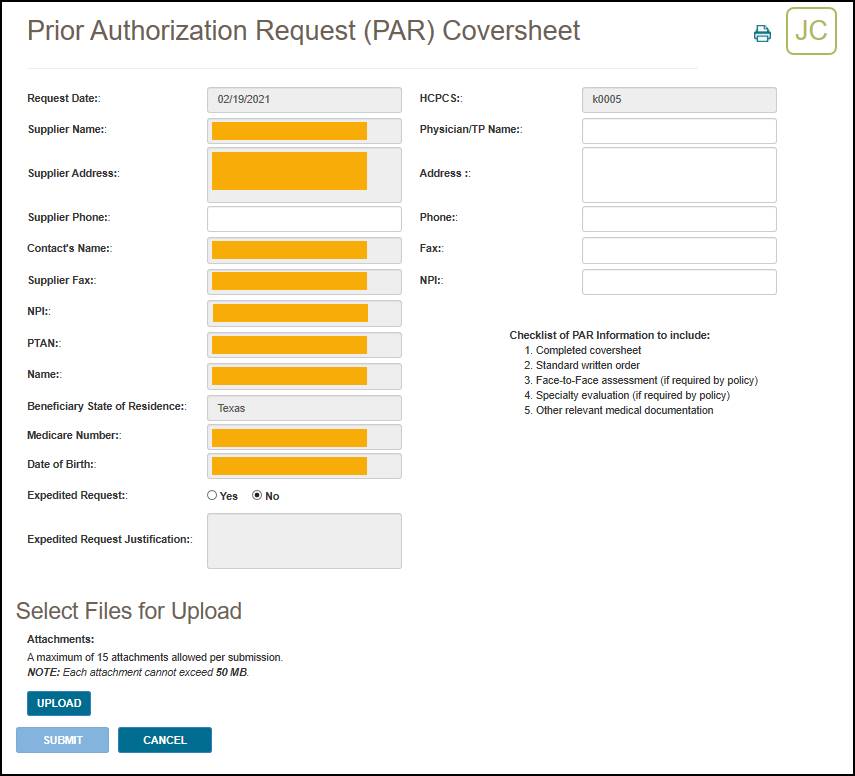
After pressing the Upload button, a navigation window will pop up allowing you to select the files you wish to attach and submit with your request.
NOTE: The maximum size limit for upload is 50 MB per file. A maximum of 15 files may be attached per submission. Only the following files types are permitted for submission in myCGS:
After selecting your documents, myCGS will list the files under the Upload button on the screen. Verify that all of the appropriate files have been selected and then press the Submit button to submit your request.
A popup message will appear, asking if you have attached all of your documentation. If you are ready to submit, press Yes. If you need to attach more documents or wish to cancel your request, press No.
After pressing yes, myCGS will upload your request into the CGS internal processing system. You will receive a message stating that your request was submitted successfully, with the time and date of the submission.
After submitting your request, you can use the Prior Authorization Status screen to check the status of your request; however, it will take up to three business days after submission before the status of your request is available.
ADMC
The ADMC screens in myCGS allow you to view the status of Advanced Determination of Medicare Coverage (ADMC) requests you've submitted to Jurisdiction B or C, as well as to submit new ADMC requests. To view status of an ADMC request, go to the Claim Preparation menu, choose ADMC, and then select the Status sub-menu. To submit an ADMC request, choose Form Submission from the ADMC sub-menu.
For information about ADMC, refer to the Medical Review pages found on our Jurisdiction B or C website—go to www.cgsmedicare.com, select either JB or JC DME, and then go to Medical Review. ADMC information is also available in Chapter 9 of the Supplier Manual.
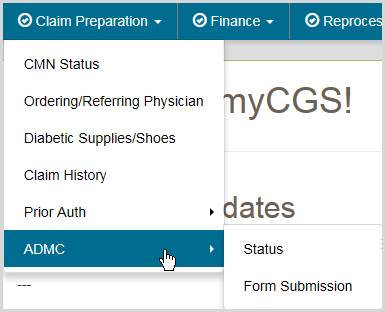
ADMC Status
The ADMC Status screen in myCGS allows you to view the status of any ADMC request you have submitted to Jurisdiction B or C (depending on which jurisdiction you have selected). To search for ADMC status, select ADMC from the Claim Preparation menu, choose Status in the ADMC sub-menu, and then enter the following information:
- Medicare ID (MBI only)
- Beneficiary Last Name (first six letters)
- Beneficiary First Name (first initial)
- Beneficiary Date of Birth (six digits)
- HCPCS Code
NOTE: Please allow three business days after submission for requests to appear in myCGS.
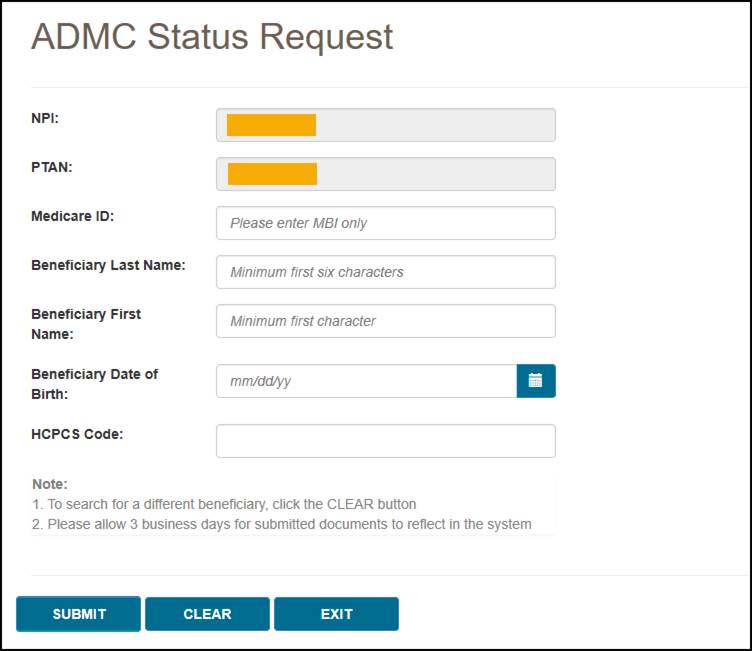
After pressing the Submit button, myCGS will return the following information:
- Status
- Date of Receipt
- Date of Decision
- Action Taken (Affirmed or Non-Affirmed)
- Denial Reason (if the request was non-affirmed)
- DCN
- Documents
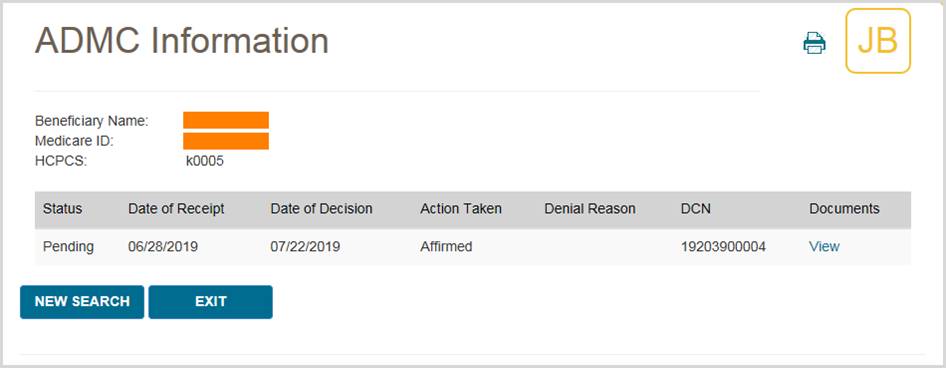
To view the ADMC decision letter, press the View link in the documents column. myCGS will then open a document window where you can view and print the letter by pressing the Download icon.
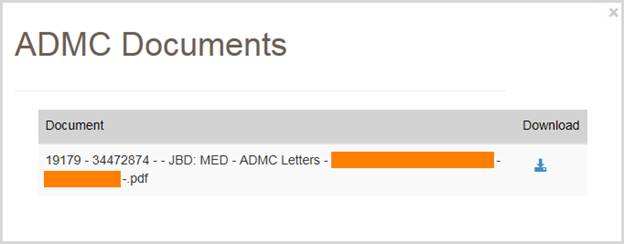
ADMC Form Submission
The ADMC Form Submission screen in myCGS allows you to submit ADMC requests to Jurisdiction B or C.
NOTE: If you are an End User, then ADMC Form Submission access is turned off by default. Your Designated Approver (DA) must grant you access before you can use the ADMC Form Submission Screen. If you need access, please contact your DA.
To submit an ADMC status, select ADMC from the Claim Preparation menu, choose Form Submission in the ADMC sub-menu, and then enter the following information:
- Medicare ID (MBI only)
- Beneficiary Last Name
- Beneficiary First Name
- Beneficiary Date of Birth (eight digits)
- HCPCS Code
Note that myCGS will only accept HCPCS codes which are valid for ADMC submission (a list of codes is available on our website and in the Supplier Manual, Chapter 9).
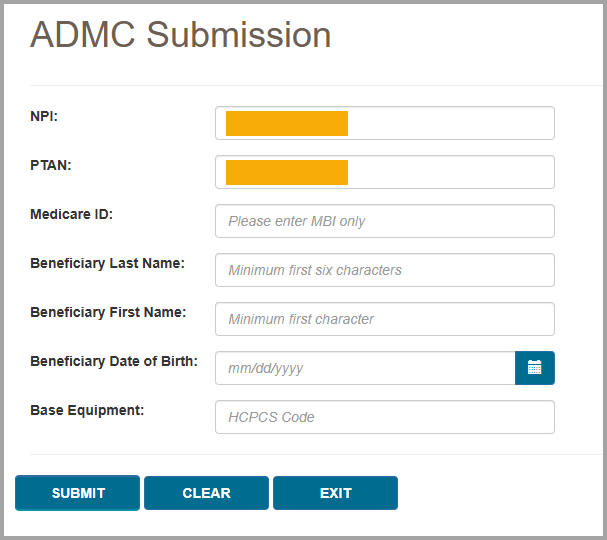
After pressing the Submit button, myCGS will verify the beneficiary and HCPCS information you have entered and then will take you to the ADMC Submission Form screen.
On the ADMC Submission Form, complete all of the required information, and attach your supporting documentation. To attach documents, press the Upload button.
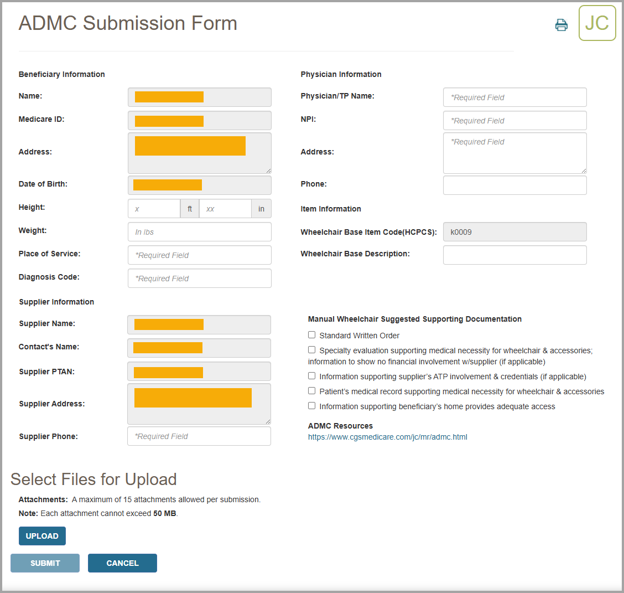
After pressing the Upload button, a navigation window will pop up allowing you to select the files you wish to attach and submit with your request.
NOTE: The maximum size limit for upload is 50 MB per file. A maximum of 15 files may be attached per submission. Only the following file types are permitted for submission in myCGS:
After selecting your documents, myCGS will list the files under the Upload button on the screen. Verify that all of the appropriate files have been selected and then press the Submit button to submit your request.
A popup message will appear, asking if you have attached all of your documentation. If you are ready to submit, press Yes. If you need to attach more documents or wish to cancel your request, press No.
After pressing Yes, myCGS will upload your request into the CGS internal processing system and you will see the ADMC Confirmation screen with the following information:
- User ID
- User Name
- Date Submitted
- Time Submitted
After submitting your request, you can use the ADMC Status screen to check the status of your request; however, it will take up to three business days after submission before the status of your request is available.

Chapter 6 – Finance
Finance Overview
The Finance menu in myCGS gives you access to a variety of financial information, including:
- The last five checks issued to your account
- Recent outstanding checks
- Offset information
- Overpayment recovery
- Pricing (fee schedules)
Within the Finance menu, there are four options: Checks, Offsets, Overpayment Recovery (which has two submenus—Search and Form Submission), and Pricing. The Checks screen allows you to see the checks that have been issued to you recently, as well as any outstanding (not cashed) checks. The Overpayment Recovery – Search screen allows you to search for financial details regarding overpayments. The Overpayment Recovery – Form Submission screen allows you to submit either an Offset Request or an Overpayment Recovery Request. The Pricing screen provides a link to the current DME MAC fee schedules.
NOTE: The Offsets screen is disabled in myCGS 10. Use the Overpayment Recovery – Search screen to find detailed information about offsets.
All screens within the Finance menu automatically populate your NPI and PTAN; therefore you do not need to manually enter this information. If you need to use a different NPI/PTAN than what is currently selected, change your NPI/PTAN following the instructions in the Change NPI/PTAN section in this manual.
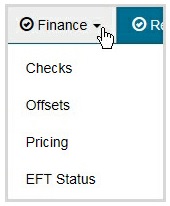
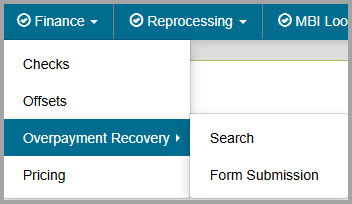
Top
Checks
The Checks screen allows you to see the last five issued checks issued to your account by CGS, as well as outstanding checks that have been issued in the last 30 days. To search for your checks, select the Checks option in the Finance menu. Your NPI and PTAN will be auto-filled based on the NPI/PTAN you have selected from your profile. If you need to use a different NPI/PTAN than what is currently selected, change your NPI/PTAN following the instructions in the Change NPI/PTAN section in this manual.
After confirming the NPI and PTAN are correct, press the SUBMIT button.
myCGS will return the following check information:
- The date, amount, and status of the last five checks issued to your NPI/PTAN
- The date and amount of any outstanding checks issued to your NPI/PTAN within the last 30 days
Note that if you have outstanding checks that are greater than 30 days old, they will not be reflected in the check results.
The following image shows an example of check results in myCGS:
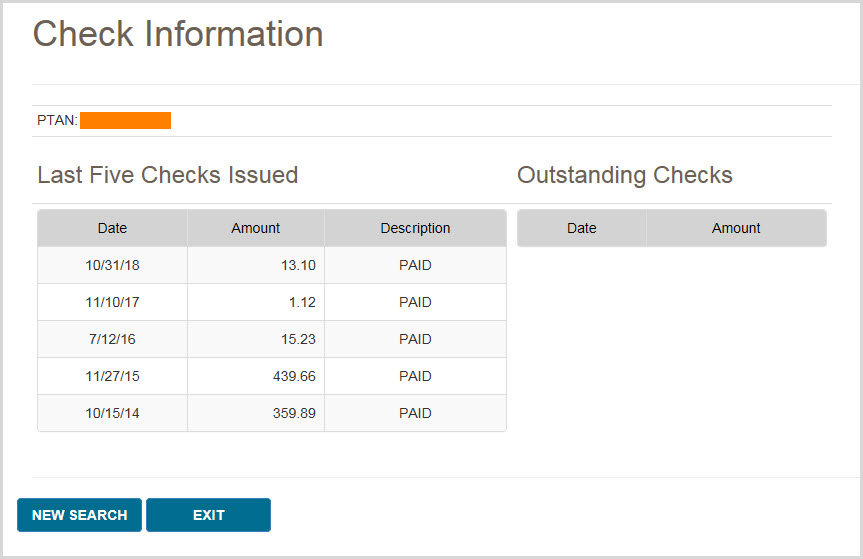
Top
Offsets
The Offsets screen is disabled in myCGS 10. Use the Overpayment Recovery – Search screen to find detailed information about offsets.
Overpayment Recovery – Search
The Overpayment Recovery Search screen allows you to search for financial details of overpayments by either the AR/Invoice Number or the Letter Number of the overpayment. Once you perform your search, myCGS will return financial data related to your search criteria.
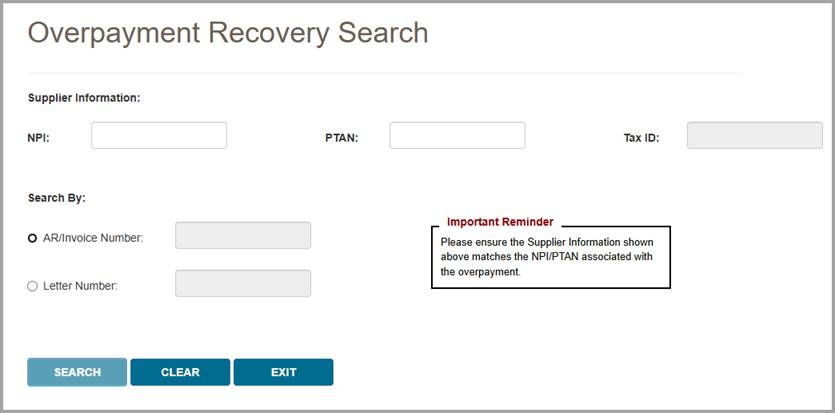
Searching by AR/Invoice Number
To search for financial information by the AR/Invoice Number, select the AR/Invoice Number radio button, enter the AR/Invoice Number, and press Search. After submitting your search, myCGS will return the following information:
- Financial details
- A link to the overpayment invoice details (beneficiary name, date of service, patient account number, and MBI)
- Offset details, including the type of offset, date, and amount
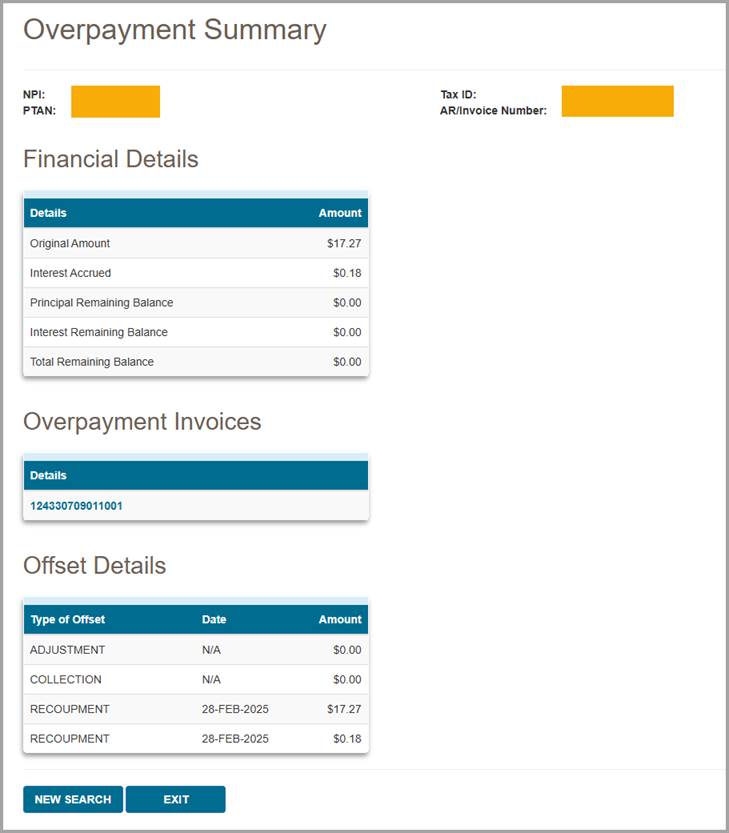
Searching by Letter Number
To search for financial information by the Letter Number, select the Letter Number radio button, enter the Letter Number, and press Search. After submitting your search, myCGS will return the following information:
- Details of the letter, including a link to view the letter
- Financial details
- Links to the overpayment invoice details (beneficiary name, date of service, patient account number, MBI, AR original balance, and AR remaining balance) and offset details (type of offset, date, and amount) for each AR number associated with the demand letter
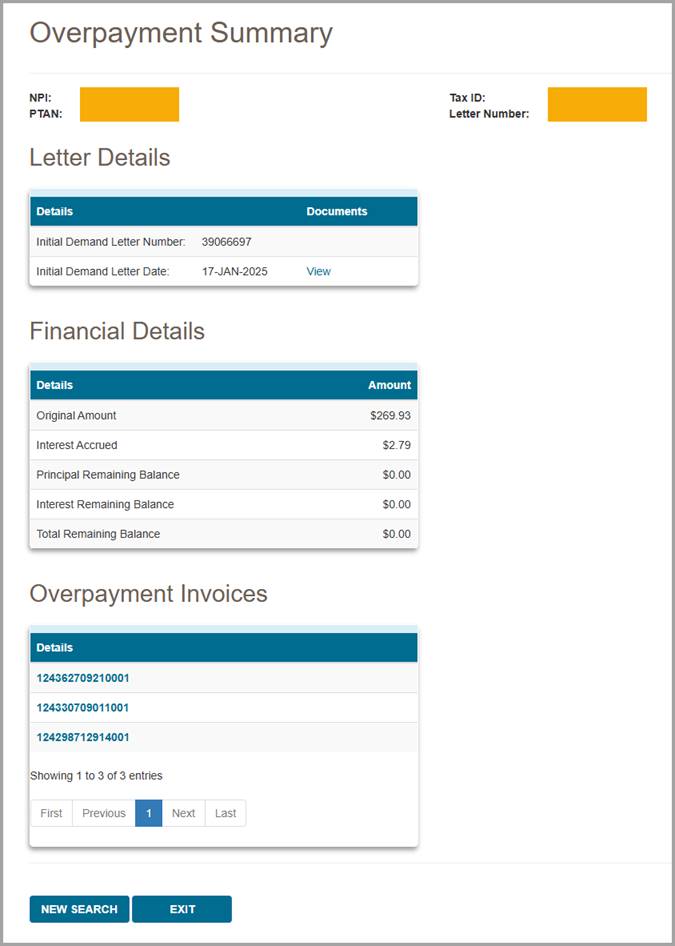
Top
Overpayment Recovery – Form Submission
The Overpayment Recovery Form Submission screen allows you to submit forms related to overpayments. When you navigate to the Overpayment Recovery Form Submission screen, you will be presented with two form submission options:
- Offset Request – Use this form to request an immediate offset or to stop a previously requested offset. Immediate offsets are considered voluntary payments, thereby waiving rights to interest under Section 935 of the Medicare Modernization Act (MMA) for eligible debts. An offset can only take place if payment is still being received under this payee number.
- Overpayment Recovery Request – Use this form to initiate an adjustment for an overpaid claim. Some examples of overpayment situations in which you would use this form include when an item was returned, there was a billing error, or overpayments involving Medicare Secondary Payer (MSP) (these examples are not all-inclusive).
To proceed with an overpayment submission, choose the appropriate form and press NEXT.
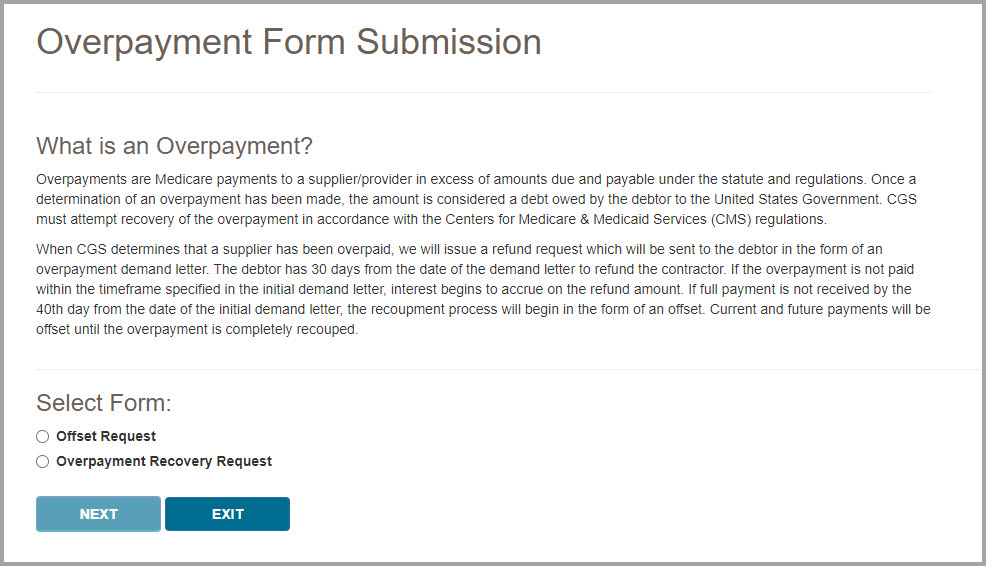
Offset Request
After you have selected Offset Request from the Overpayment Form Submission page, follow the steps below to make your submission.
- Ensure the Supplier Information is correct.
myCGS will auto-fill your NPI, PTAN, Tax ID, and Supplier Name based on the NPI/PTAN you currently have selected. Verify that you have selected the correct NPI/PTAN (refer to Chapter 1 of this manual for instructions on changing your NPI/PTAN).
- Enter your Contact Information, including:
- Contact Name
- Contact Email
You must complete both fields to continue.
- In the Type of Request section, choose from one of the following two options:
- Supplier Level Offset – Select this option to establish immediate offsets for any current and all future overpayments. The offset will continue even if you choose to appeal the debt. This request is specific to the NPI/PTAN combination shown in the Supplier Information section.
- Stop Previously Requested Supplier Level Offset – Select this option to cancel a request. This change will affect new debts created on and after the date this request is processed. Debts currently in an offset status will remain so until the debt has been satisfied. This request is specific to the NPI/PTAN combination shown in the Supplier Information section.

- If you select Demand Letter Offset, enter either the Letter Number of the Demand Letter (maximum one letter per submission) or the AR/Invoice Number of the overpayment (maximum 10 AR/Invoice Numbers per submission).

- Complete the eSignature section by entering your name.

- Once you have completed all sections of the form and added your eSignature, press the Submit button. myCGS will upload your request into the CGS internal processing system. You will receive a confirmation statement that includes the time and date of the submission.
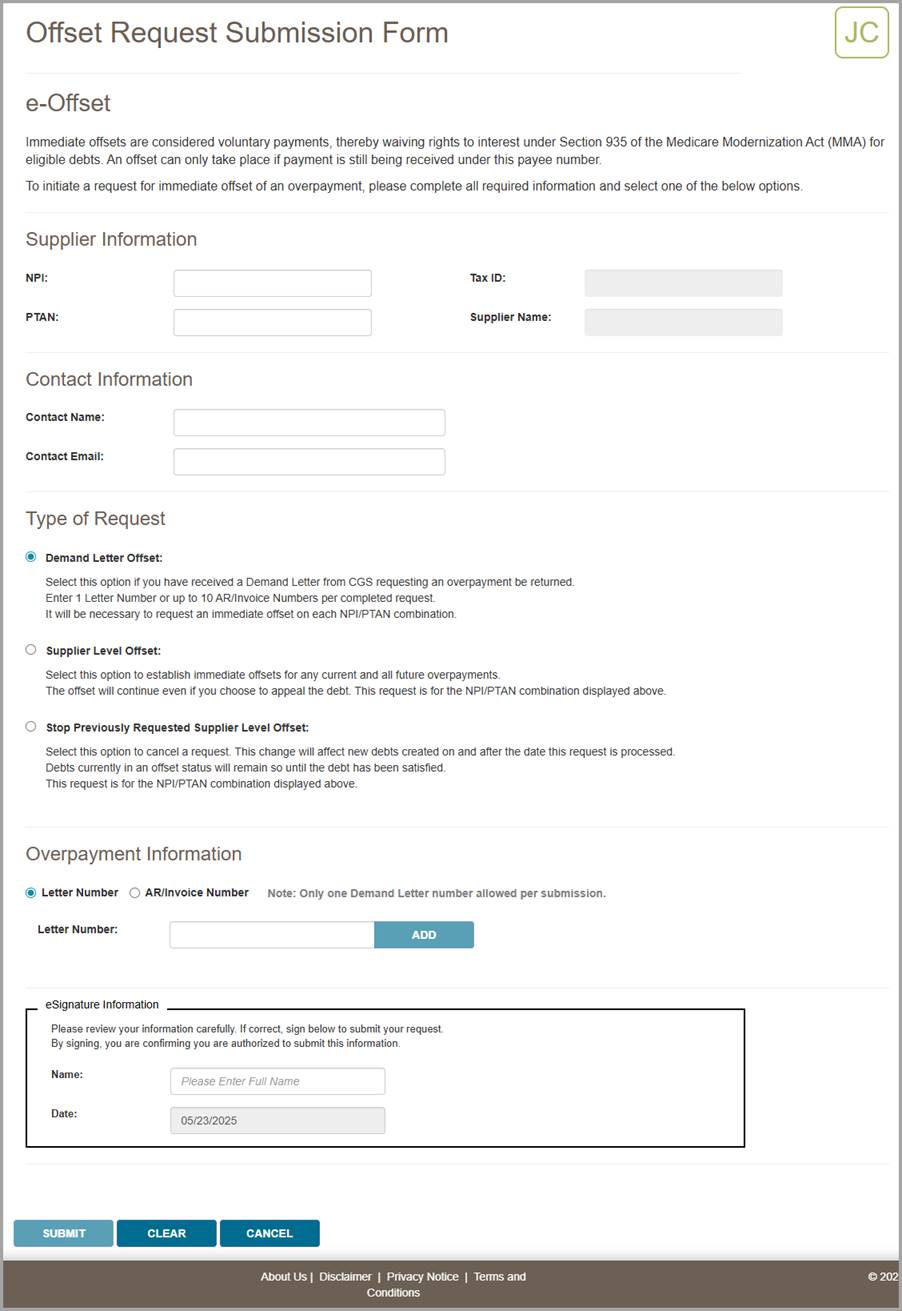
Overpayment Recovery Request
After you have selected Overpayment Recovery Request from the Overpayment Form Submission page, follow the steps below to make your submission.
- Ensure the Supplier Information is correct.
myCGS will auto-fill your NPI, PTAN, Tax ID, and Supplier Name based on the NPI/PTAN you currently have selected. If the supplier information displayed does not match your claim, then choose another NPI/PTAN (refer to Chapter 1 of this manual for instructions on changing your NPI/PTAN).
- Enter your Contact Information, including:
- Contact Name
- Contact Email
You must complete both fields to continue.
- Enter the Beneficiary Information for the claim which has been overpaid, including:
- Medicare Number
- Beneficiary Last Name (first six characters)
- Beneficiary First Name (first character)
myCGS will verify that the beneficiary information matches our records.
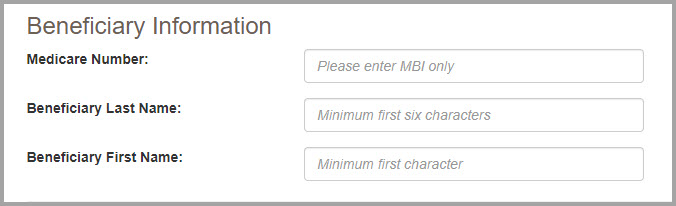
- Complete the Claim Information section by entering the CCN of the claim which was overpaid. After you have entered the CCN, press the Add CCN button. myCGS will then check to make sure that the CCN matches the information you have entered. Note that you can only add one CCN per form submission.
After adding the CCN, you will see a list of the claim lines on the screen. Select every line on the claim which you are reporting as an overpayment. If the entire claim was overpaid, then select the "Select All" checkbox.
If you added the wrong CCN, you can remove it by pressing the red X next to the CCN.
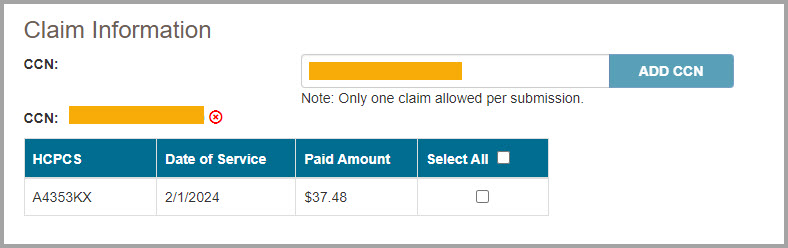
- In the Overpayment Information section, choose from one of the following two options:
- Non MSP Overpayment
- MSP Overpayment
For information about Medicare Secondary Payer (MSP), refer to the DME MAC Supplier Manual, Chapter 11.
After you choose the appropriate overpayment option, a list of reasons for overpayment will appear. Select the appropriate reason from the list. If the reason for your overpayment is not listed, select "Other" and then enter your reason in the "Specify reason for Overpayment" box.
NOTE: If you choose "Other" you MUST manually enter the specific reason for the overpayment.

- In the Required Documentation section, verify that you are including the listed documents with your submission. You must check off every item on the list to continue.
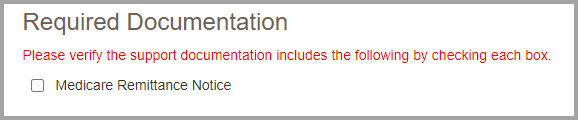
- Upload any files that are needed to complete your request. Be sure to include the required documentation listed on the page.
After pressing the Upload button, a navigation window will pop up allowing you to select the files you wish to attach and submit with your request.
NOTE: The maximum size limit for upload is 50 MB per file. A maximum of 15 files may be attached per submission. Only the following file types are permitted for submission in myCGS:
After selecting your documents, myCGS will list the files under the Upload button on the screen. Verify that all the appropriate files have been selected.
NOTE: Please ensure all required documents are included in your submission. Duplicate portal submissions are not allowed. Any documents submitted later by fax cannot be tied to the submission and will not be included in the request. Do not include multiple files with the same name (duplicated names will be dropped from your submission, even if the contents of the files are different).
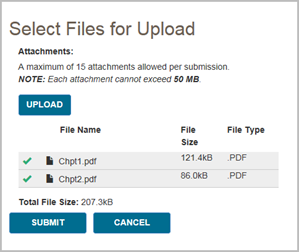
- Complete the eSignature section by entering your name.
- Once you have completed all sections of the form and added your eSignature, press the Submit button. A popup message will appear, asking if you have attached all your documentation. If you are ready to submit, press Yes. If you need to attach more documents or wish to cancel your request, press No.
After pressing yes, myCGS will upload your request into the CGS internal processing system. You will receive a confirmation statement that includes the time and date of the submission.

Top
Pricing
The DME MAC fee schedules are available for download or online viewing o the CGS website. The Pricing screen in myCGS gives you a direct link to the fee schedule page on our website.
To access pricing information, select the Pricing option in the Finance menu. From the Pricing screen, select the pricing hyperlink. A new window will open, taking you directly to the Jurisdiction B or C fee schedule page on www.cgsmedicare.com.
Top
Finance Overview
The Finance menu in myCGS gives you access to a variety of financial information, including:
- The last five checks issued to your account
- Recent outstanding checks
- Offset information
- Overpayment recovery
- Pricing (fee schedules)
Within the Finance menu, there are four options: Checks, Offsets, Overpayment Recovery (which has two submenus—Search and Form Submission), and Pricing. The Checks screen allows you to see the checks that have been issued to you recently, as well as any outstanding (not cashed) checks. The Overpayment Recovery – Search screen allows you to search for financial details regarding overpayments. The Overpayment Recovery – Form Submission screen allows you to submit either an Offset Request or an Overpayment Recovery Request. The Pricing screen provides a link to the current DME MAC fee schedules.
NOTE: The Offsets screen is disabled in myCGS 10. Use the Overpayment Recovery – Search screen to find detailed information about offsets.
All screens within the Finance menu automatically populate your NPI and PTAN; therefore you do not need to manually enter this information. If you need to use a different NPI/PTAN than what is currently selected, change your NPI/PTAN following the instructions in the Change NPI/PTAN section in this manual.
Checks
The Checks screen allows you to see the last five issued checks issued to your account by CGS, as well as outstanding checks that have been issued in the last 30 days. To search for your checks, select the Checks option in the Finance menu. Your NPI and PTAN will be auto-filled based on the NPI/PTAN you have selected from your profile. If you need to use a different NPI/PTAN than what is currently selected, change your NPI/PTAN following the instructions in the Change NPI/PTAN section in this manual.
After confirming the NPI and PTAN are correct, press the SUBMIT button.
myCGS will return the following check information:
- The date, amount, and status of the last five checks issued to your NPI/PTAN
- The date and amount of any outstanding checks issued to your NPI/PTAN within the last 30 days
Note that if you have outstanding checks that are greater than 30 days old, they will not be reflected in the check results.
The following image shows an example of check results in myCGS:
Offsets
The Offsets screen is disabled in myCGS 10. Use the Overpayment Recovery – Search screen to find detailed information about offsets.
Overpayment Recovery – Search
The Overpayment Recovery Search screen allows you to search for financial details of overpayments by either the AR/Invoice Number or the Letter Number of the overpayment. Once you perform your search, myCGS will return financial data related to your search criteria.
Searching by AR/Invoice Number
To search for financial information by the AR/Invoice Number, select the AR/Invoice Number radio button, enter the AR/Invoice Number, and press Search. After submitting your search, myCGS will return the following information:
- Financial details
- A link to the overpayment invoice details (beneficiary name, date of service, patient account number, and MBI)
- Offset details, including the type of offset, date, and amount
Searching by Letter Number
To search for financial information by the Letter Number, select the Letter Number radio button, enter the Letter Number, and press Search. After submitting your search, myCGS will return the following information:
- Details of the letter, including a link to view the letter
- Financial details
- Links to the overpayment invoice details (beneficiary name, date of service, patient account number, MBI, AR original balance, and AR remaining balance) and offset details (type of offset, date, and amount) for each AR number associated with the demand letter
Overpayment Recovery – Form Submission
The Overpayment Recovery Form Submission screen allows you to submit forms related to overpayments. When you navigate to the Overpayment Recovery Form Submission screen, you will be presented with two form submission options:
- Offset Request – Use this form to request an immediate offset or to stop a previously requested offset. Immediate offsets are considered voluntary payments, thereby waiving rights to interest under Section 935 of the Medicare Modernization Act (MMA) for eligible debts. An offset can only take place if payment is still being received under this payee number.
- Overpayment Recovery Request – Use this form to initiate an adjustment for an overpaid claim. Some examples of overpayment situations in which you would use this form include when an item was returned, there was a billing error, or overpayments involving Medicare Secondary Payer (MSP) (these examples are not all-inclusive).
To proceed with an overpayment submission, choose the appropriate form and press NEXT.
Offset Request
After you have selected Offset Request from the Overpayment Form Submission page, follow the steps below to make your submission.
- Ensure the Supplier Information is correct.
myCGS will auto-fill your NPI, PTAN, Tax ID, and Supplier Name based on the NPI/PTAN you currently have selected. Verify that you have selected the correct NPI/PTAN (refer to Chapter 1 of this manual for instructions on changing your NPI/PTAN).
- Enter your Contact Information, including:
- Contact Name
- Contact Email
You must complete both fields to continue.
- In the Type of Request section, choose from one of the following two options:
- Supplier Level Offset – Select this option to establish immediate offsets for any current and all future overpayments. The offset will continue even if you choose to appeal the debt. This request is specific to the NPI/PTAN combination shown in the Supplier Information section.
- Stop Previously Requested Supplier Level Offset – Select this option to cancel a request. This change will affect new debts created on and after the date this request is processed. Debts currently in an offset status will remain so until the debt has been satisfied. This request is specific to the NPI/PTAN combination shown in the Supplier Information section.
- If you select Demand Letter Offset, enter either the Letter Number of the Demand Letter (maximum one letter per submission) or the AR/Invoice Number of the overpayment (maximum 10 AR/Invoice Numbers per submission).
- Complete the eSignature section by entering your name.
- Once you have completed all sections of the form and added your eSignature, press the Submit button. myCGS will upload your request into the CGS internal processing system. You will receive a confirmation statement that includes the time and date of the submission.
Overpayment Recovery Request
After you have selected Overpayment Recovery Request from the Overpayment Form Submission page, follow the steps below to make your submission.
- Ensure the Supplier Information is correct.
myCGS will auto-fill your NPI, PTAN, Tax ID, and Supplier Name based on the NPI/PTAN you currently have selected. If the supplier information displayed does not match your claim, then choose another NPI/PTAN (refer to Chapter 1 of this manual for instructions on changing your NPI/PTAN).
- Enter your Contact Information, including:
- Contact Name
- Contact Email
You must complete both fields to continue.
- Enter the Beneficiary Information for the claim which has been overpaid, including:
- Medicare Number
- Beneficiary Last Name (first six characters)
- Beneficiary First Name (first character)
myCGS will verify that the beneficiary information matches our records.
- Complete the Claim Information section by entering the CCN of the claim which was overpaid. After you have entered the CCN, press the Add CCN button. myCGS will then check to make sure that the CCN matches the information you have entered. Note that you can only add one CCN per form submission.
After adding the CCN, you will see a list of the claim lines on the screen. Select every line on the claim which you are reporting as an overpayment. If the entire claim was overpaid, then select the "Select All" checkbox.
If you added the wrong CCN, you can remove it by pressing the red X next to the CCN.
- In the Overpayment Information section, choose from one of the following two options:
- Non MSP Overpayment
- MSP Overpayment
For information about Medicare Secondary Payer (MSP), refer to the DME MAC Supplier Manual, Chapter 11.
After you choose the appropriate overpayment option, a list of reasons for overpayment will appear. Select the appropriate reason from the list. If the reason for your overpayment is not listed, select "Other" and then enter your reason in the "Specify reason for Overpayment" box.
NOTE: If you choose "Other" you MUST manually enter the specific reason for the overpayment.
- In the Required Documentation section, verify that you are including the listed documents with your submission. You must check off every item on the list to continue.
- Upload any files that are needed to complete your request. Be sure to include the required documentation listed on the page.
After pressing the Upload button, a navigation window will pop up allowing you to select the files you wish to attach and submit with your request.
NOTE: The maximum size limit for upload is 50 MB per file. A maximum of 15 files may be attached per submission. Only the following file types are permitted for submission in myCGS:
After selecting your documents, myCGS will list the files under the Upload button on the screen. Verify that all the appropriate files have been selected.
NOTE: Please ensure all required documents are included in your submission. Duplicate portal submissions are not allowed. Any documents submitted later by fax cannot be tied to the submission and will not be included in the request. Do not include multiple files with the same name (duplicated names will be dropped from your submission, even if the contents of the files are different).
- Complete the eSignature section by entering your name.
- Once you have completed all sections of the form and added your eSignature, press the Submit button. A popup message will appear, asking if you have attached all your documentation. If you are ready to submit, press Yes. If you need to attach more documents or wish to cancel your request, press No.
After pressing yes, myCGS will upload your request into the CGS internal processing system. You will receive a confirmation statement that includes the time and date of the submission.
Pricing
The DME MAC fee schedules are available for download or online viewing o the CGS website. The Pricing screen in myCGS gives you a direct link to the fee schedule page on our website.
To access pricing information, select the Pricing option in the Finance menu. From the Pricing screen, select the pricing hyperlink. A new window will open, taking you directly to the Jurisdiction B or C fee schedule page on www.cgsmedicare.com.

Chapter 7 – Reprocessing
Reprocessing Overview
The Reprocessing menu in myCGS gives you the ability to view the status of Redetermination and Reopening requests and the ability to submit Redeterminations, Reopenings, and Claim Correction requests. There are two main menu options in the Claim Preparation menu: Redeterminations and Reopenings, each of which have submenus which contain options for status or form submissions.
Refer to the sections below for detailed information about each of the Reprocessing menu options.
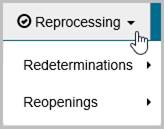
Top
Redeterminations
The Redeterminations menu in myCGS includes two options: Status and Form Submission. Use the Status screen to find the current status of Redeterminations you've submitted to CGS. Use the Form Submission screen to submit a new Redetermination request. Refer to the sections below for details.
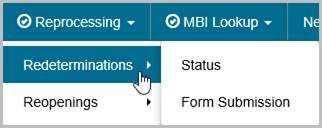
Top
Redeterminations Status
The Redeterminations Status screen provides current status of redetermination requests that you have submitted to Jurisdiction B or C (depending on the jurisdiction you have selected). You can choose to search for a redetermination in myCGS by entering in the Document Control Number (DCN) of the request or the Claim Control Number (CCN) of the original claim, or you can search using the beneficiary's information.
To search for Redetermination status, go to the Reprocessing menu, select Redeterminations Status, and then select one of the following options:
- DCN or CCN
- Beneficiary Information
If you select the option for DCN or CCN, you will be prompted to enter the following information:
- DCN or CCN (as appropriate)
- HICN or MBI of the beneficiary on the claim which you have appealed
If you select the option for Beneficiary Information, you will be prompted to enter the following information:
- HICN or MBI of the beneficiary on the claim which you have appealed
- The Date of Service for the claim
Your NPI and PTAN will be auto-filled based on the NPI/PTAN you have selected from your profile. If you have more than one NPI/PTAN and need to use a different NPI/PTAN than what is currently selected, follow the instructions in the Change NPI/PTAN section in this manual.
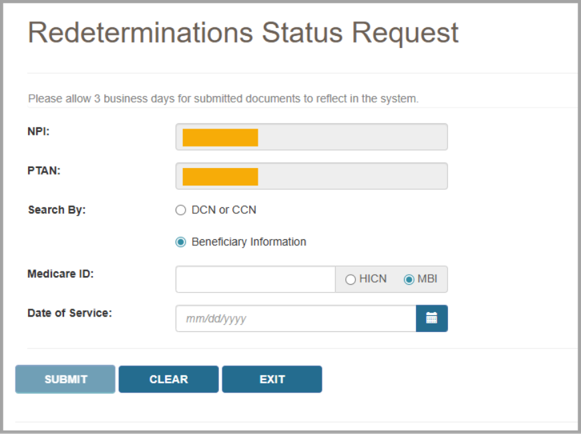
After pressing the SUBMIT button, myCGS will return following information about your request:
- Date of Receipt
- Status
- Date of Decision
- CCN
- DCN
The following image shows an example of redetermination status:
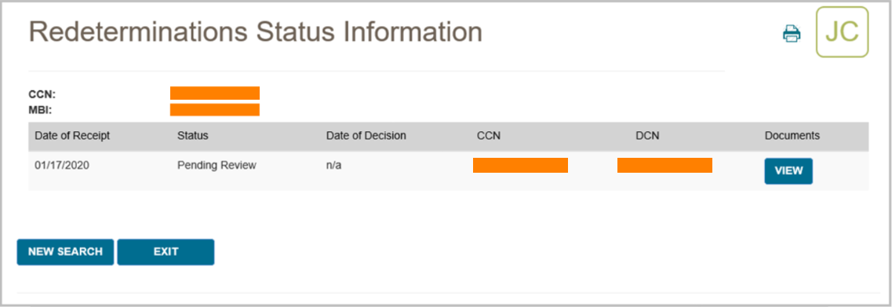
myCGS also allows you to view any related documents attached to your Redeterminations request. To view the attached documents, press the View button in the Documents column. A popup window will appear on screen, showing a list of any documents that are attached to the request. You can then press the download icon next to the document you wish to view to open the document in a new window.

NOTE: When myCGS pulls documents related to your search criteria, a variety of documents may be displayed. This will include any documents you have submitted with your original request and any letters sent to you by CGS. Note that myCGS may also display documents from other Redeterminations/Reopenings cases that meet your search criteria. For instance, if you search for Redeterminations Status in myCGS and there are other Redeterminations cases on file matching your search, then myCGS may also display documents and letters related to those cases.
Top
Redeterminations Form Submission
The Redeterminations Form Submission screen in myCGS allows you to submit Redeterminations requests for claims that you have submitted to CGS. Redeterminations submitted through myCGS will be processed by the DME MAC just like Redeterminations submitted via fax or mail. For information about the Redeterminations process, refer to Appeals section of our website (www.cgsmedicare.com) and/or the Supplier Manual, Chapter 13.
NOTE: If you are an End User, then Redeterminations Form Submission access is turned off by default. Your Designated Approver (DA) must grant you access before you can use the Redeterminations Form Submission Screen. If you need access, please contact your DA.
In order to initiate your request, the original claim in question must have already completed processing and must be eligible for a Redetermination. If the claim is still in process, you must wait for it to complete processing before submitting your request. Use the Claim Status screen in myCGS to check on the current status of your claim. If a Redetermination cannot be requested for the claim you select for any reason, you will receive an error message with instructions.
You can initiate Redeterminations requests in myCGS from either the Claim Status screen (in the Claims menu) or from the Redeterminations Form Submission screen (in the Reprocessing menu). Both options work the same way; it is a matter of personal preference/convenience as to which screen you use to begin. To submit a Redetermination in myCGS, follow the steps below.
Step 1 Select Your Claim(s)
The first step in requesting a Redetermination in myCGS is to select the claim or claims you wish to include in your request. You can find your claim using either a regular Claim Status search (via the Claims menu refer to the Claims section in this manual) or through the Redeterminations Form Submission screen (in the Reprocessing menu). Either method will take you to the same Redeterminations Request Form after you have found and selected your claim.
From the Claim Status screen, select your claim(s) by pressing the Redeterminations button on the Claim Status Summary screen. After pressing the Redeterminations button, you must select the claim lines you wish to include in your request. After selecting your claim lines, press the Next button. This will take you to the Redeterminations Request Form.
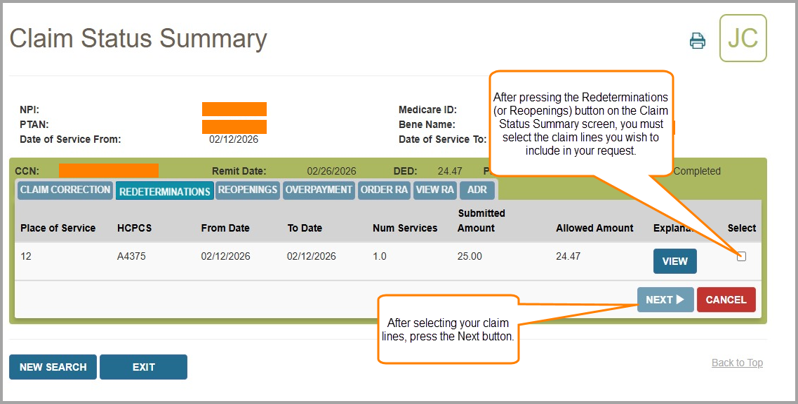
From the Redeterminations Form Submission screen (in the Reprocessing menu), enter the beneficiary's Medicare ID. Your NPI and PTAN will be auto-populated (make sure you have the correct NPI/PTAN selected). Then enter the CCN of the claim you wish to appeal and press the ADD CCN button. If you wish to include more than one claim in your request, continue to add more CCNs until all of the claims you need to appeal are included.
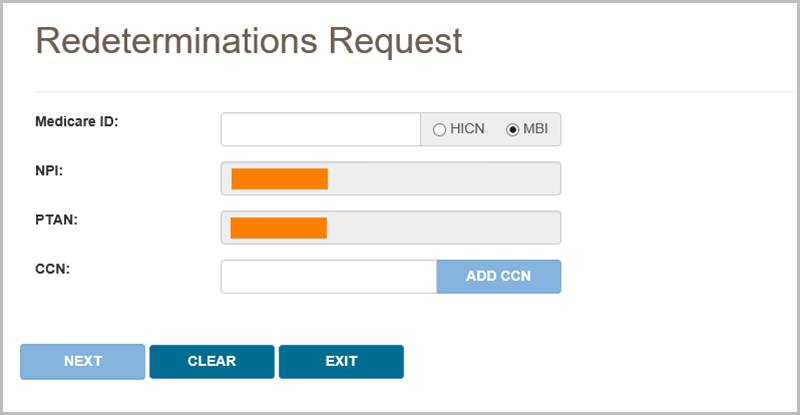
Once you have added a CCN successfully, it will appear on the screen with a green checkmark next to it, as shown in the following image.
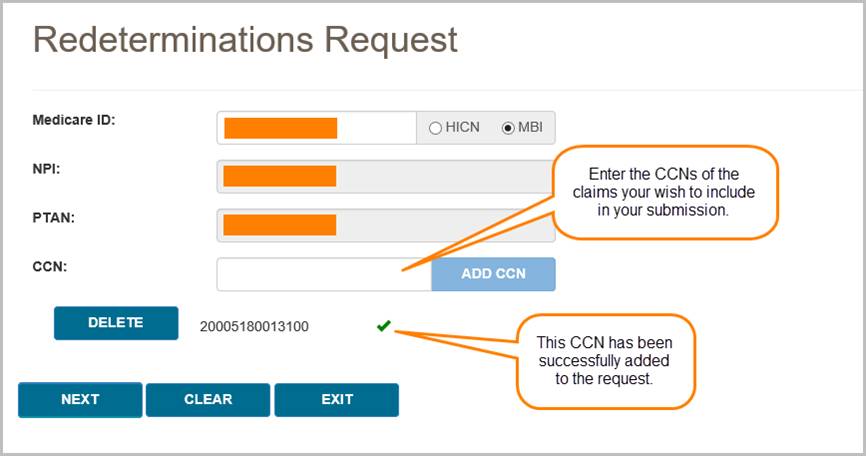
If the claim in question is past the timely filing limit for submitting a Redetermination request, the Past Timely popup message will appear. If you have good cause to submit your request past the timely limit, enter your reason in the Past Timely window and press Save.
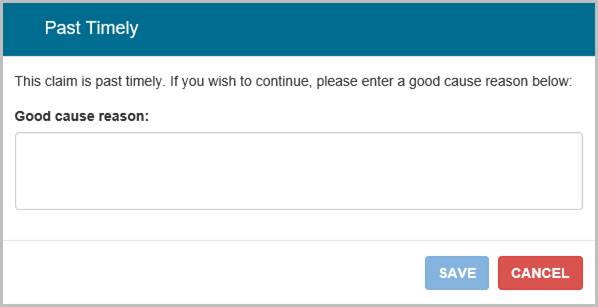
After adding your CCN(s), press the NEXT button to continue with your request.
A message will appear to confirm that you are submitting the correct form for the request you are making regarding your claim. It will give you the option to navigate to the following functions along with helpful links to our website for more information:
- Overpayment Form (To initiate an overpayment)
- Claim Correction (To perform a simple correction to your claim)
- Reopening (To perform a simple correction to your claim)

Step 2 Review the Redeterminations Request Summary
The Redeterminations Request Summary will display all of the information for the claim entered on the Redeterminations Request screen including the claim lines, dates of service, HCPCS & modifiers, and CCN. You will be prompted to select the claim line item you wish to appeal, or you can press the Select All button to choose all the line items for a claim
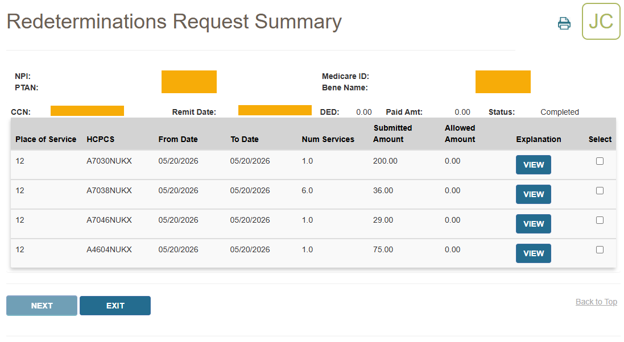
Step 3 Complete the Redeterminations Request Form
The Redeterminations Request Form in myCGS includes all the same information as the normal Redeterminations Request Form that you would use to mail or fax Redeterminations requests. The supplier and beneficiary information sections will be auto-populated based on your user information and the claim(s) you ve selected. The contact information should be filled out by the individual who is making the request. Complete the rest of the form just as you would complete the paper version of the Redeterminations Request Form.
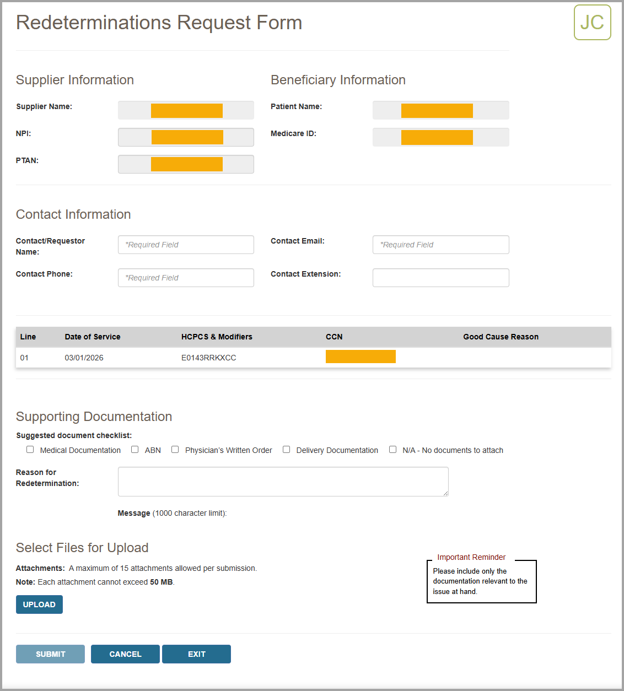
Step 4 Upload Files and Submit
The final step before submitting your request is to attach your supporting documentation. To upload your files, press the Upload button at the bottom of the form. After pressing the Upload button, a navigation window will pop up allowing you to select the files you wish to attach and submit with your request.
NOTE: The maximum size limit for upload is 50 MB per file. A maximum of 15 files may be attached per submission. Only the following file types are permitted for submission in myCGS:
After selecting your documents, myCGS will list the files under the Upload button on the screen. Verify that all of the appropriate files have been selected and then press the Submit button to submit your request.
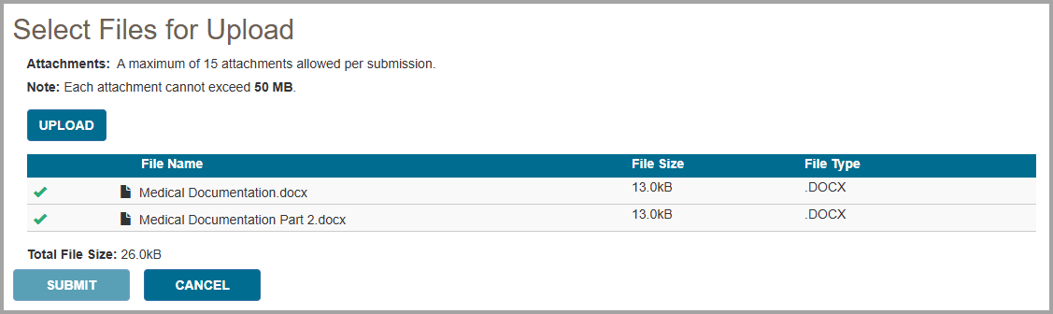
After pressing the Submit button, you will be taken to the Redeterminations Request Confirmation Sheet that will include:
- User ID
- User Name
- Date Submitted
- Time Submitted
Your request will be submitted to CGS and processed just like a Redetermination request that was submitted via mail or fax. You can check the status of your request using the Redeterminations Status screen. Please allow three business days for submitted requests to reflect in the system.
Top
Reopenings
The Reopenings menu in myCGS includes three options: Status, Form Submission, and Claim Correction. Use the Status screen to find the current status of Reopenings you've submitted to CGS. Use the Form Submission screen to submit a new Reopening request. Use the Claim Correction screen to make simple claim corrections. Refer to the sections below for details.
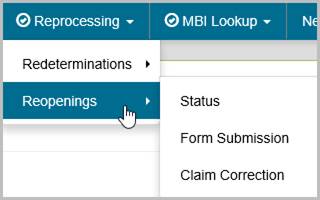
Top
Reopenings Status
The Reopenings Status screen provides current status of reopening requests that you have submitted to Jurisdiction B or C (depending on the jurisdiction you have selected). You can search for a reopening in myCGS by either the Document Control Number (DCN) of the request or the Claim Control Number (CCN) of the original claim.
To search for Reopening status, go to the Reprocessing menu, select Reopenings Status, and then enter the following information:
- DCN or CCN (as appropriate)
- The beneficiary's MBI
Your NPI and PTAN will be auto-filled based on the NPI/PTAN you have selected from your profile. If you have more than one NPI/PTAN and need to use a different NPI/PTAN than what is currently selected, follow the instructions in the Change NPI/PTAN section in this manual.
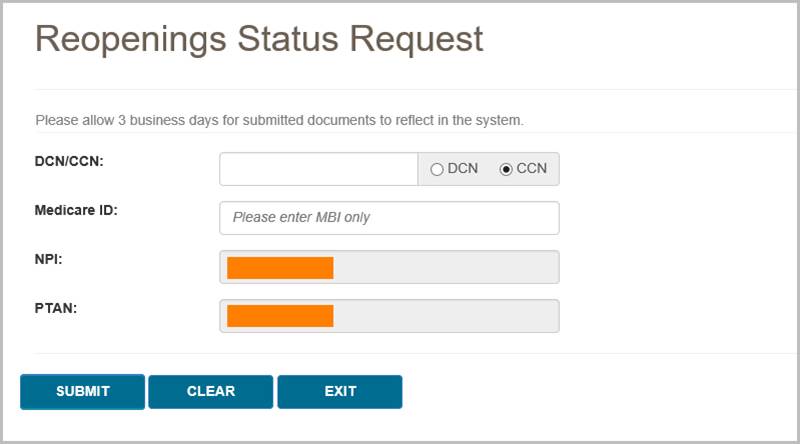
After pressing the SUBMIT button, myCGS will return following information about your request:
- Date of Receipt
- Status
- Date of Decision
- CCN
- DCN
The following image shows an example of reopening status:
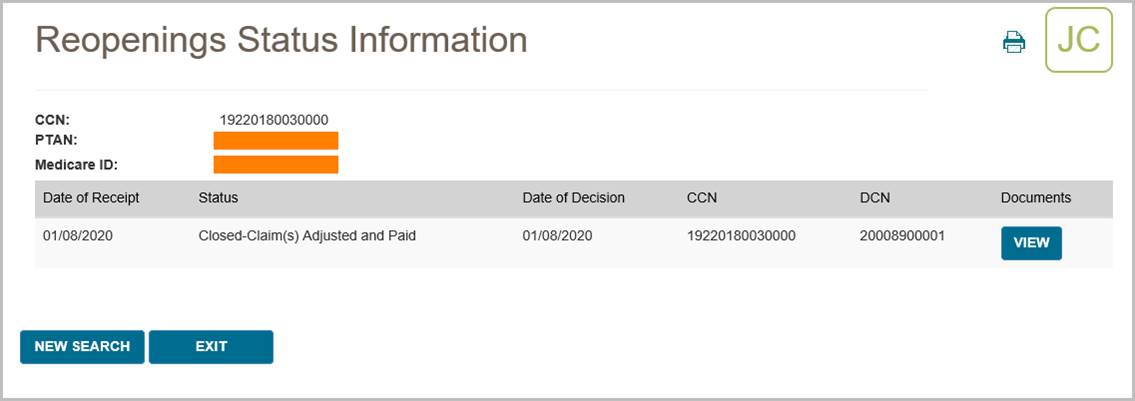
myCGS also allows you to view any related documents attached to your Reopenings request. To view the attached documents, press the View button in the Documents column. A popup window will appear on screen, showing a list of any documents that are attached to the request. You can then press the download icon next to the document you wish to view to open the document in a new window.
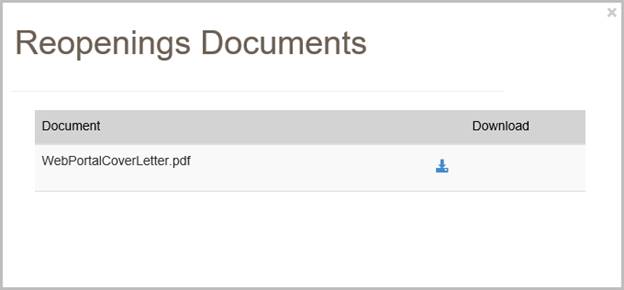
NOTE: When myCGS pulls documents related to your search criteria, a variety of documents may be displayed. This will include any documents you have submitted with your original request and any letters sent to you by CGS. Note that myCGS may also display documents from other Redeterminations/Reopenings cases that meet your search criteria. For instance, if you search for Reopenings Status in myCGS and there are other Reopenings cases on file matching your search, then myCGS may also display documents and letters related to those cases.
Top
Reopenings Form Submission
The Reopenings Form Submission screen in myCGS allows you to submit Reopenings requests for claims that you have submitted to CGS. Reopenings submitted through myCGS will be processed by the DME MAC just like requests submitted via mail. For information about the Reopenings process, refer to the Reopenings section of our website (www.cgsmedicare.com) and/or the Supplier Manual, Chapter 13.
Note that if a claim is eligible for a simple claim correction, then using the Claim Correction screen in myCGS is the fastest and easiest way to reopen and correct your claim. Refer to the Claim Correction section below. You should use the Reopenings Form Submission only when a simple claim correction is not an option.
NOTE: If you are an End User, then Reopenings Form Submission access is turned off by default. Your Designated Approver (DA) must grant you access before you can use the Reopenings Form Submission Screen. If you need access, please contact your DA.
In order to initiate your request, the original claim in question must have already completed processing and must be eligible for a Reopening. If the claim is still in process, you must wait for it to complete processing before submitting your request. Use the Claim Status screen in myCGS to check on the current status of your claim. If a Reopening cannot be requested for the claim you select for any reason, you will receive an error message with instructions.
You can initiate Reopenings requests in myCGS from either the Claim Status screen (in the Claims menu) or from the Reopenings Form Submission screen (in the Reprocessing menu). Both options work the same way; it is a matter of personal preference/convenience as to which screen you use to begin. To submit a Reopening in myCGS, follow the steps below.
Step 1 – Select Your Claim(s)
The first step in requesting a Reopening in myCGS is to select the claim or claims you wish to include in your request. You can find your claim using either a regular Claim Status search (via the Claims menu—refer to the Claims section in this manual) or through the Reopenings Form Submission screen (in the Reprocessing menu). Either method will take you to the same Reopenings Request Form after you have found and selected your claim.
From the Claim Status screen, select your claim(s) by pressing the Reopenings button on the Claim Status Summary screen. After pressing the Reopenings button, you must select the claim lines you wish to include in your request. After selecting your claim lines, press the Next button. This will take you to the Reopenings Request Form.
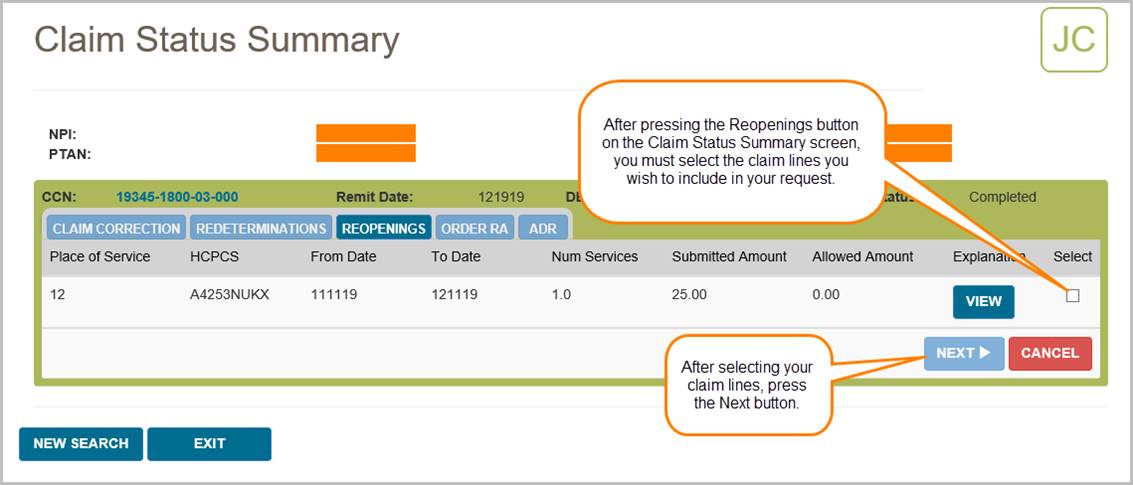
From the Reopenings Form Submission screen (in the Reprocessing menu), enter the beneficiary's Medicare ID. Your NPI and PTAN will be auto-populated (make sure you have the correct NPI/PTAN selected). Then enter the CCN of the claim you wish to appeal, and press the ADD CCN button. If you wish to include more than one claim in your request, continue to add more CCNs until all of the claims you need to appeal are included.
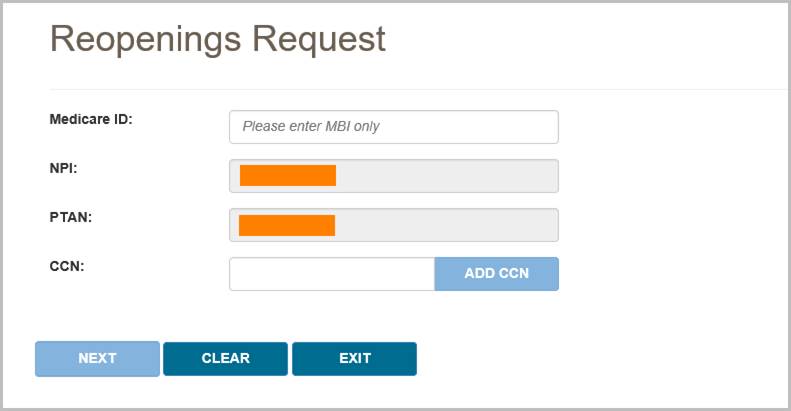
Once you have added a CCN successfully, it will appear on the screen with a green checkmark next to it, as shown in the following image.
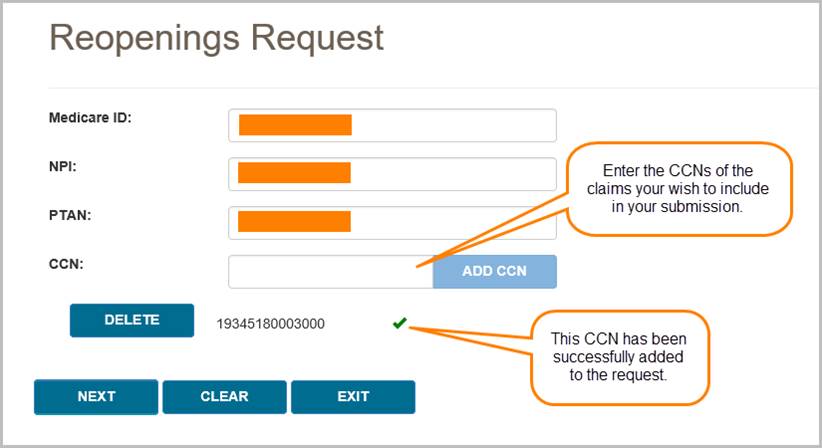
After adding your CCN(s), press the NEXT button to continue with your request.
Step 2 – Select Your Claim Line(s)
After selecting the claims/CCNs you wish to include in your request, you must then select the specific claim lines that your request applies to.
myCGS will display all the claim lines on the original claim, along with details of each line. To include a claim line in your request, you must select the checkbox in the rightmost column for the line. To include all claim lines on your request, use the Select All checkbox.
Once you have selected the appropriate claim lines, press the NEXT button to continue.
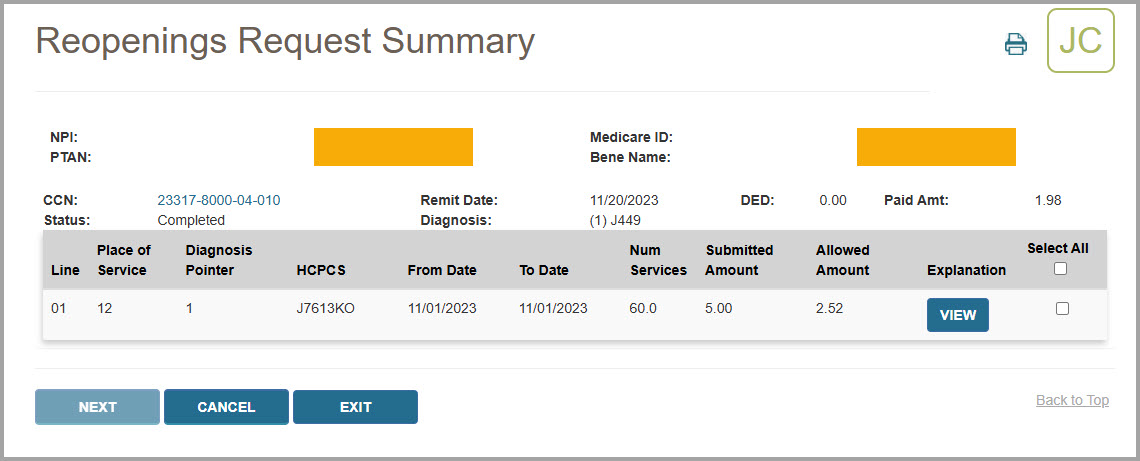
Step 3 – Complete the Reopenings Request Form
The Reopenings Request Form in myCGS includes all the same information as the normal Reopenings Request Form that you would use to mail Reopenings requests. The supplier and beneficiary information sections will be auto-populated based on your user information and the claim(s) you’ve selected. Complete the rest of the form just as you would complete the paper version of the Reopenings Request Form.
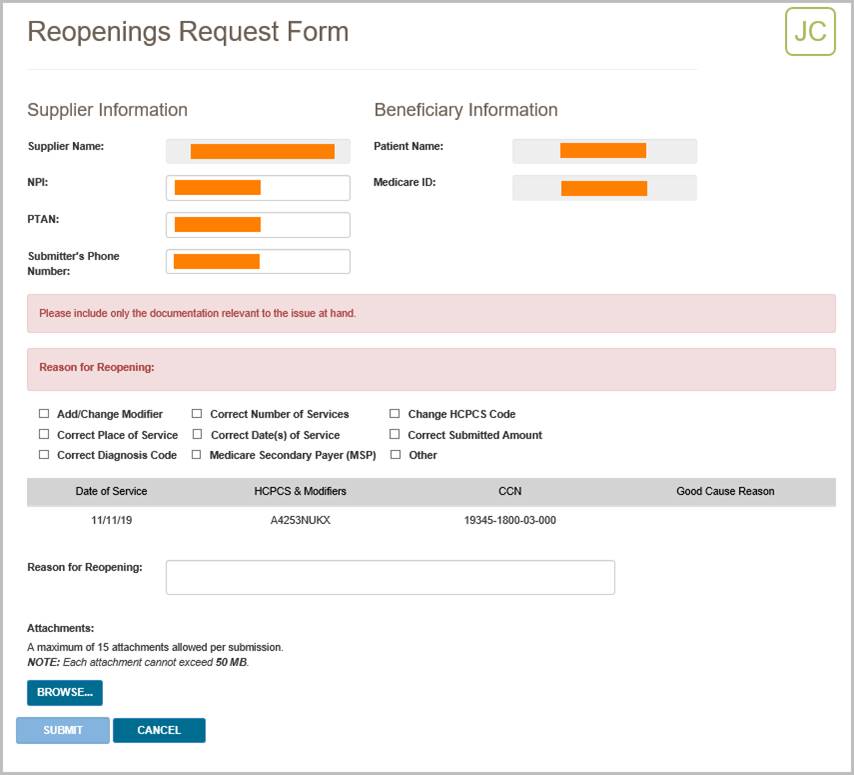
Note that one of the required fields on the form is the Type of Reopening section, where you must select the reason for your reopening from the dropdown list.
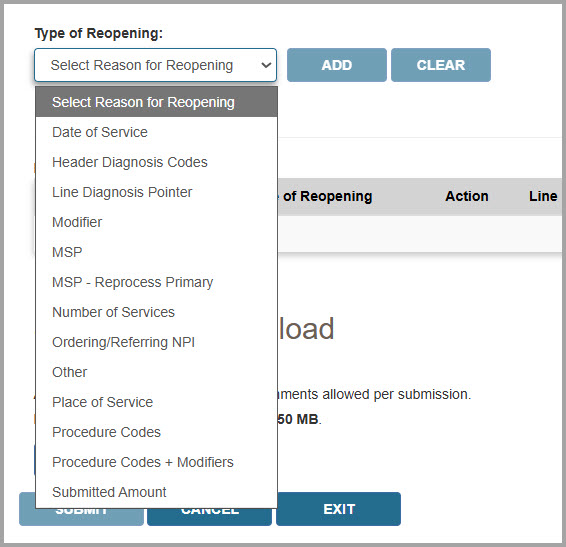
Depending on which reason for Reopening is selected, myCGS will give you options of what to correct on the claim. For instance, in the image below “Date of Service” has been selected. myCGS then gives the option to choose which line number the action applies to and to add the new value, in this case Date of Service (DOS).

Step 4 – Upload Files (Optional) and Submit
The final step before submitting your request is to attach any supporting documentation you wish to include. Note that this step is optional; unlike a Redetermination request, Reopening requests do not require any supporting documentation.
To upload your files, press the Upload button at the bottom of the form. After pressing the Upload button, a navigation window will pop up allowing you to select the files you wish to attach and submit with your request.
NOTE: The maximum size limit for upload is 50 MB per file. A maximum of 15 files may be attached per submission. Only the following files types are permitted for submission in myCGS:
After selecting your documents, myCGS will list the files under the Upload button on the screen. Verify that all the appropriate files have been selected and then press the Submit button to submit your request.
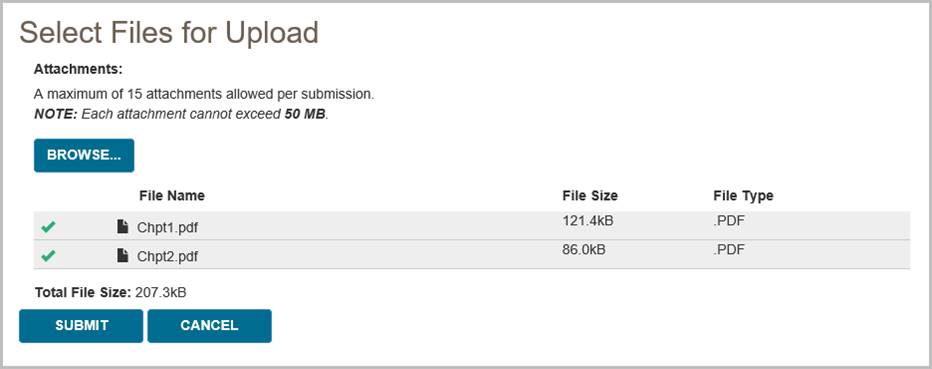
After pressing the Submit button, your request will be submitted to CGS and processed just like a Reopenings request that was submitted via mail. You can check the status of your request using the Reopenings Status screen. Please allow three business days for submitted requests to reflect in the system.
Top
Claim Correction
The Claim Correction screen in myCGS allows you to make simple corrections to claims that you have submitted to CGS. This is similar to a telephone reopening, but done in the web portal instead of over the phone. Only simple corrections can be made through this process. For more complicated claim adjustments or for a claim appeal, you will need to submit a reopening or redetermination request (whichever is appropriate for the situation).
NOTE: If you are an End User, then Claim Correction access is turned off by default. Your Designated Approver (DA) must grant you access before you can use the Claim Correction Screen. If you need access, please contact your DA.
The following items on a claim can be corrected via the Claim Correction process in myCGS:
- Place of Service
- HCPCS Code (except for "miscellaneous" codes and codes beginning with WW)
- Modifiers (except for KX, GA, GY, and GZ modifiers)
- Date of Service (From and To Dates)
- Number of Services
- Submitted Amount
NOTE: Diagnosis codes cannot be corrected through Claim Corrections or Reopenings. Corrections to diagnosis codes must be submitted through Redeterminations.
In order to initiate a claim correction, the original claim must have already completed processing. If the claim is still in process, you must wait for it to complete processing before submitting a correction. Use the Claim Status screen in myCGS to check on the current status of your claim. Duplicate claims and claims which have already had an adjustment initiated (through a reopening, appeal, or other adjustment process) are not eligible for correction in myCGS. Claims that completed processing over one year ago are not eligible for correction. If a claim cannot be corrected/adjusted in myCGS for any reason, you will receive an error message with instructions.
NOTE: Claims with MSP involvement that are adjusted through the claim correction process may deny for MSP reasons. We do not recommend using the Claim Correction screen in myCGS for MSP claims.
You can request a claim correction in myCGS from either the Claim Status screen (in the Claims menu) or from the Claim Correction screen (in the Reprocessing menu). Both options work the same way; it is a matter of personal preference/convenience as to which screen you use to begin. To initiate a claim correction in myCGS, follow the steps below.
Step 1—Find the claim that needs to be corrected
You can find your claim using either a regular Claim Status search (via the Claims menu—refer to the Claims section in this manual) or through the Claim Correction screen (in the Reprocessing menu). Either method will take you to the same Claim Correction screen after you have found and selected your claim.
If you begin on the Claim Status screen, search for your claim as you normally would when checking claim status, and then press the Claim Correction button on the Claim Status Summary screen.
If you begin on the Claim Correction screen, search for your claim using the same data as you would when searching for claim status. The Claim Correction search screen behaves exactly the same way as the Claim Status screen. Once you have found your claim, press the Claim Correction button.
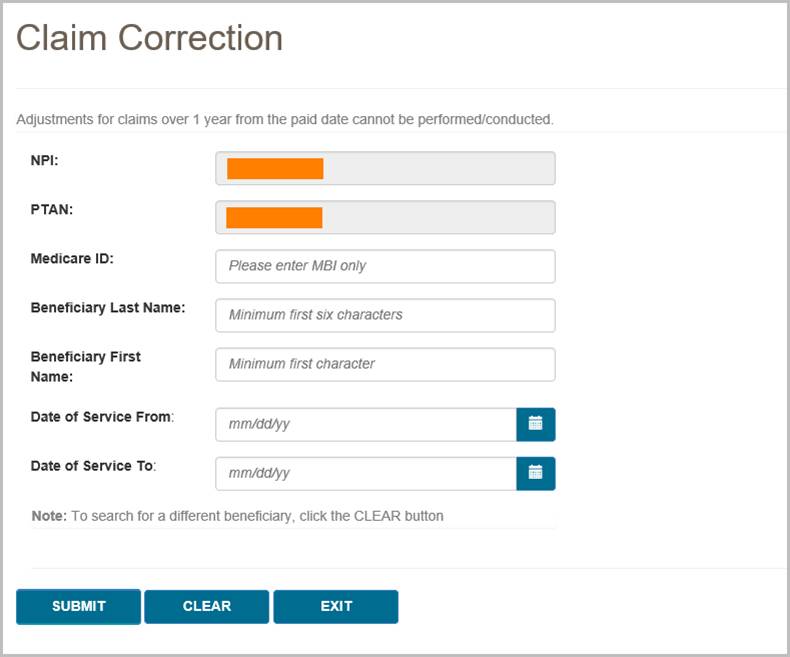
After you have found the claim that needs correction and pressed the Claim Correction button, you will be taken to the Claim Correction screen, where you can make your request.
Step 2—Correct the claim
Once you're on the Claim Correction screen, myCGS will present the claim that you've selected for adjustment. All fields that are eligible for correction will be editable. Make as many changes to your claim as you need (you must make at least one change). After you have updated the field or fields you need to change, enter the reason why you are making the correction in the Reason for Claim Correction field.
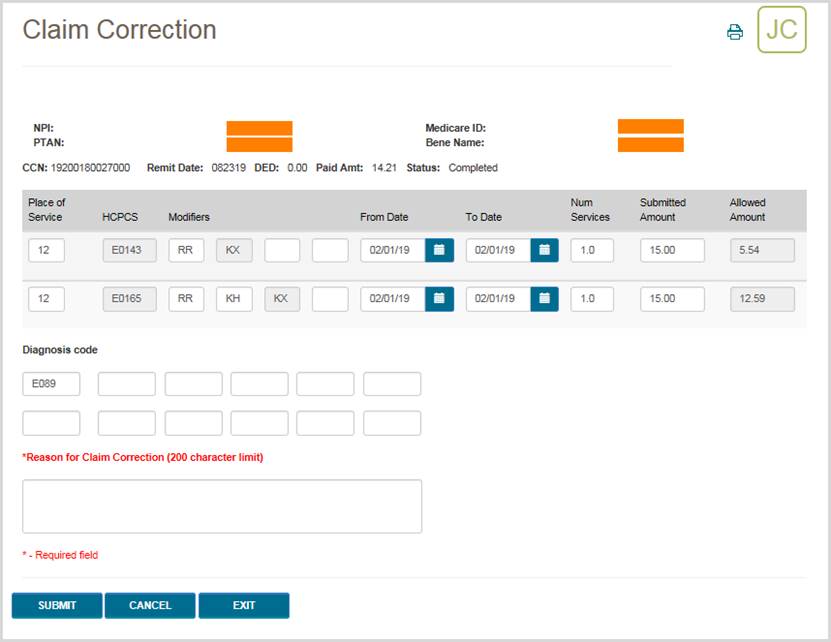
Once you have made your correction and completed all required fields, press the SUBMIT button. myCGS will then initiate the adjustment in our claim processing system and you will receive a confirmation number. Please be sure to keep a copy of the confirmation number for your records. If you have a question about the adjusted claim and need to call Customer Service, you will need to reference the confirmation number. Use the print icon in the top right corner of the screen to print a copy or save a PDF of the confirmation screen.
NOTE: Pressing Enter on your keyboard also acts as a submit button (depending where your cursor is positioned), as it does throughout myCGS. You can press Enter if your cursor is in the Reason for Claim Correction field to create a paragraph break, but if your cursor is anywhere else on the screen, pressing Enter may submit your request. Be careful not to press Enter until you are ready to submit your claim correction, otherwise you may submit your request prematurely.
After the request has been successfully submitted, the claim correction will be processed by CGS just like any claim correction/reopening. Note that most reopening requests are completed in 10–14 days. To check the status of your claim correction, go to the Reopening Status screen (in the Reprocessing menu) in myCGS. When checking status, you can use the confirmation number you received as the DCN in your reopening search (or you can search using the CCN). You can also check the status of your claim correction on the Claim Status screen in myCGS. When you search for claim status, you will see both your original claim and your adjusted claim. The adjusted claim will show the current status of your claim correction.
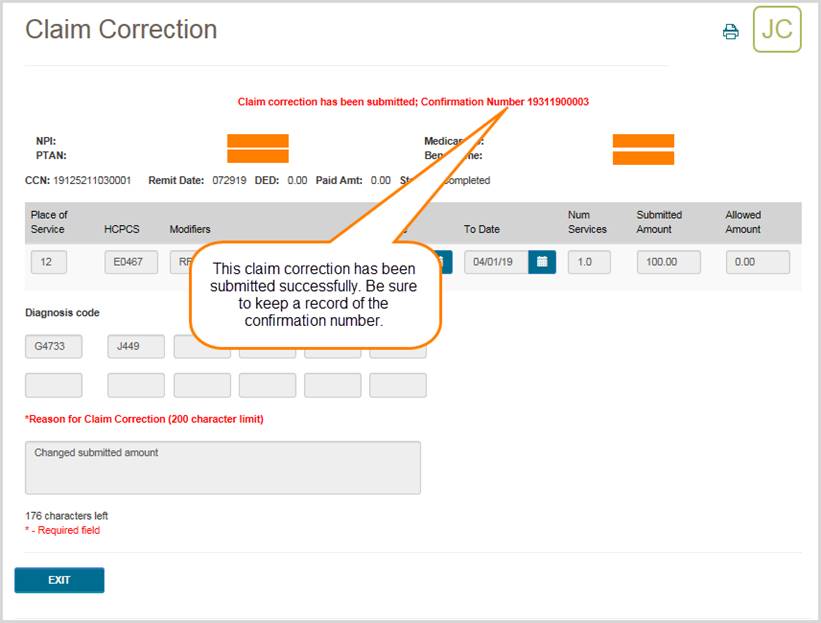
Top
Reprocessing Overview
The Reprocessing menu in myCGS gives you the ability to view the status of Redetermination and Reopening requests and the ability to submit Redeterminations, Reopenings, and Claim Correction requests. There are two main menu options in the Claim Preparation menu: Redeterminations and Reopenings, each of which have submenus which contain options for status or form submissions.
Refer to the sections below for detailed information about each of the Reprocessing menu options.
Redeterminations
The Redeterminations menu in myCGS includes two options: Status and Form Submission. Use the Status screen to find the current status of Redeterminations you've submitted to CGS. Use the Form Submission screen to submit a new Redetermination request. Refer to the sections below for details.
Redeterminations Status
The Redeterminations Status screen provides current status of redetermination requests that you have submitted to Jurisdiction B or C (depending on the jurisdiction you have selected). You can choose to search for a redetermination in myCGS by entering in the Document Control Number (DCN) of the request or the Claim Control Number (CCN) of the original claim, or you can search using the beneficiary's information.
To search for Redetermination status, go to the Reprocessing menu, select Redeterminations Status, and then select one of the following options:
- DCN or CCN
- Beneficiary Information
If you select the option for DCN or CCN, you will be prompted to enter the following information:
- DCN or CCN (as appropriate)
- HICN or MBI of the beneficiary on the claim which you have appealed
If you select the option for Beneficiary Information, you will be prompted to enter the following information:
- HICN or MBI of the beneficiary on the claim which you have appealed
- The Date of Service for the claim
Your NPI and PTAN will be auto-filled based on the NPI/PTAN you have selected from your profile. If you have more than one NPI/PTAN and need to use a different NPI/PTAN than what is currently selected, follow the instructions in the Change NPI/PTAN section in this manual.
After pressing the SUBMIT button, myCGS will return following information about your request:
- Date of Receipt
- Status
- Date of Decision
- CCN
- DCN
The following image shows an example of redetermination status:
myCGS also allows you to view any related documents attached to your Redeterminations request. To view the attached documents, press the View button in the Documents column. A popup window will appear on screen, showing a list of any documents that are attached to the request. You can then press the download icon next to the document you wish to view to open the document in a new window.
NOTE: When myCGS pulls documents related to your search criteria, a variety of documents may be displayed. This will include any documents you have submitted with your original request and any letters sent to you by CGS. Note that myCGS may also display documents from other Redeterminations/Reopenings cases that meet your search criteria. For instance, if you search for Redeterminations Status in myCGS and there are other Redeterminations cases on file matching your search, then myCGS may also display documents and letters related to those cases.
Redeterminations Form Submission
The Redeterminations Form Submission screen in myCGS allows you to submit Redeterminations requests for claims that you have submitted to CGS. Redeterminations submitted through myCGS will be processed by the DME MAC just like Redeterminations submitted via fax or mail. For information about the Redeterminations process, refer to Appeals section of our website (www.cgsmedicare.com) and/or the Supplier Manual, Chapter 13.
NOTE: If you are an End User, then Redeterminations Form Submission access is turned off by default. Your Designated Approver (DA) must grant you access before you can use the Redeterminations Form Submission Screen. If you need access, please contact your DA.
In order to initiate your request, the original claim in question must have already completed processing and must be eligible for a Redetermination. If the claim is still in process, you must wait for it to complete processing before submitting your request. Use the Claim Status screen in myCGS to check on the current status of your claim. If a Redetermination cannot be requested for the claim you select for any reason, you will receive an error message with instructions.
You can initiate Redeterminations requests in myCGS from either the Claim Status screen (in the Claims menu) or from the Redeterminations Form Submission screen (in the Reprocessing menu). Both options work the same way; it is a matter of personal preference/convenience as to which screen you use to begin. To submit a Redetermination in myCGS, follow the steps below.
Step 1 Select Your Claim(s)
The first step in requesting a Redetermination in myCGS is to select the claim or claims you wish to include in your request. You can find your claim using either a regular Claim Status search (via the Claims menu refer to the Claims section in this manual) or through the Redeterminations Form Submission screen (in the Reprocessing menu). Either method will take you to the same Redeterminations Request Form after you have found and selected your claim.
From the Claim Status screen, select your claim(s) by pressing the Redeterminations button on the Claim Status Summary screen. After pressing the Redeterminations button, you must select the claim lines you wish to include in your request. After selecting your claim lines, press the Next button. This will take you to the Redeterminations Request Form.
From the Redeterminations Form Submission screen (in the Reprocessing menu), enter the beneficiary's Medicare ID. Your NPI and PTAN will be auto-populated (make sure you have the correct NPI/PTAN selected). Then enter the CCN of the claim you wish to appeal and press the ADD CCN button. If you wish to include more than one claim in your request, continue to add more CCNs until all of the claims you need to appeal are included.
Once you have added a CCN successfully, it will appear on the screen with a green checkmark next to it, as shown in the following image.
If the claim in question is past the timely filing limit for submitting a Redetermination request, the Past Timely popup message will appear. If you have good cause to submit your request past the timely limit, enter your reason in the Past Timely window and press Save.
After adding your CCN(s), press the NEXT button to continue with your request.
A message will appear to confirm that you are submitting the correct form for the request you are making regarding your claim. It will give you the option to navigate to the following functions along with helpful links to our website for more information:
- Overpayment Form (To initiate an overpayment)
- Claim Correction (To perform a simple correction to your claim)
- Reopening (To perform a simple correction to your claim)
Step 2 Review the Redeterminations Request Summary
The Redeterminations Request Summary will display all of the information for the claim entered on the Redeterminations Request screen including the claim lines, dates of service, HCPCS & modifiers, and CCN. You will be prompted to select the claim line item you wish to appeal, or you can press the Select All button to choose all the line items for a claim
Step 3 Complete the Redeterminations Request Form
The Redeterminations Request Form in myCGS includes all the same information as the normal Redeterminations Request Form that you would use to mail or fax Redeterminations requests. The supplier and beneficiary information sections will be auto-populated based on your user information and the claim(s) you ve selected. The contact information should be filled out by the individual who is making the request. Complete the rest of the form just as you would complete the paper version of the Redeterminations Request Form.
Step 4 Upload Files and Submit
The final step before submitting your request is to attach your supporting documentation. To upload your files, press the Upload button at the bottom of the form. After pressing the Upload button, a navigation window will pop up allowing you to select the files you wish to attach and submit with your request.
NOTE: The maximum size limit for upload is 50 MB per file. A maximum of 15 files may be attached per submission. Only the following file types are permitted for submission in myCGS:
After selecting your documents, myCGS will list the files under the Upload button on the screen. Verify that all of the appropriate files have been selected and then press the Submit button to submit your request.
After pressing the Submit button, you will be taken to the Redeterminations Request Confirmation Sheet that will include:
- User ID
- User Name
- Date Submitted
- Time Submitted
Your request will be submitted to CGS and processed just like a Redetermination request that was submitted via mail or fax. You can check the status of your request using the Redeterminations Status screen. Please allow three business days for submitted requests to reflect in the system.
Reopenings
The Reopenings menu in myCGS includes three options: Status, Form Submission, and Claim Correction. Use the Status screen to find the current status of Reopenings you've submitted to CGS. Use the Form Submission screen to submit a new Reopening request. Use the Claim Correction screen to make simple claim corrections. Refer to the sections below for details.
Reopenings Status
The Reopenings Status screen provides current status of reopening requests that you have submitted to Jurisdiction B or C (depending on the jurisdiction you have selected). You can search for a reopening in myCGS by either the Document Control Number (DCN) of the request or the Claim Control Number (CCN) of the original claim.
To search for Reopening status, go to the Reprocessing menu, select Reopenings Status, and then enter the following information:
- DCN or CCN (as appropriate)
- The beneficiary's MBI
Your NPI and PTAN will be auto-filled based on the NPI/PTAN you have selected from your profile. If you have more than one NPI/PTAN and need to use a different NPI/PTAN than what is currently selected, follow the instructions in the Change NPI/PTAN section in this manual.
After pressing the SUBMIT button, myCGS will return following information about your request:
- Date of Receipt
- Status
- Date of Decision
- CCN
- DCN
The following image shows an example of reopening status:
myCGS also allows you to view any related documents attached to your Reopenings request. To view the attached documents, press the View button in the Documents column. A popup window will appear on screen, showing a list of any documents that are attached to the request. You can then press the download icon next to the document you wish to view to open the document in a new window.
NOTE: When myCGS pulls documents related to your search criteria, a variety of documents may be displayed. This will include any documents you have submitted with your original request and any letters sent to you by CGS. Note that myCGS may also display documents from other Redeterminations/Reopenings cases that meet your search criteria. For instance, if you search for Reopenings Status in myCGS and there are other Reopenings cases on file matching your search, then myCGS may also display documents and letters related to those cases.
Reopenings Form Submission
The Reopenings Form Submission screen in myCGS allows you to submit Reopenings requests for claims that you have submitted to CGS. Reopenings submitted through myCGS will be processed by the DME MAC just like requests submitted via mail. For information about the Reopenings process, refer to the Reopenings section of our website (www.cgsmedicare.com) and/or the Supplier Manual, Chapter 13.
Note that if a claim is eligible for a simple claim correction, then using the Claim Correction screen in myCGS is the fastest and easiest way to reopen and correct your claim. Refer to the Claim Correction section below. You should use the Reopenings Form Submission only when a simple claim correction is not an option.
NOTE: If you are an End User, then Reopenings Form Submission access is turned off by default. Your Designated Approver (DA) must grant you access before you can use the Reopenings Form Submission Screen. If you need access, please contact your DA.
In order to initiate your request, the original claim in question must have already completed processing and must be eligible for a Reopening. If the claim is still in process, you must wait for it to complete processing before submitting your request. Use the Claim Status screen in myCGS to check on the current status of your claim. If a Reopening cannot be requested for the claim you select for any reason, you will receive an error message with instructions.
You can initiate Reopenings requests in myCGS from either the Claim Status screen (in the Claims menu) or from the Reopenings Form Submission screen (in the Reprocessing menu). Both options work the same way; it is a matter of personal preference/convenience as to which screen you use to begin. To submit a Reopening in myCGS, follow the steps below.
Step 1 – Select Your Claim(s)
The first step in requesting a Reopening in myCGS is to select the claim or claims you wish to include in your request. You can find your claim using either a regular Claim Status search (via the Claims menu—refer to the Claims section in this manual) or through the Reopenings Form Submission screen (in the Reprocessing menu). Either method will take you to the same Reopenings Request Form after you have found and selected your claim.
From the Claim Status screen, select your claim(s) by pressing the Reopenings button on the Claim Status Summary screen. After pressing the Reopenings button, you must select the claim lines you wish to include in your request. After selecting your claim lines, press the Next button. This will take you to the Reopenings Request Form.
From the Reopenings Form Submission screen (in the Reprocessing menu), enter the beneficiary's Medicare ID. Your NPI and PTAN will be auto-populated (make sure you have the correct NPI/PTAN selected). Then enter the CCN of the claim you wish to appeal, and press the ADD CCN button. If you wish to include more than one claim in your request, continue to add more CCNs until all of the claims you need to appeal are included.
Once you have added a CCN successfully, it will appear on the screen with a green checkmark next to it, as shown in the following image.
After adding your CCN(s), press the NEXT button to continue with your request.
Step 2 – Select Your Claim Line(s)
After selecting the claims/CCNs you wish to include in your request, you must then select the specific claim lines that your request applies to.
myCGS will display all the claim lines on the original claim, along with details of each line. To include a claim line in your request, you must select the checkbox in the rightmost column for the line. To include all claim lines on your request, use the Select All checkbox.
Once you have selected the appropriate claim lines, press the NEXT button to continue.
Step 3 – Complete the Reopenings Request Form
The Reopenings Request Form in myCGS includes all the same information as the normal Reopenings Request Form that you would use to mail Reopenings requests. The supplier and beneficiary information sections will be auto-populated based on your user information and the claim(s) you’ve selected. Complete the rest of the form just as you would complete the paper version of the Reopenings Request Form.
Note that one of the required fields on the form is the Type of Reopening section, where you must select the reason for your reopening from the dropdown list.
Depending on which reason for Reopening is selected, myCGS will give you options of what to correct on the claim. For instance, in the image below “Date of Service” has been selected. myCGS then gives the option to choose which line number the action applies to and to add the new value, in this case Date of Service (DOS).
Step 4 – Upload Files (Optional) and Submit
The final step before submitting your request is to attach any supporting documentation you wish to include. Note that this step is optional; unlike a Redetermination request, Reopening requests do not require any supporting documentation.
To upload your files, press the Upload button at the bottom of the form. After pressing the Upload button, a navigation window will pop up allowing you to select the files you wish to attach and submit with your request.
NOTE: The maximum size limit for upload is 50 MB per file. A maximum of 15 files may be attached per submission. Only the following files types are permitted for submission in myCGS:
After selecting your documents, myCGS will list the files under the Upload button on the screen. Verify that all the appropriate files have been selected and then press the Submit button to submit your request.
After pressing the Submit button, your request will be submitted to CGS and processed just like a Reopenings request that was submitted via mail. You can check the status of your request using the Reopenings Status screen. Please allow three business days for submitted requests to reflect in the system.
Claim Correction
The Claim Correction screen in myCGS allows you to make simple corrections to claims that you have submitted to CGS. This is similar to a telephone reopening, but done in the web portal instead of over the phone. Only simple corrections can be made through this process. For more complicated claim adjustments or for a claim appeal, you will need to submit a reopening or redetermination request (whichever is appropriate for the situation).
NOTE: If you are an End User, then Claim Correction access is turned off by default. Your Designated Approver (DA) must grant you access before you can use the Claim Correction Screen. If you need access, please contact your DA.
The following items on a claim can be corrected via the Claim Correction process in myCGS:
- Place of Service
- HCPCS Code (except for "miscellaneous" codes and codes beginning with WW)
- Modifiers (except for KX, GA, GY, and GZ modifiers)
- Date of Service (From and To Dates)
- Number of Services
- Submitted Amount
NOTE: Diagnosis codes cannot be corrected through Claim Corrections or Reopenings. Corrections to diagnosis codes must be submitted through Redeterminations.
In order to initiate a claim correction, the original claim must have already completed processing. If the claim is still in process, you must wait for it to complete processing before submitting a correction. Use the Claim Status screen in myCGS to check on the current status of your claim. Duplicate claims and claims which have already had an adjustment initiated (through a reopening, appeal, or other adjustment process) are not eligible for correction in myCGS. Claims that completed processing over one year ago are not eligible for correction. If a claim cannot be corrected/adjusted in myCGS for any reason, you will receive an error message with instructions.
NOTE: Claims with MSP involvement that are adjusted through the claim correction process may deny for MSP reasons. We do not recommend using the Claim Correction screen in myCGS for MSP claims.
You can request a claim correction in myCGS from either the Claim Status screen (in the Claims menu) or from the Claim Correction screen (in the Reprocessing menu). Both options work the same way; it is a matter of personal preference/convenience as to which screen you use to begin. To initiate a claim correction in myCGS, follow the steps below.
Step 1—Find the claim that needs to be corrected
You can find your claim using either a regular Claim Status search (via the Claims menu—refer to the Claims section in this manual) or through the Claim Correction screen (in the Reprocessing menu). Either method will take you to the same Claim Correction screen after you have found and selected your claim.
If you begin on the Claim Status screen, search for your claim as you normally would when checking claim status, and then press the Claim Correction button on the Claim Status Summary screen.
If you begin on the Claim Correction screen, search for your claim using the same data as you would when searching for claim status. The Claim Correction search screen behaves exactly the same way as the Claim Status screen. Once you have found your claim, press the Claim Correction button.
After you have found the claim that needs correction and pressed the Claim Correction button, you will be taken to the Claim Correction screen, where you can make your request.
Step 2—Correct the claim
Once you're on the Claim Correction screen, myCGS will present the claim that you've selected for adjustment. All fields that are eligible for correction will be editable. Make as many changes to your claim as you need (you must make at least one change). After you have updated the field or fields you need to change, enter the reason why you are making the correction in the Reason for Claim Correction field.
Once you have made your correction and completed all required fields, press the SUBMIT button. myCGS will then initiate the adjustment in our claim processing system and you will receive a confirmation number. Please be sure to keep a copy of the confirmation number for your records. If you have a question about the adjusted claim and need to call Customer Service, you will need to reference the confirmation number. Use the print icon in the top right corner of the screen to print a copy or save a PDF of the confirmation screen.
NOTE: Pressing Enter on your keyboard also acts as a submit button (depending where your cursor is positioned), as it does throughout myCGS. You can press Enter if your cursor is in the Reason for Claim Correction field to create a paragraph break, but if your cursor is anywhere else on the screen, pressing Enter may submit your request. Be careful not to press Enter until you are ready to submit your claim correction, otherwise you may submit your request prematurely.
After the request has been successfully submitted, the claim correction will be processed by CGS just like any claim correction/reopening. Note that most reopening requests are completed in 10–14 days. To check the status of your claim correction, go to the Reopening Status screen (in the Reprocessing menu) in myCGS. When checking status, you can use the confirmation number you received as the DCN in your reopening search (or you can search using the CCN). You can also check the status of your claim correction on the Claim Status screen in myCGS. When you search for claim status, you will see both your original claim and your adjusted claim. The adjusted claim will show the current status of your claim correction.

Chapter 8 – MBI Lookup
MBI Lookup Tool
The MBI Lookup Tool in myCGS gives you the ability to search for a beneficiary's Medicare Beneficiary Identifier (MBI). Use this tool when you have a patient who is unable to provide you with their MBI.
NOTE: The MBI Lookup Tool is to be used only when a Medicare patient doesn't or can't give you his/her MBI. The patient's first name, last name, date of birth, and social security number are required to get a unique match. The MBI is confidential, so you must protect it as Personally Identifiable Information and use it only for Medicare-related business.
To lookup a beneficiary's MBI, select the MBI Lookup Tool from the MBI Lookup menu, and then enter the following information:
- Patient Last Name
- Patient First Name
- Patient Suffix (choose from dropdown menu if applicable; if the patient does not have a name suffix, do not use this field)
- Patient Date of Birth (MM/DD/YYYY)
- Patient Social Security Number (SSN)
After entering all of the required information, check the box which says "I'm not a robot." You must check this box and correctly pass the reCAPTCHA test in order to successfully submit your request.
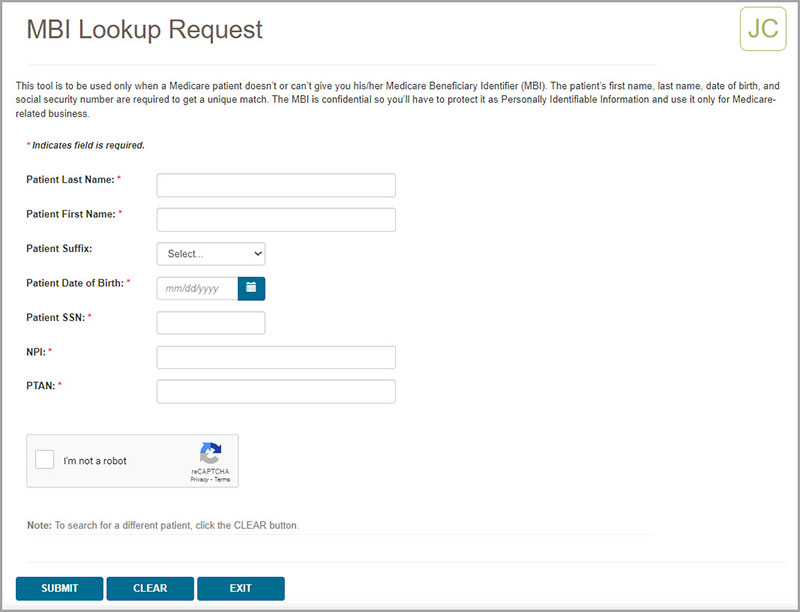
After pressing the SUBMIT button, myCGS will return the beneficiary's MBI (if a match is found).
In addition to providing the beneficiary's MBI, myCGS will also provide an IVR MBI Number Converter, which allows you to easily see the correct sequence of digits that you would need to enter into the IVR when prompted for a beneficiary MBI.
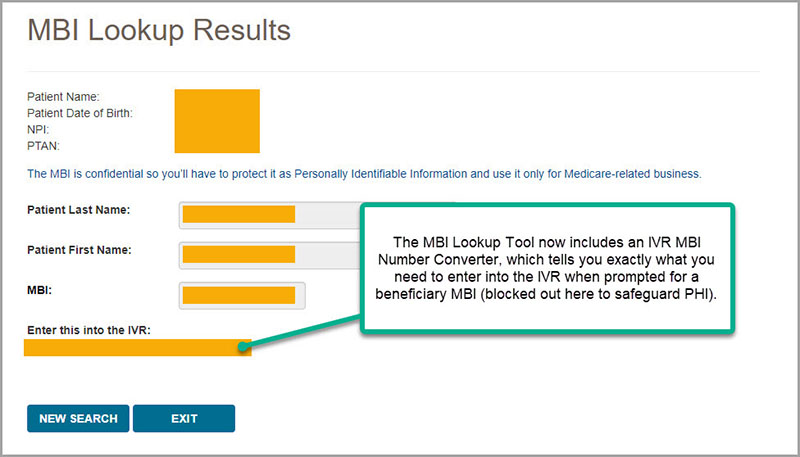
Top
MBI Lookup Tool
The MBI Lookup Tool in myCGS gives you the ability to search for a beneficiary's Medicare Beneficiary Identifier (MBI). Use this tool when you have a patient who is unable to provide you with their MBI.
NOTE: The MBI Lookup Tool is to be used only when a Medicare patient doesn't or can't give you his/her MBI. The patient's first name, last name, date of birth, and social security number are required to get a unique match. The MBI is confidential, so you must protect it as Personally Identifiable Information and use it only for Medicare-related business.
To lookup a beneficiary's MBI, select the MBI Lookup Tool from the MBI Lookup menu, and then enter the following information:
- Patient Last Name
- Patient First Name
- Patient Suffix (choose from dropdown menu if applicable; if the patient does not have a name suffix, do not use this field)
- Patient Date of Birth (MM/DD/YYYY)
- Patient Social Security Number (SSN)
After entering all of the required information, check the box which says "I'm not a robot." You must check this box and correctly pass the reCAPTCHA test in order to successfully submit your request.
After pressing the SUBMIT button, myCGS will return the beneficiary's MBI (if a match is found).
In addition to providing the beneficiary's MBI, myCGS will also provide an IVR MBI Number Converter, which allows you to easily see the correct sequence of digits that you would need to enter into the IVR when prompted for a beneficiary MBI.

Chapter 9 – Correspondence
eLetters
The eLetters Inbox in myCGS allows you to view a table of the letters that CGS has sent to you over a 30-day time span. Using this screen allows you to view information about letters we ve sent to you, such as the name of the associated beneficiary, as well as to view and/or save a copy of the letter.
Access the eLetters Inbox using the Correspondence menu.
NOTE: End Users must be given permission to use eLetters by their Designated Approver (DA). DAs can grant this permission via the User Management section of myCGS refer to the myCGS Registration and Account Management Guide.
Currently, the eLetters Inbox includes ADR letters, ADMC letters, Prior Authorization letters, Redetermination letters, and Reopening letters. Additional letter types will be added in a future myCGS update.
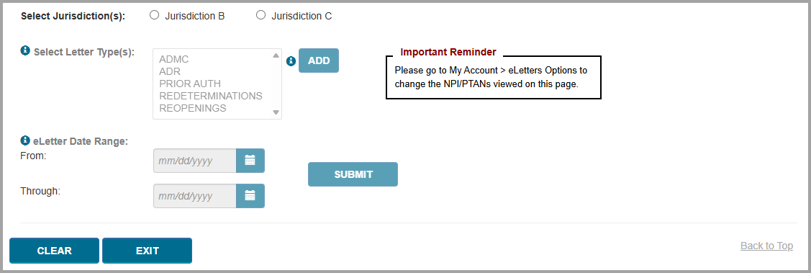
To search for letters, follow these steps:
NOTE: To change/customize the NPI/PTANs viewed on the eLetters page, go to My Account>eLetters Options (refer to Chapter 12 of this manual for assistance).
- Select which jurisdiction(s) you wish to search Jurisdiction B or Jurisdiction C.
- Select at least one letter type ADMC, ADR, PRIOR AUTH, REDETERMINATIONS, and/or REOPENINGS. To make your selection, click on the desired letter type and then press the ADD button. Repeat this for each letter type you wish to search for. You can search for as many letter types as you wish. Note that you can press and hold the Ctrl or Shift key on your keyboard to select multiple letter types at once.
After selecting a letter type and pressing ADD, the letter type you ve selected will display next to the Letter Type selection field.
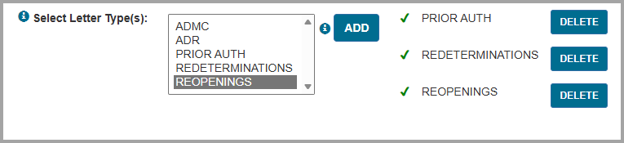
If you wish to remove a letter type which you have already added, press the DELETE button next to the letter type.
- Enter the date range you wish to search. You can search for up to a 30-day range within the past 365 days. Note that you cannot search for today's date, as those letters will not yet appear in myCGS.
- After entering all the appropriate search criteria, press the SUBMIT button.
myCGS will display a table listing all letters matching your search criteria. The following information will be listed for each letter displayed:
NOTE: The table columns displayed are customizable. To customize your table, press the SELECT COLUMNS button and check/uncheck the columns as desired.
- Jurisdiction (JB or JC)
- Letter Date
- Letter Type
- NPI
- PTAN
- DCN
- CCN/ICN
- Beneficiary Name
Additionally, a download icon will appear on each line. Click the download icon to view/print/save the letter.
For Redeterminations or Reopenings with multiple claims, the table will display the message SEE LETTER in the CCN/ICN column. You must view the letter to see all associated CCNs.
You can sort the letters displayed by any of the information that appears on screen. To do so, simply click on the header of any column.
If you wish to filter the results, you can do so by typing any filter criteria you wish in the search bar. Any information displayed in the table can be used as a search filter. For instance, you can type in a specific date, a beneficiary name (full or partial), etc.
myCGS defaults to display up to 10 letters on the screen at a time. If more than 10 letters match your search, use the page navigation tool at the bottom right of the screen. You can also change the number of letters displayed by using the Show XX entries dropdown menu located just above the letter display columns (choose between 10, 25, 50, or 100).
You can export the table from your search to MS Excel. To do so, press the MS Excel icon located in the top-right portion of the screen.
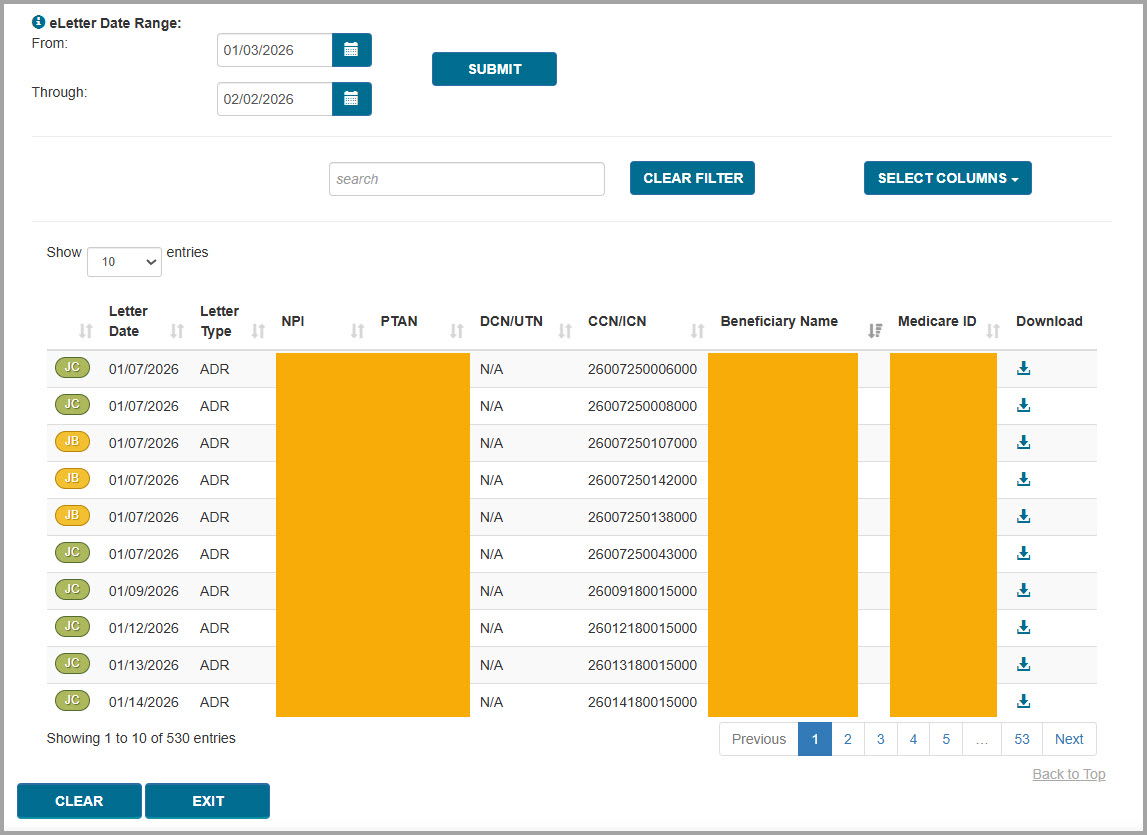
eLetters Email Notifications
Email notifications will be available for eLetters at a later date.
Refer to Chapter 12 My Account of this manual for further details.
Top
eLetters
The eLetters Inbox in myCGS allows you to view a table of the letters that CGS has sent to you over a 30-day time span. Using this screen allows you to view information about letters we ve sent to you, such as the name of the associated beneficiary, as well as to view and/or save a copy of the letter.
Access the eLetters Inbox using the Correspondence menu.
NOTE: End Users must be given permission to use eLetters by their Designated Approver (DA). DAs can grant this permission via the User Management section of myCGS refer to the myCGS Registration and Account Management Guide.
Currently, the eLetters Inbox includes ADR letters, ADMC letters, Prior Authorization letters, Redetermination letters, and Reopening letters. Additional letter types will be added in a future myCGS update.
To search for letters, follow these steps:
NOTE: To change/customize the NPI/PTANs viewed on the eLetters page, go to My Account>eLetters Options (refer to Chapter 12 of this manual for assistance).
- Select which jurisdiction(s) you wish to search Jurisdiction B or Jurisdiction C.
- Select at least one letter type ADMC, ADR, PRIOR AUTH, REDETERMINATIONS, and/or REOPENINGS. To make your selection, click on the desired letter type and then press the ADD button. Repeat this for each letter type you wish to search for. You can search for as many letter types as you wish. Note that you can press and hold the Ctrl or Shift key on your keyboard to select multiple letter types at once.
After selecting a letter type and pressing ADD, the letter type you ve selected will display next to the Letter Type selection field.
If you wish to remove a letter type which you have already added, press the DELETE button next to the letter type.
- Enter the date range you wish to search. You can search for up to a 30-day range within the past 365 days. Note that you cannot search for today's date, as those letters will not yet appear in myCGS.
- After entering all the appropriate search criteria, press the SUBMIT button.
myCGS will display a table listing all letters matching your search criteria. The following information will be listed for each letter displayed:
NOTE: The table columns displayed are customizable. To customize your table, press the SELECT COLUMNS button and check/uncheck the columns as desired.
- Jurisdiction (JB or JC)
- Letter Date
- Letter Type
- NPI
- PTAN
- DCN
- CCN/ICN
- Beneficiary Name
Additionally, a download icon will appear on each line. Click the download icon to view/print/save the letter.
For Redeterminations or Reopenings with multiple claims, the table will display the message SEE LETTER in the CCN/ICN column. You must view the letter to see all associated CCNs.
You can sort the letters displayed by any of the information that appears on screen. To do so, simply click on the header of any column.
If you wish to filter the results, you can do so by typing any filter criteria you wish in the search bar. Any information displayed in the table can be used as a search filter. For instance, you can type in a specific date, a beneficiary name (full or partial), etc.
myCGS defaults to display up to 10 letters on the screen at a time. If more than 10 letters match your search, use the page navigation tool at the bottom right of the screen. You can also change the number of letters displayed by using the Show XX entries dropdown menu located just above the letter display columns (choose between 10, 25, 50, or 100).
You can export the table from your search to MS Excel. To do so, press the MS Excel icon located in the top-right portion of the screen.
eLetters Email Notifications
Email notifications will be available for eLetters at a later date.
Refer to Chapter 12 My Account of this manual for further details.

Chapter 10 – News & Information
News & Information Overview
The News & Information menu contains a variety of useful information for suppliers and myCGS users, including the following information:
- News about myCGS and other DME MAC happenings
- Hours of operation for CGS Customer Service Representatives
- Information about your appeal rights for Medicare claims
- Links to helpful resources and tools
- Provider Outreach and Education Information
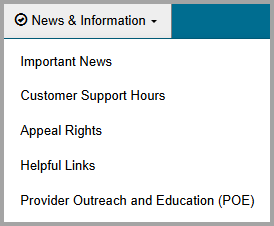
Top
Important News
The Important News screen in myCGS contains information about upcoming system outages, recent myCGS revisions, and addition DME MAC news. As a myCGS user, you should visit the Important News screen on a regular basis in order to keep up with the latest myCGS news.
To access the Important News screen, select the Important News option from the News & Information menu.
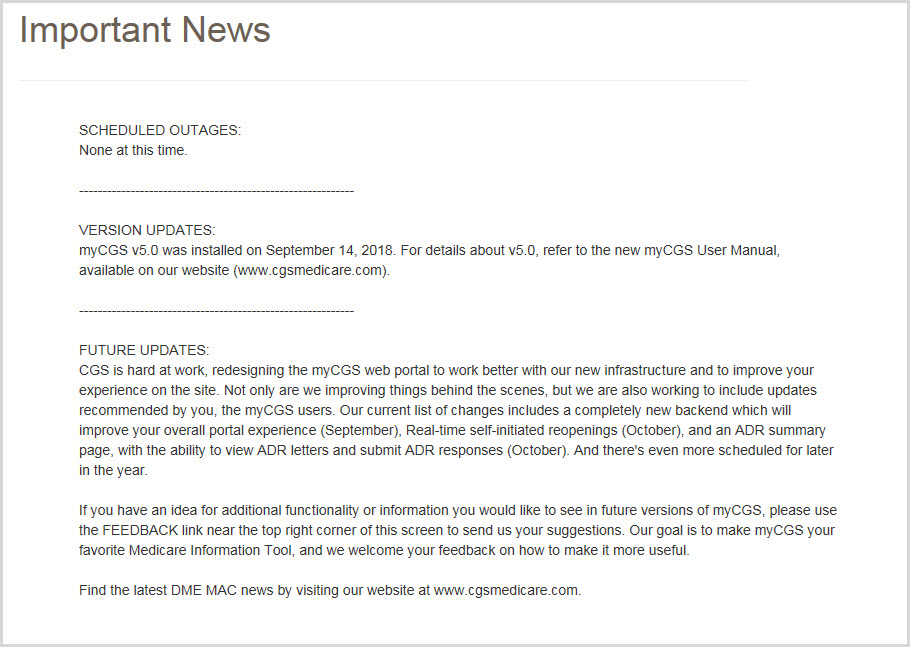
Top
CSR Hours
The CSR Hours screen in myCGS lets you view the times and days when DME MAC Jurisdictions B and C Customer Service Representatives (CSRs) are available to assist you. It also informs you of our holiday closure schedule.
To access the CSR Hours screen, select the CSR Hours option from the News & Information menu.
Top
Appeal Rights
The Appeal Rights screen in myCGS contains information about your right to appeal Medicare claims.
To access the Appeal Rights, select the Appeal Rights option from the News & Information menu.
Top
Helpful Links
The Helpful Links screen in myCGS contains a list of educational resources and tools that you may find useful as a DMEPOS supplier.
Top
Provider Outreach and Education (POE)
The Provider Outreach and Education screen in myCGS contains information about upcoming POE events, such as live webinars and other education opportunities.
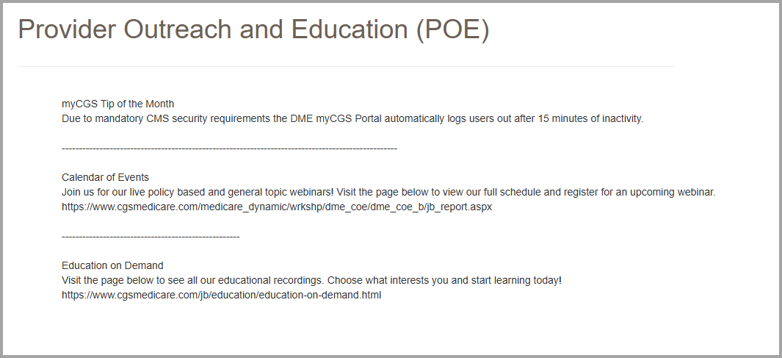
Top
News & Information Overview
The News & Information menu contains a variety of useful information for suppliers and myCGS users, including the following information:
- News about myCGS and other DME MAC happenings
- Hours of operation for CGS Customer Service Representatives
- Information about your appeal rights for Medicare claims
- Links to helpful resources and tools
- Provider Outreach and Education Information
Important News
The Important News screen in myCGS contains information about upcoming system outages, recent myCGS revisions, and addition DME MAC news. As a myCGS user, you should visit the Important News screen on a regular basis in order to keep up with the latest myCGS news.
To access the Important News screen, select the Important News option from the News & Information menu.
CSR Hours
The CSR Hours screen in myCGS lets you view the times and days when DME MAC Jurisdictions B and C Customer Service Representatives (CSRs) are available to assist you. It also informs you of our holiday closure schedule.
To access the CSR Hours screen, select the CSR Hours option from the News & Information menu.
Appeal Rights
The Appeal Rights screen in myCGS contains information about your right to appeal Medicare claims.
To access the Appeal Rights, select the Appeal Rights option from the News & Information menu.
Helpful Links
The Helpful Links screen in myCGS contains a list of educational resources and tools that you may find useful as a DMEPOS supplier.
Provider Outreach and Education (POE)
The Provider Outreach and Education screen in myCGS contains information about upcoming POE events, such as live webinars and other education opportunities.

Chapter 11 – Secure Messaging
Inbox
The Secure Messaging Inbox in myCGS allows you to receive and respond to direct messages from CGS Jurisdiction B and C staff. Currently this feature is used exclusively for Targeted Probe and Educate (TPE) cases in which you have already responded to an ADR request, but our Medical Review staff needs additional information (for instance, when your ADR response did not include all requested documents or information). When you receive a message, you have five business days to respond to the request; after 10 business days the message is deleted.
Note that submitting the requested documentation does not guarantee claim payment.
When a message is generated to you by CGS staff, you will receive email notification from myCGS stating that you have a new message. When you log into myCGS, the Secure Message icon (which looks like an envelope) in the top-right corner of your screen will display the number of new/unread messages you have in your inbox, as shown in the following image.
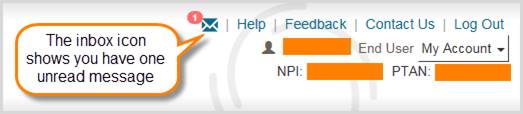
Note that messaging in myCGS can only be initiated by CGS staff. You cannot initiate a message yourself in myCGS, only respond to a message we have sent regarding a claim.
Top
Permissions
All Designated Approvers (DAs) in myCGS automatically have access to the secure message inbox in myCGS. End Users by default do not have access—DAs must specifically give End Users access to secure messaging in order for them to access the inbox. CHBA user access will depend upon the access granted by the associated supplier on the CEDI Supplier Authorization Form.
If you are a DA in myCGS, you must identify which of your End Users need access to secure messaging and then grant them access on the User Permissions screen. Refer to the myCGS Registration & Account Management Guide at myCGS Registration Guide for instructions on granting user permissions in myCGS.
Top
Accessing your Inbox
To access your inbox, select the inbox icon in the top-right corner of your screen (you can access your inbox whether you have any unread messages or not). Note that the inbox itself is jurisdiction-neutral, meaning it doesn't matter if you are currently logged into Jurisdiction B or Jurisdiction C. Also note that it doesn't matter which NPI/PTAN you currently have selected—the inbox will show you messages for all of your NPI/PTANs. There is only one inbox; each message in your inbox will identify the associated jurisdiction and NPI/PTAN.
After selecting the icon, you will be taken to your inbox, where you will see a list of any read and/or unread messages you have (if any). From the inbox, you will see the following information for each message you have:
- Jurisdiction (JB or JC)
- Type of message (currently all messages are "DME: ADS – RESPONSES")
- Title of the message, along with the first few words of the message text
- Date of the message
Click on the desired message to open it. If you hover your cursor over the message, you will also have the option of a quick reply or delete button.
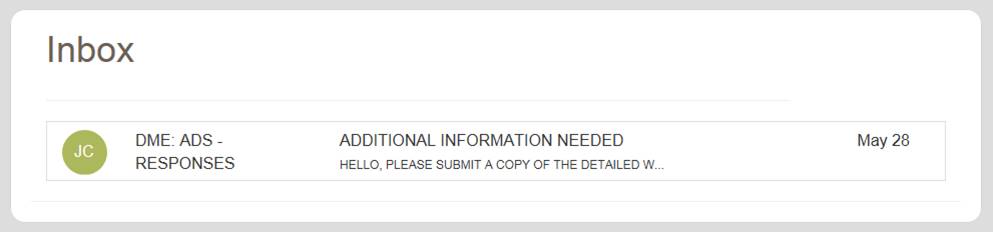
Top
Viewing Messages
After selecting a message, a popup window will appear on your screen showing you the full message, as well as the following information about the message and claim in question:
- NPI
- PTAN
- Beneficiary (Name and Medicare ID)
- CCN
- Date of Service
- Web Submission ID
NOTE: By default, the message window only displays the NPI, PTAN, and Beneficiary. To see the other fields mentioned above, press the "More details&hellip" link.
The message window also includes the following button options:
- Reply – Respond to the message
- Export – Create a PDF file of the message and save it to your computer
- Delete – Permanently delete the message
- Close – Close the message window
Please respond to all messages sent to you within five business days. All messages are automatically deleted from myCGS 10 business days after they are sent to you. Note that "business days" are Mondays through Fridays; holidays are not taken into account.
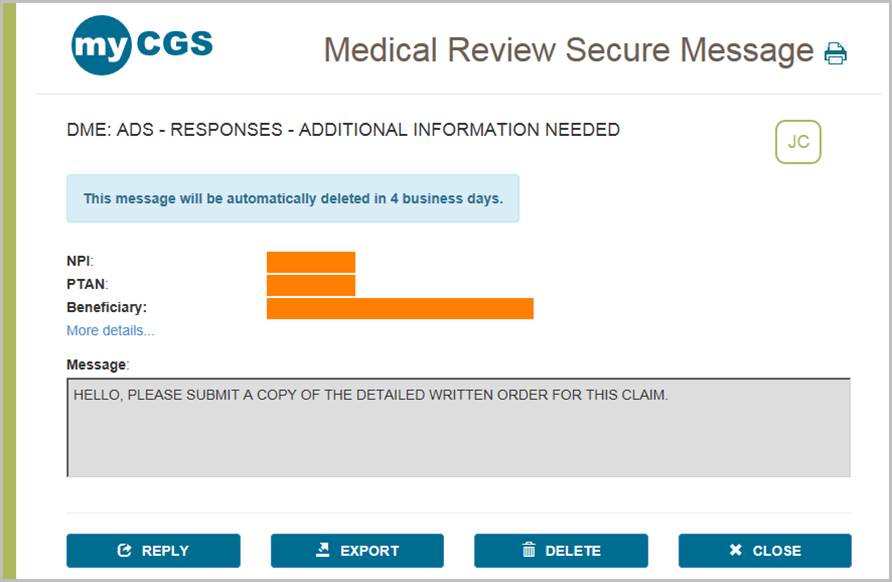
Top
User Account
To view your basic user profile information (such as your address or telephone number), select the User Account option in the My Account menu. The User Info screen will appear, showing your basic contact information.
On the User Account screen, you can update your last name and/or email address using the available text boxes. Make your changes, and press the SUBMIT button.
NOTE: The email address listed under User Account is separate from the email address listed in your MFA settings. Changing the email address your User Account does not affect the email address in your MFA settings (and vice versa). If your email address has changed, you must update it on both screens. Refer to the Update Your MFA Settings section below.
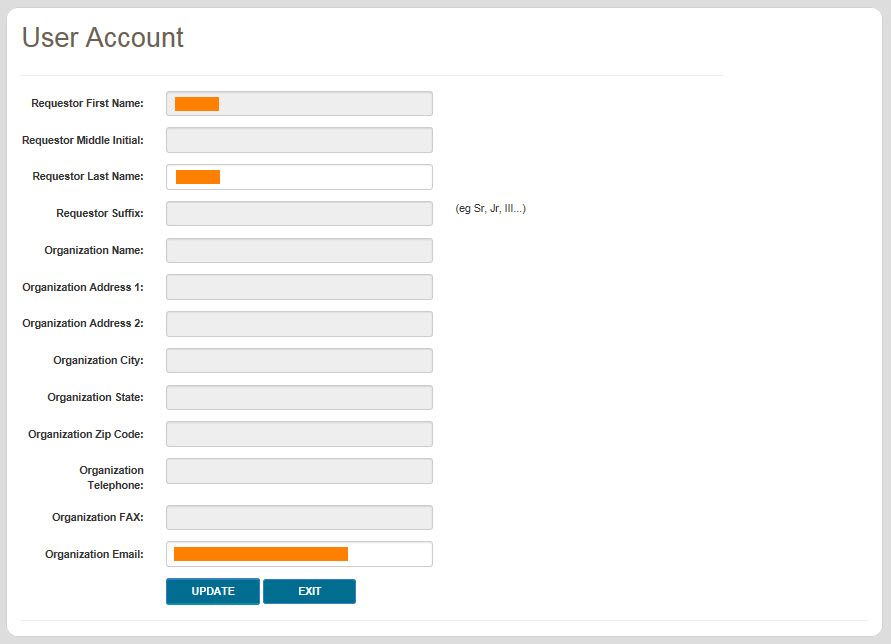
Top
Inbox
The Secure Messaging Inbox in myCGS allows you to receive and respond to direct messages from CGS Jurisdiction B and C staff. Currently this feature is used exclusively for Targeted Probe and Educate (TPE) cases in which you have already responded to an ADR request, but our Medical Review staff needs additional information (for instance, when your ADR response did not include all requested documents or information). When you receive a message, you have five business days to respond to the request; after 10 business days the message is deleted.
Note that submitting the requested documentation does not guarantee claim payment.
When a message is generated to you by CGS staff, you will receive email notification from myCGS stating that you have a new message. When you log into myCGS, the Secure Message icon (which looks like an envelope) in the top-right corner of your screen will display the number of new/unread messages you have in your inbox, as shown in the following image.
Note that messaging in myCGS can only be initiated by CGS staff. You cannot initiate a message yourself in myCGS, only respond to a message we have sent regarding a claim.
Permissions
All Designated Approvers (DAs) in myCGS automatically have access to the secure message inbox in myCGS. End Users by default do not have access—DAs must specifically give End Users access to secure messaging in order for them to access the inbox. CHBA user access will depend upon the access granted by the associated supplier on the CEDI Supplier Authorization Form.
If you are a DA in myCGS, you must identify which of your End Users need access to secure messaging and then grant them access on the User Permissions screen. Refer to the myCGS Registration & Account Management Guide at myCGS Registration Guide for instructions on granting user permissions in myCGS.
Accessing your Inbox
To access your inbox, select the inbox icon in the top-right corner of your screen (you can access your inbox whether you have any unread messages or not). Note that the inbox itself is jurisdiction-neutral, meaning it doesn't matter if you are currently logged into Jurisdiction B or Jurisdiction C. Also note that it doesn't matter which NPI/PTAN you currently have selected—the inbox will show you messages for all of your NPI/PTANs. There is only one inbox; each message in your inbox will identify the associated jurisdiction and NPI/PTAN.
After selecting the icon, you will be taken to your inbox, where you will see a list of any read and/or unread messages you have (if any). From the inbox, you will see the following information for each message you have:
- Jurisdiction (JB or JC)
- Type of message (currently all messages are "DME: ADS – RESPONSES")
- Title of the message, along with the first few words of the message text
- Date of the message
Click on the desired message to open it. If you hover your cursor over the message, you will also have the option of a quick reply or delete button.
Viewing Messages
After selecting a message, a popup window will appear on your screen showing you the full message, as well as the following information about the message and claim in question:
- NPI
- PTAN
- Beneficiary (Name and Medicare ID)
- CCN
- Date of Service
- Web Submission ID
NOTE: By default, the message window only displays the NPI, PTAN, and Beneficiary. To see the other fields mentioned above, press the "More details&hellip" link.
The message window also includes the following button options:
- Reply – Respond to the message
- Export – Create a PDF file of the message and save it to your computer
- Delete – Permanently delete the message
- Close – Close the message window
Please respond to all messages sent to you within five business days. All messages are automatically deleted from myCGS 10 business days after they are sent to you. Note that "business days" are Mondays through Fridays; holidays are not taken into account.
User Account
To view your basic user profile information (such as your address or telephone number), select the User Account option in the My Account menu. The User Info screen will appear, showing your basic contact information.
On the User Account screen, you can update your last name and/or email address using the available text boxes. Make your changes, and press the SUBMIT button.
NOTE: The email address listed under User Account is separate from the email address listed in your MFA settings. Changing the email address your User Account does not affect the email address in your MFA settings (and vice versa). If your email address has changed, you must update it on both screens. Refer to the Update Your MFA Settings section below.

Chapter 12 – My Account
My Account Overview
The My Account menu in myCGS allows you to view information about your user account, such as your NPI/PTAN information. There are several options in the My Account menu, including:
- Change Password – change your myCGS password
- Update MFA Settings – change your Multi-Factor Authentication (MFA) settings
- Provider Profile – view the supplier information on file for your NPI/PTAN, such as your PTAN's effective dates, location and payee addresses, and more
- User Account – view and update your basic user information
- View NPI/PTAN – view the NPI/PTAN combinations associated with your account
- Update Security Questions – update your security questions and answers
- eLetters Options – set preferences for your eLetters Inbox
When you are finished viewing any screen within the My Account section, select the Home menu to return to the myCGS home page, where you can continue to use the functions and features of myCGS.
NOTE: The menu items available in the My Account menu may vary based on your user role (End User, CHBA, Designated Approver, or Same/Similar User).
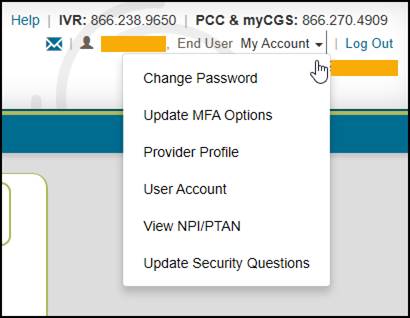
Top
Change Password
Passwords are an important part of securing both beneficiary data and your company's data. Your myCGS password should be kept up to date (changed every 60 days) and should be known only to you. Your account will be locked if you enter your password incorrectly three consecutive times within a 120-minute period.
myCGS keeps count of consecutive invalid login attempts within a 120-minute period until there is a successful login. Once your account is locked, you can unsuspend your account by following the "Unsuspend Your Account" instructions in Chapter 11 of this manual. We recommend that if you have two consecutive unsuccessful login attempts that you do one of the following to prevent being locked out:
- Wait 120 minutes and then try to log in again
OR
- Use the "Forgot Password" link on the login screen to generate a temporary password
Passwords in myCGS must:
- Be at least eight characters
- Begin with a letter
- Include at least one upper case letter
- Include at least one lower case letter
- Include at least one number
- Include at least one special character (such as @,#, $, etc.)
- Contain at least six different characters than your previous password
- May not be the same as one of your previous 12 passwords
When you change your password, you cannot reuse any of your previous 12 passwords. Additionally, your new password must contain at least six different characters than your previous password, or if you reuse the same characters, they must be in a different position in the password. For example, if your previous password started with the letter P, your new password should start with a different character, but you can still use the letter P in a different position of the password.
Example: Your old password is Portal$84. If you attempt to change to a new password of Portal#92, myCGS will give you an error message stating that you need to use different characters for your password. This is due to the fact that six characters ("Portal") are the same characters in the same position as your previous password. If you instead change your password to Latrop#92, this password would be accepted because even though six of the same characters are reused, they are in different positions.
Change Password
To change your myCGS password, use the Change Password link found on the initial myCGS "splash" page (before you log in) or if you're already logged in, select the Change Password option in the My Account menu.
On the Change Password screen, enter your myCGS User ID and previous (old) password, and then enter your new password twice. Note that myCGS includes an optional suggested password in case you are having difficulty creating your own password (see the Password Suggestion section below). Press the SUBMIT button to complete your password change.
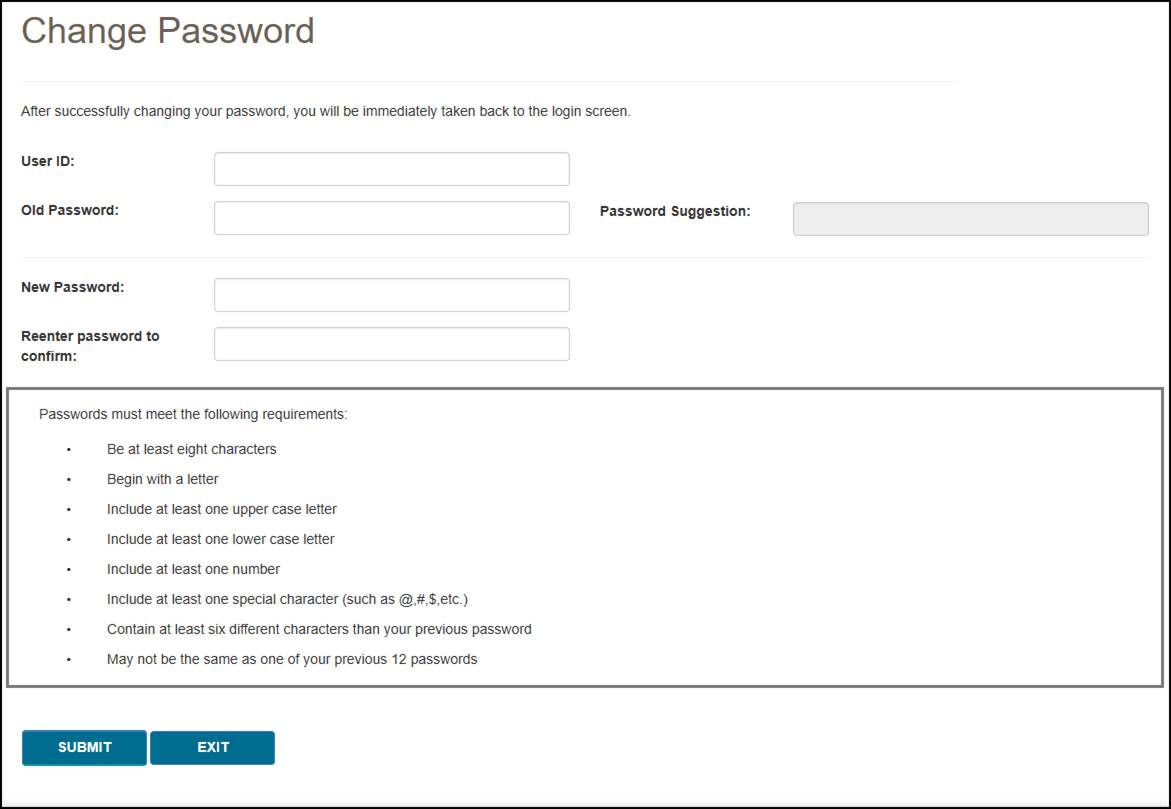
Password Suggestion
When changing your password, myCGS offers an optional "password suggestion" that you can use as your new password. To use the password suggestion, follow these steps:
- Go to the Change Password screen in myCGS.
- Enter your User ID. (The suggested password will not appear unless you have done this step.)
- Type the suggestion into the New Password field, re-enter to confirm, and press SUBMIT. For security reasons, you cannot copy and paste the password suggestion.

Top
Update MFA Options
If you need to update or change your cell phone, email information, or Google Authenticator account that is associated with your Multi-Factor Authentication (MFA) settings, go to the MFA Options screen. To access the MFA Options screen, select the My Account menu found in the top-right corner of your screen, and choose Update MFA Options.
On the MFA Options screen, you can add or alter your MFA email address, cell phone information, and/or Google Authenticator. We recommend that you set up at least two forms of MFA so that you always have a backup.
If you choose to use Text as one of your MFA options, you must enter your 10-digit cell phone number, and choose your cell phone service provider (AT&T, Sprint, T-Mobile, or Verizon).
NOTE: If you change cell phone carriers, you must update your Service Provider to reflect your current carrier in order to continue to receive myCGS MFA text messages, even if your cell phone number remains unchanged. If you use a cell phone carrier other than one of the four service providers listed, choose the service provider network which is used by your carrier to provide service. If you are unsure of the network, please contact your carrier. If you choose the wrong service provider, you will not receive MFA text messages.
If you choose to use Google Authenticator, you will need to either download the Google Authenticator app on your smart device (phone, tablet, etc.) or add the Google Authenticator extension to your web browser (Chrome, Firefox, or Edge). There are also third-party applications that can give you access to Google Authenticator (CGS does not provide advice on use of third-party applications). Check with your management to see if Google Authenticator can be made available to you.
To use Google Authenticator, first download the appropriate app on your smart device, or download the web browser extension:
Then select the checkmark next to "Use Google Authenticator," or press "New Authentication Setup." A QR code will display on screen. Follow the instructions in your Google Authenticator app or web extension to scan the QR code, or manually enter the code.
NOTE: You must press SUBMIT in myCGS in order for your account to be saved and linked to your Google Authenticator app.
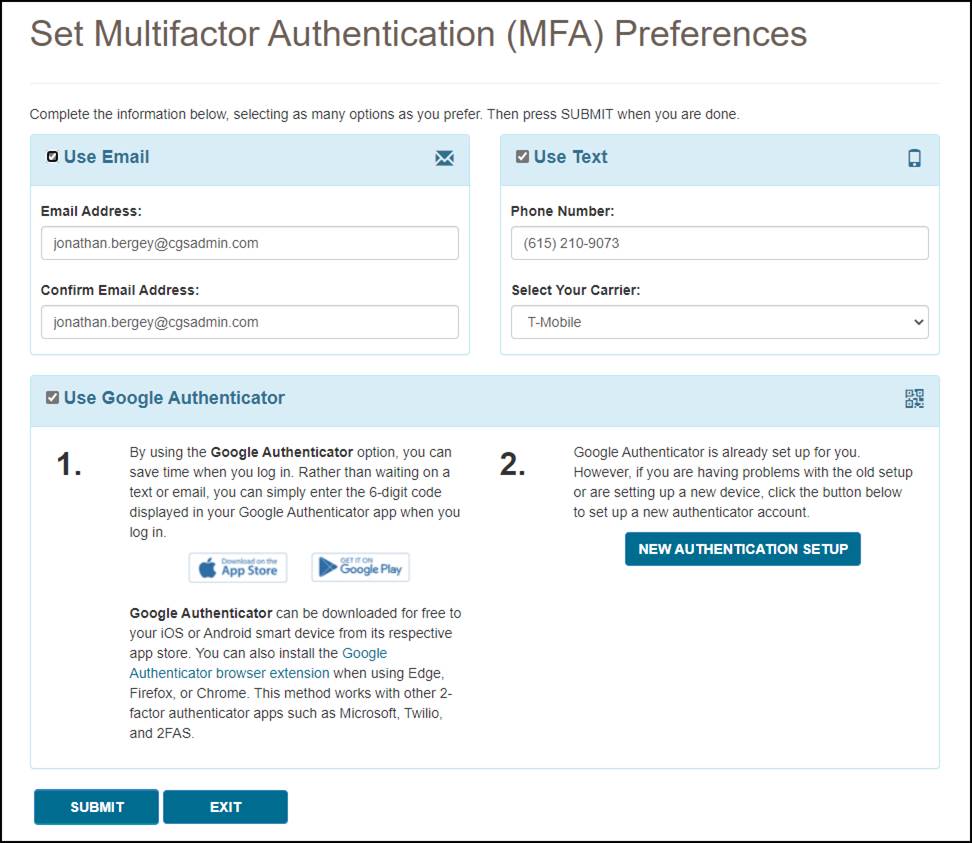
Make any necessary changes to your information, and press the SUBMIT button. If you chose Google Authenticator as one of your MFA choices, you will be immediately asked to enter your Google Authenticator code.
Top
Provider Profile
The Provider Profile screen in myCGS allows you to view basic records about your PTAN as maintained by the National Supplier Clearinghouse (NSC) and PECOS. To view your provider profile, select the Provider Profile option in the My Account menu.
The Provider Profile screen is based on the NPI/PTAN you currently have selected in myCGS. If you have more than one NPI/PTAN and wish to view the Provider Profile for a PTAN different than what is currently selected, follow the instructions in the Change NPI/PTAN section in this manual.
On the Provider Profile screen, you will find the following information about your PTAN:
- Supplier Name
- Payee Name
- Location Address
- Payee Address
- Phone
- Fax
- Last Standard Paper Remit Date
- Biller ID
- Participation Information
- PTAN Effective and Termination Dates
- Notes on your account
Any changes to your supplier information must be made through the appropriate entity (i.e., NPE).
Once you are finished viewing your provider profile, press the Home menu to return to the main functional areas of myCGS.
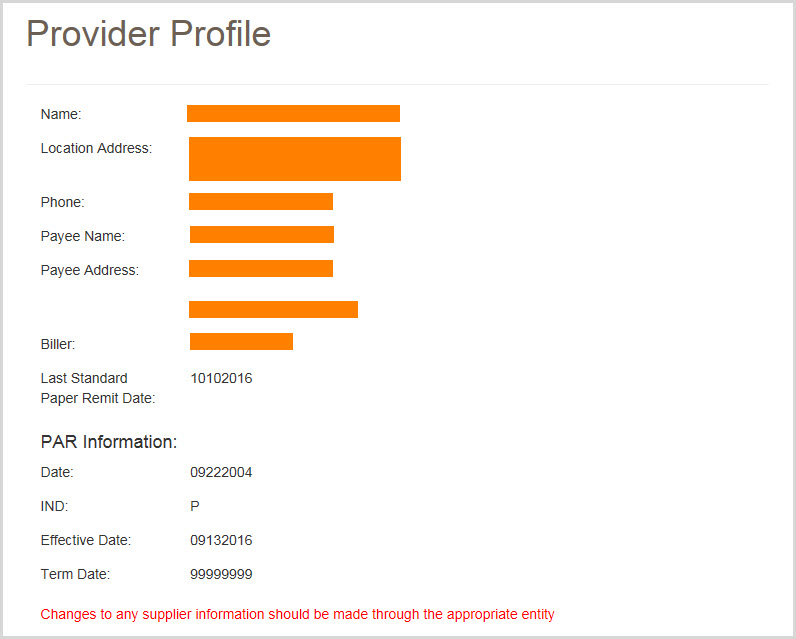
Top
User Account
To view your basic user profile information (such as your address or telephone number), select the User Account option in the My Account menu. The User Info screen will appear, showing your basic contact information.
On the User Account screen, you can update your last name and/or email address using the available text boxes. Make your changes, and press the SUBMIT button.
NOTE: The email address listed under User Account is separate from the email address listed in your MFA settings. Changing the email address your User Account does not affect the email address in your MFA settings (and vice versa). If your email address has changed, you must update it on both screens. Refer to the Update Your MFA Settings section below.
Top
View NPI/PTAN
Registration for End Users and Designated Approvers in myCGS is based on your company's Tax ID/EIN. When you register for myCGS, all of the NPI/PTAN combinations associated with your Tax ID are automatically added to your myCGS account. When you log in to myCGS, your currently selected NPI/PTAN will be random. You can change your NPI/PTAN using the dropdown menu found in the "Select Jurisdiction" box—refer to the Change NPI/PTAN section in Chapter 1 of this manual for instructions. If you'd like for myCGS to always open with a specific NPI/PTAN, you can select a default NPI/PTAN. myCGS allows you to set a default NPI/PTAN for both Jurisdiction B and C.
NOTE: If your company has more than one Tax ID, then you will need to submit a request to add the additional Tax IDs to your myCGS account. Refer to the myCGS Registration & Account Management Guide for instructions.
To view the NPI/PTAN combinations associated with your account and select a default, select the View NPI/PTAN option in the My Account menu. The View NPI/PTAN screen will appear. Enter at least the first three digits of one of your NPIs and press the Search button. You can also use this screen to view a list of the Designated Approvers (DAs) for your company.
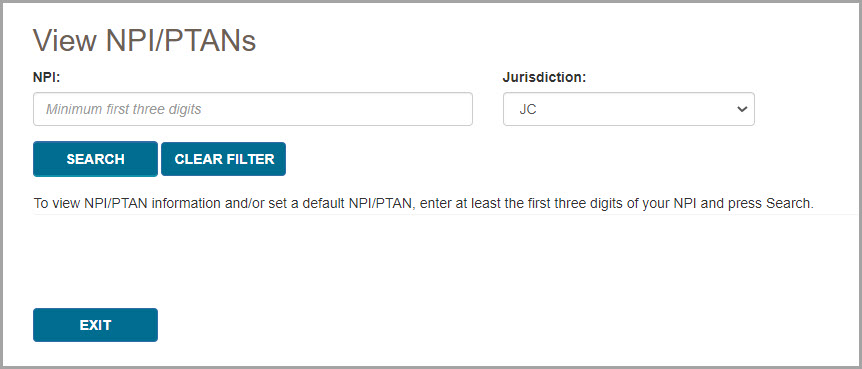
A table listing all your NPI/PTANs will be displayed. If more than eight results are found, use the page buttons at the bottom of the table to navigate and find the NPI/PTAN you'd like to select as a default. Once you've found the NPI/PTAN you'd like to set as your default, press the Default radio button in the row of the desired NPI/PTAN, and press the Submit button. A message will be displayed stating that your default NPI/PTAN was successfully updated. If desired, repeat this process for both Jurisdiction B and C.
If you'd like to change your default NPI/PTAN, simply follow the same steps and choose a new default.
If you've already set a default NPI/PTAN, but wish to remove it, you can do so by navigating to the page listing your default NPI/PTAN and then pressing the Submit button. You will receive a warning message stating that you are about to remove your default NPI/PTAN. Press Yes to remove your default.
NOTE: Setting a default NPI/PTAN in Jurisdiction B does not affect your default in Jurisdiction C, and vice versa. Each jurisdiction default works independently. You can choose to have a default in one jurisdiction, but not set a default in the other. You can select the same default NPI/PTAN in both jurisdictions. You can also select different default NPI/PTANs for each jurisdiction.
If you would like to see a list of the current Designated Approvers (DAs) for your company, press the View button in the Designated Approvers column.
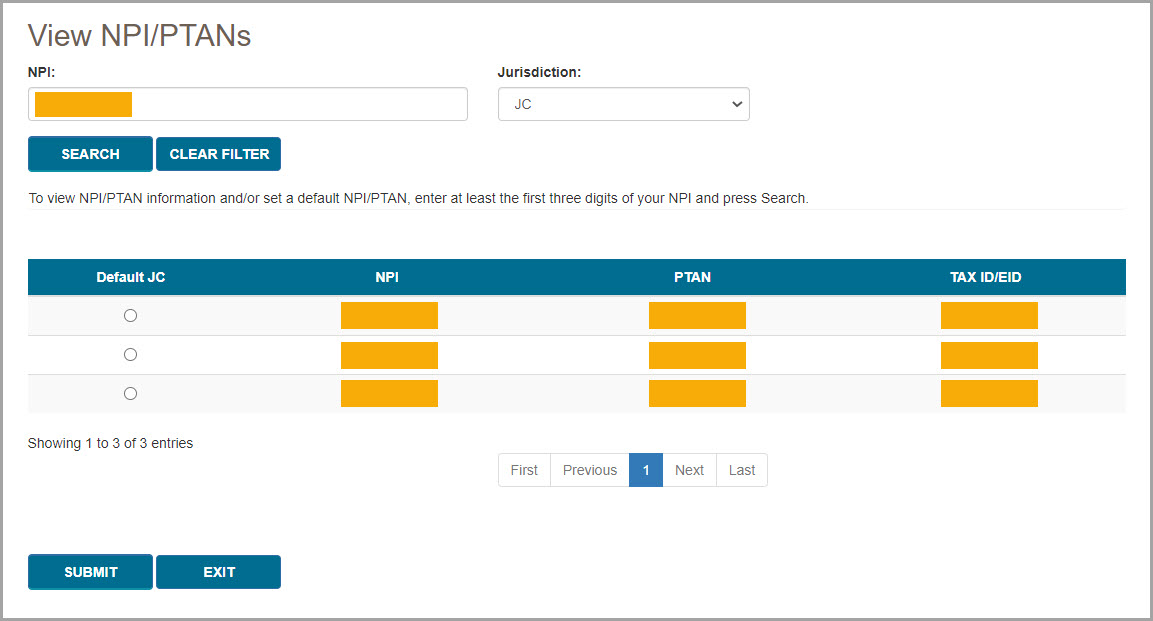
Once you have set a default NPI/PTAN, the checkmark icon next to your NPI/PTAN in the upper-right corner of the screen will become blue, indicating that the NPI/PTAN currently selected is set as your default. If you switch to a different NPI/PTAN that is not your default, the checkmark icon will be gray.
Once you are finished viewing your NPI/PTAN profile, press the Exit button to return to the main functional areas of myCGS.
Top
Update Security Questions
If you wish to update or change your security challenge questions and answers, go to the Update Security Questions screen. To access the Security Questions screen, select the My Account menu found in the top-right corner of your screen, and select Update Security Questions.
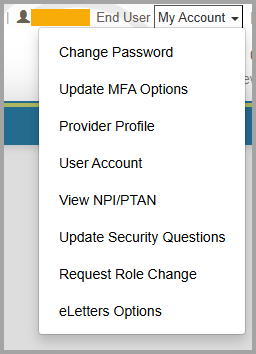
Choose questions from each of the three drop down menus, and answer them accurately. Be sure to choose questions and answers that are personal to you and that you will remember. You will need to be able to answer the challenge questions should you forget your password and need to have it reset.
NOTE: Special characters are not allowed in your security answers.
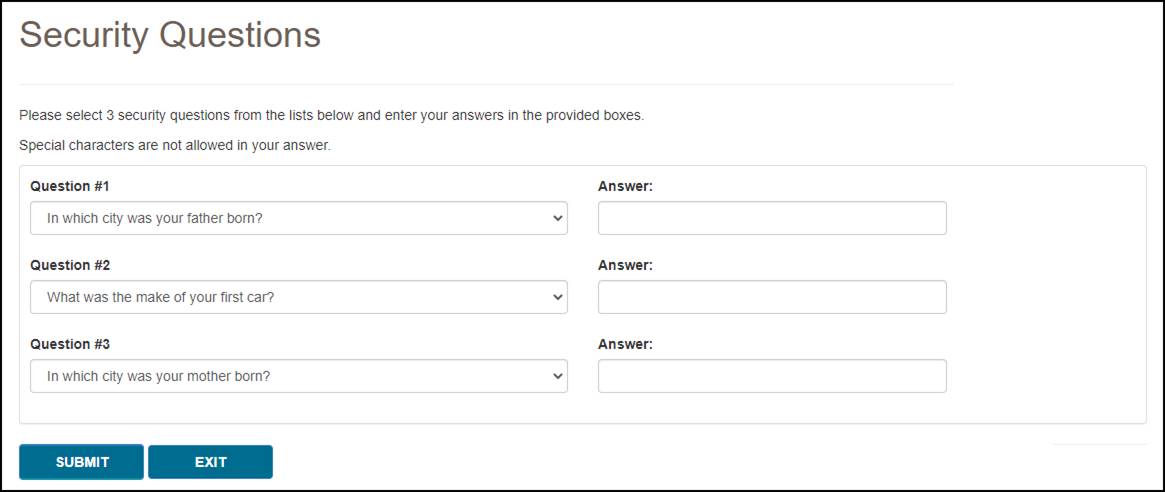
Top
eLetters Options
The eLetters Inbox in myCGS allows you to view a table of the letters that CGS has sent to you over a 30-day time span. The eLetters Options screen allows you to set preferences for your eLetters Inbox.
The eLetters Inbox defaults to a display setting that will show you letters for all the NPI/PTANs associated with your myCGS account. Use the eLetters Options screen to customize your eLetters settings.
myCGS allows you to use the eLetters Inbox to view letters for all, some, or none of your NPI/PTANs.
When you navigate to the eLetters Options screen for the first time, you will see that your Opt In/Opt Out options are not set. This means that your eLetters Inbox is set to the default option, which is fully opted in–you will see letters for all your NPI/PTANs.
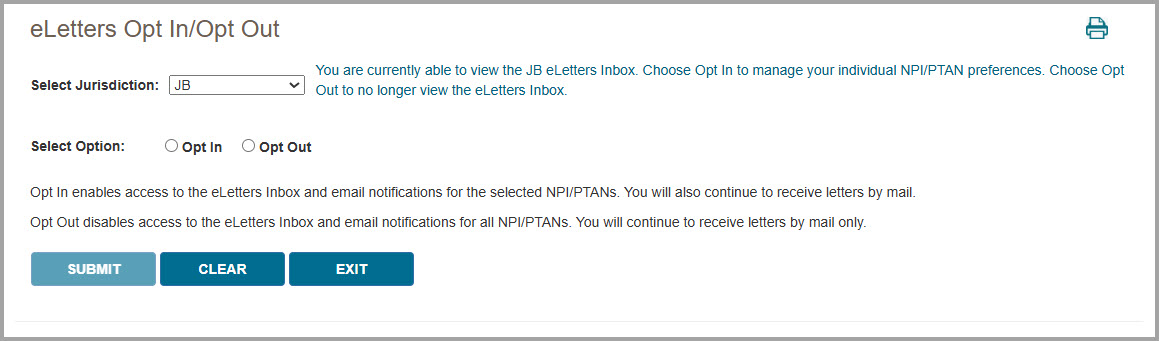
To change your eLetters options, select either the Opt In or Opt Out radio button. You can set these options for both Jurisdiction B and Jurisdiction C.
Opt In enables access to the eLetters Inbox. After selecting Opt In, you will be given the option to set the following preferences for each of your NPI/PTAN combinations:
- eLetters Inbox - Choose which NPI/PTANs you wish to be able to view on the eLetters Inbox screen. Either check/uncheck individual NPI/PTANs or use the Select All checkbox to set the same options for all your NPI/PTANs at once. (A checked box means you will be able to view the NPI/PTAN on the eLetters screen, while an unchecked box means you will not see the NPI/PTAN on the eLetters screen.)
Note that myCGS displays up to 10 NPI/PTANs per page in the NPI/PTAN Selection table. You can change the number of NPI/PTANs displayed by using the “Show XX entries” dropdown menu located just above the table (choose between 10, 25, 50, or 100). If you have more than one page of NPI/PTANs and you have made changes to your options, you must press the SUBMIT button to save your changes before navigating to the next page on the table.
Opt Out disables access to the eLetters Inbox entirely. You will not be able to view any information on the eLetters Inbox screen.
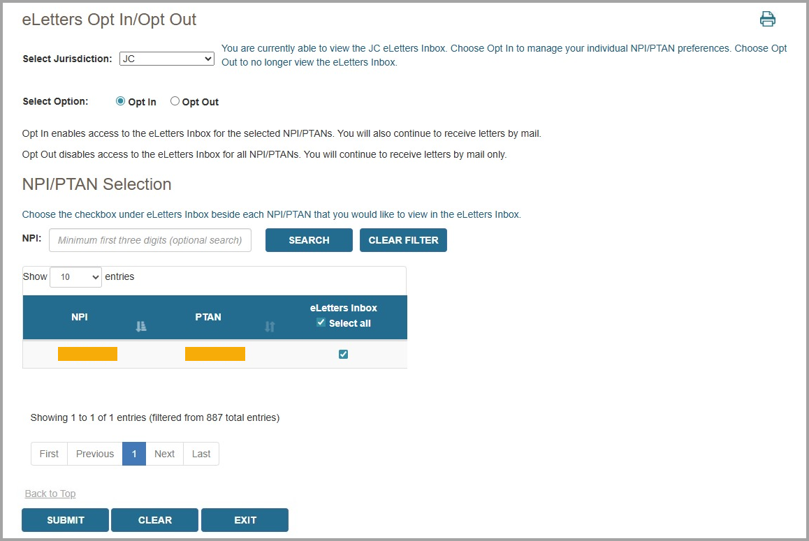
Top
Unsuspend Your Account
Your myCGS account may be suspended in certain situations, such as if you enter an incorrect password three consecutive times. If you are locked out of your account for any of the following reasons, myCGS allows you to unsuspend yourself without having to call our Provider Contact Center:
- Three consecutive invalid password attempts
- Three consecutive invalid MFA attempts
- Account inactivity (haven’t logged in for over 30 days)
To unsuspend your account, follow these steps:
- Attempt to log in to myCGS as normal. If your account is suspended, you will receive an error message explaining why your account has been suspended. Press OK.
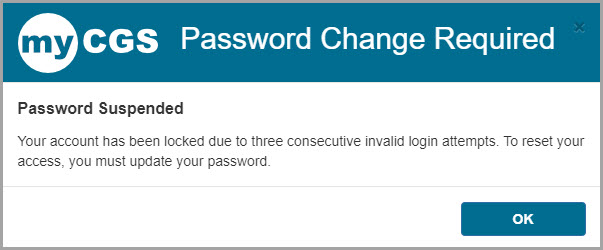
- You will then be asked to answer the security questions you provided when you created your myCGS account. Answer the questions and press Submit. Note that your answers are case-sensitive.
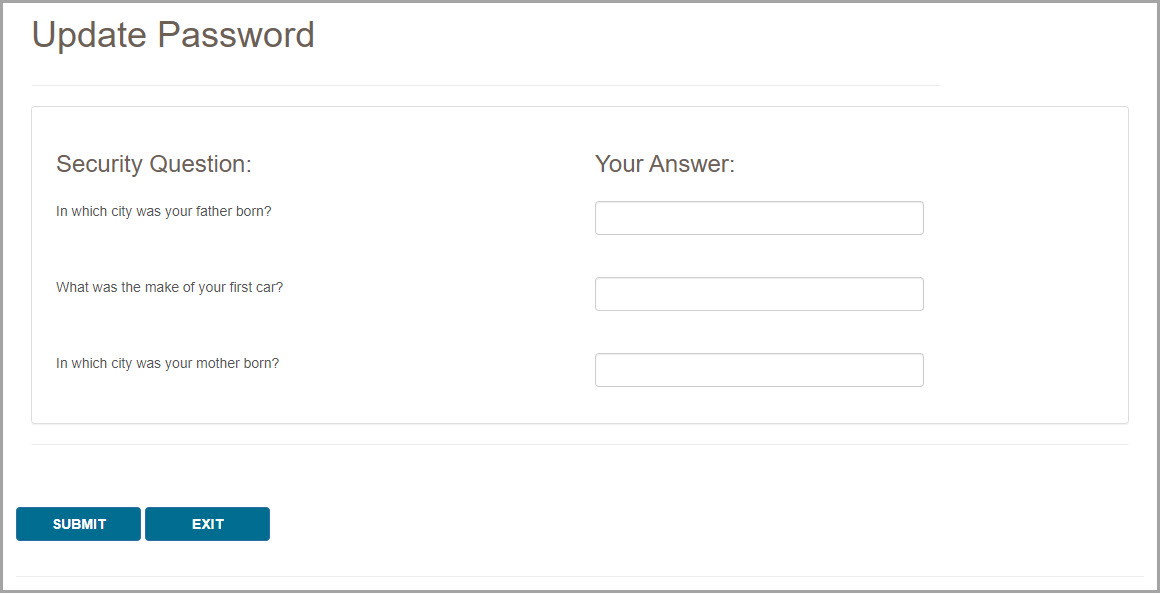
- If your answers match the questions correctly, you will receive a message stating that an email is being sent to you with further instructions. If your answers do not match, try again. Note that if you’re unable to answer your security questions correctly, you will need to call our Provider Contact Center to have your account unsuspended.
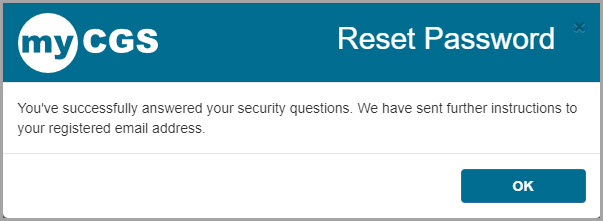
- Once you receive the email, follow the link provided in the email to change your password and reset your account. You will be taken to the Change Password screen. Enter your User ID and your new password, then press Submit.
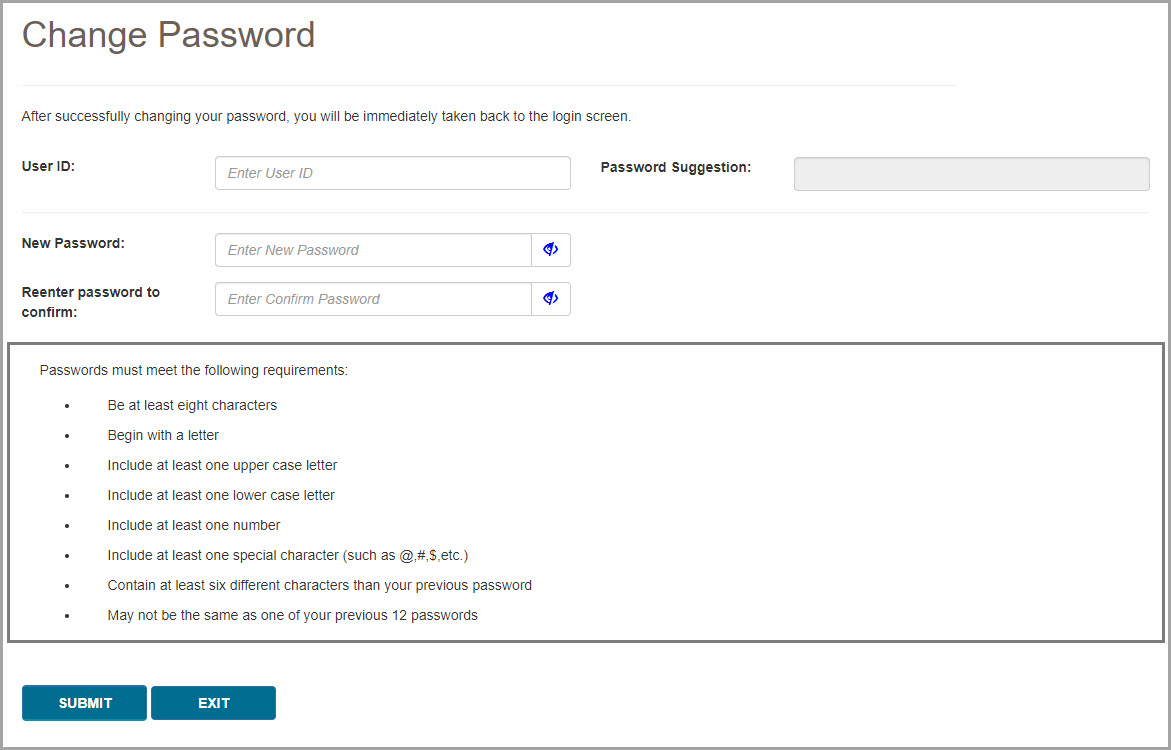
- Your account will now be unsuspended. Use your new password to log in to myCGS.
Top
My Account Overview
The My Account menu in myCGS allows you to view information about your user account, such as your NPI/PTAN information. There are several options in the My Account menu, including:
- Change Password – change your myCGS password
- Update MFA Settings – change your Multi-Factor Authentication (MFA) settings
- Provider Profile – view the supplier information on file for your NPI/PTAN, such as your PTAN's effective dates, location and payee addresses, and more
- User Account – view and update your basic user information
- View NPI/PTAN – view the NPI/PTAN combinations associated with your account
- Update Security Questions – update your security questions and answers
- eLetters Options – set preferences for your eLetters Inbox
When you are finished viewing any screen within the My Account section, select the Home menu to return to the myCGS home page, where you can continue to use the functions and features of myCGS.
NOTE: The menu items available in the My Account menu may vary based on your user role (End User, CHBA, Designated Approver, or Same/Similar User).
Change Password
Passwords are an important part of securing both beneficiary data and your company's data. Your myCGS password should be kept up to date (changed every 60 days) and should be known only to you. Your account will be locked if you enter your password incorrectly three consecutive times within a 120-minute period.
myCGS keeps count of consecutive invalid login attempts within a 120-minute period until there is a successful login. Once your account is locked, you can unsuspend your account by following the "Unsuspend Your Account" instructions in Chapter 11 of this manual. We recommend that if you have two consecutive unsuccessful login attempts that you do one of the following to prevent being locked out:
- Wait 120 minutes and then try to log in again
OR
- Use the "Forgot Password" link on the login screen to generate a temporary password
Passwords in myCGS must:
- Be at least eight characters
- Begin with a letter
- Include at least one upper case letter
- Include at least one lower case letter
- Include at least one number
- Include at least one special character (such as @,#, $, etc.)
- Contain at least six different characters than your previous password
- May not be the same as one of your previous 12 passwords
When you change your password, you cannot reuse any of your previous 12 passwords. Additionally, your new password must contain at least six different characters than your previous password, or if you reuse the same characters, they must be in a different position in the password. For example, if your previous password started with the letter P, your new password should start with a different character, but you can still use the letter P in a different position of the password.
Example: Your old password is Portal$84. If you attempt to change to a new password of Portal#92, myCGS will give you an error message stating that you need to use different characters for your password. This is due to the fact that six characters ("Portal") are the same characters in the same position as your previous password. If you instead change your password to Latrop#92, this password would be accepted because even though six of the same characters are reused, they are in different positions.
Change Password
To change your myCGS password, use the Change Password link found on the initial myCGS "splash" page (before you log in) or if you're already logged in, select the Change Password option in the My Account menu.
On the Change Password screen, enter your myCGS User ID and previous (old) password, and then enter your new password twice. Note that myCGS includes an optional suggested password in case you are having difficulty creating your own password (see the Password Suggestion section below). Press the SUBMIT button to complete your password change.
Password Suggestion
When changing your password, myCGS offers an optional "password suggestion" that you can use as your new password. To use the password suggestion, follow these steps:
- Go to the Change Password screen in myCGS.
- Enter your User ID. (The suggested password will not appear unless you have done this step.)
- Type the suggestion into the New Password field, re-enter to confirm, and press SUBMIT. For security reasons, you cannot copy and paste the password suggestion.
Update MFA Options
If you need to update or change your cell phone, email information, or Google Authenticator account that is associated with your Multi-Factor Authentication (MFA) settings, go to the MFA Options screen. To access the MFA Options screen, select the My Account menu found in the top-right corner of your screen, and choose Update MFA Options.
On the MFA Options screen, you can add or alter your MFA email address, cell phone information, and/or Google Authenticator. We recommend that you set up at least two forms of MFA so that you always have a backup.
If you choose to use Text as one of your MFA options, you must enter your 10-digit cell phone number, and choose your cell phone service provider (AT&T, Sprint, T-Mobile, or Verizon).
NOTE: If you change cell phone carriers, you must update your Service Provider to reflect your current carrier in order to continue to receive myCGS MFA text messages, even if your cell phone number remains unchanged. If you use a cell phone carrier other than one of the four service providers listed, choose the service provider network which is used by your carrier to provide service. If you are unsure of the network, please contact your carrier. If you choose the wrong service provider, you will not receive MFA text messages.
If you choose to use Google Authenticator, you will need to either download the Google Authenticator app on your smart device (phone, tablet, etc.) or add the Google Authenticator extension to your web browser (Chrome, Firefox, or Edge). There are also third-party applications that can give you access to Google Authenticator (CGS does not provide advice on use of third-party applications). Check with your management to see if Google Authenticator can be made available to you.
To use Google Authenticator, first download the appropriate app on your smart device, or download the web browser extension:
Then select the checkmark next to "Use Google Authenticator," or press "New Authentication Setup." A QR code will display on screen. Follow the instructions in your Google Authenticator app or web extension to scan the QR code, or manually enter the code.
NOTE: You must press SUBMIT in myCGS in order for your account to be saved and linked to your Google Authenticator app.
Make any necessary changes to your information, and press the SUBMIT button. If you chose Google Authenticator as one of your MFA choices, you will be immediately asked to enter your Google Authenticator code.
Provider Profile
The Provider Profile screen in myCGS allows you to view basic records about your PTAN as maintained by the National Supplier Clearinghouse (NSC) and PECOS. To view your provider profile, select the Provider Profile option in the My Account menu.
The Provider Profile screen is based on the NPI/PTAN you currently have selected in myCGS. If you have more than one NPI/PTAN and wish to view the Provider Profile for a PTAN different than what is currently selected, follow the instructions in the Change NPI/PTAN section in this manual.
On the Provider Profile screen, you will find the following information about your PTAN:
- Supplier Name
- Payee Name
- Location Address
- Payee Address
- Phone
- Fax
- Last Standard Paper Remit Date
- Biller ID
- Participation Information
- PTAN Effective and Termination Dates
- Notes on your account
Any changes to your supplier information must be made through the appropriate entity (i.e., NPE).
Once you are finished viewing your provider profile, press the Home menu to return to the main functional areas of myCGS.
User Account
To view your basic user profile information (such as your address or telephone number), select the User Account option in the My Account menu. The User Info screen will appear, showing your basic contact information.
On the User Account screen, you can update your last name and/or email address using the available text boxes. Make your changes, and press the SUBMIT button.
NOTE: The email address listed under User Account is separate from the email address listed in your MFA settings. Changing the email address your User Account does not affect the email address in your MFA settings (and vice versa). If your email address has changed, you must update it on both screens. Refer to the Update Your MFA Settings section below.
View NPI/PTAN
Registration for End Users and Designated Approvers in myCGS is based on your company's Tax ID/EIN. When you register for myCGS, all of the NPI/PTAN combinations associated with your Tax ID are automatically added to your myCGS account. When you log in to myCGS, your currently selected NPI/PTAN will be random. You can change your NPI/PTAN using the dropdown menu found in the "Select Jurisdiction" box—refer to the Change NPI/PTAN section in Chapter 1 of this manual for instructions. If you'd like for myCGS to always open with a specific NPI/PTAN, you can select a default NPI/PTAN. myCGS allows you to set a default NPI/PTAN for both Jurisdiction B and C.
NOTE: If your company has more than one Tax ID, then you will need to submit a request to add the additional Tax IDs to your myCGS account. Refer to the myCGS Registration & Account Management Guide for instructions.
To view the NPI/PTAN combinations associated with your account and select a default, select the View NPI/PTAN option in the My Account menu. The View NPI/PTAN screen will appear. Enter at least the first three digits of one of your NPIs and press the Search button. You can also use this screen to view a list of the Designated Approvers (DAs) for your company.
A table listing all your NPI/PTANs will be displayed. If more than eight results are found, use the page buttons at the bottom of the table to navigate and find the NPI/PTAN you'd like to select as a default. Once you've found the NPI/PTAN you'd like to set as your default, press the Default radio button in the row of the desired NPI/PTAN, and press the Submit button. A message will be displayed stating that your default NPI/PTAN was successfully updated. If desired, repeat this process for both Jurisdiction B and C.
If you'd like to change your default NPI/PTAN, simply follow the same steps and choose a new default.
If you've already set a default NPI/PTAN, but wish to remove it, you can do so by navigating to the page listing your default NPI/PTAN and then pressing the Submit button. You will receive a warning message stating that you are about to remove your default NPI/PTAN. Press Yes to remove your default.
NOTE: Setting a default NPI/PTAN in Jurisdiction B does not affect your default in Jurisdiction C, and vice versa. Each jurisdiction default works independently. You can choose to have a default in one jurisdiction, but not set a default in the other. You can select the same default NPI/PTAN in both jurisdictions. You can also select different default NPI/PTANs for each jurisdiction.
If you would like to see a list of the current Designated Approvers (DAs) for your company, press the View button in the Designated Approvers column.
Once you have set a default NPI/PTAN, the checkmark icon next to your NPI/PTAN in the upper-right corner of the screen will become blue, indicating that the NPI/PTAN currently selected is set as your default. If you switch to a different NPI/PTAN that is not your default, the checkmark icon will be gray.
Once you are finished viewing your NPI/PTAN profile, press the Exit button to return to the main functional areas of myCGS.
Update Security Questions
If you wish to update or change your security challenge questions and answers, go to the Update Security Questions screen. To access the Security Questions screen, select the My Account menu found in the top-right corner of your screen, and select Update Security Questions.
Choose questions from each of the three drop down menus, and answer them accurately. Be sure to choose questions and answers that are personal to you and that you will remember. You will need to be able to answer the challenge questions should you forget your password and need to have it reset.
NOTE: Special characters are not allowed in your security answers.
eLetters Options
The eLetters Inbox in myCGS allows you to view a table of the letters that CGS has sent to you over a 30-day time span. The eLetters Options screen allows you to set preferences for your eLetters Inbox.
The eLetters Inbox defaults to a display setting that will show you letters for all the NPI/PTANs associated with your myCGS account. Use the eLetters Options screen to customize your eLetters settings.
myCGS allows you to use the eLetters Inbox to view letters for all, some, or none of your NPI/PTANs.
When you navigate to the eLetters Options screen for the first time, you will see that your Opt In/Opt Out options are not set. This means that your eLetters Inbox is set to the default option, which is fully opted in–you will see letters for all your NPI/PTANs.
To change your eLetters options, select either the Opt In or Opt Out radio button. You can set these options for both Jurisdiction B and Jurisdiction C.
Opt In enables access to the eLetters Inbox. After selecting Opt In, you will be given the option to set the following preferences for each of your NPI/PTAN combinations:
- eLetters Inbox - Choose which NPI/PTANs you wish to be able to view on the eLetters Inbox screen. Either check/uncheck individual NPI/PTANs or use the Select All checkbox to set the same options for all your NPI/PTANs at once. (A checked box means you will be able to view the NPI/PTAN on the eLetters screen, while an unchecked box means you will not see the NPI/PTAN on the eLetters screen.)
Note that myCGS displays up to 10 NPI/PTANs per page in the NPI/PTAN Selection table. You can change the number of NPI/PTANs displayed by using the “Show XX entries” dropdown menu located just above the table (choose between 10, 25, 50, or 100). If you have more than one page of NPI/PTANs and you have made changes to your options, you must press the SUBMIT button to save your changes before navigating to the next page on the table.
Opt Out disables access to the eLetters Inbox entirely. You will not be able to view any information on the eLetters Inbox screen.
Unsuspend Your Account
Your myCGS account may be suspended in certain situations, such as if you enter an incorrect password three consecutive times. If you are locked out of your account for any of the following reasons, myCGS allows you to unsuspend yourself without having to call our Provider Contact Center:
- Three consecutive invalid password attempts
- Three consecutive invalid MFA attempts
- Account inactivity (haven’t logged in for over 30 days)
To unsuspend your account, follow these steps:
- Attempt to log in to myCGS as normal. If your account is suspended, you will receive an error message explaining why your account has been suspended. Press OK.
- You will then be asked to answer the security questions you provided when you created your myCGS account. Answer the questions and press Submit. Note that your answers are case-sensitive.
- If your answers match the questions correctly, you will receive a message stating that an email is being sent to you with further instructions. If your answers do not match, try again. Note that if you’re unable to answer your security questions correctly, you will need to call our Provider Contact Center to have your account unsuspended.
- Once you receive the email, follow the link provided in the email to change your password and reset your account. You will be taken to the Change Password screen. Enter your User ID and your new password, then press Submit.
- Your account will now be unsuspended. Use your new password to log in to myCGS.

Chapter 13 – Designated Approver/User Management
User Management Overview
If you are registered for myCGS as a Designated Approver (DA), you have access to user management screens in myCGS that other users in your company cannot access. In fact, when you first log in to myCGS, you are taken directly to the DA User Management screen, rather than to the normal home screen that End Users see.
For instruction on using the User Management section in myCGS, refer to the myCGS Registration Guide.
Top
User Management Overview
If you are registered for myCGS as a Designated Approver (DA), you have access to user management screens in myCGS that other users in your company cannot access. In fact, when you first log in to myCGS, you are taken directly to the DA User Management screen, rather than to the normal home screen that End Users see.
For instruction on using the User Management section in myCGS, refer to the myCGS Registration Guide.
|